5 Steps to Add a New Product Using Shopify POS
If you are a Shopify retailer who wants to move your business into a brick-and-mortar location, the Shopify POS for iPad, iPhone, and Android is a great solution for you. And add new product using Shopify POS also becomes more simple.
What is Shopify POS
First and foremost, you need to know what is Shopify POS. In simpler terms, it means you can easily integrate your whole sales system with a Shopify online store if you have your own offline store. By using an iPad, iPhone, or Android as a sales terminal, you can handle credit card transactions effectively and turn it into your cash register. Your visitors and customers can also view your product catalog quickly. The Shopify POS app offers you what you need to manage your retail store and eCommerce capabilities to power your business.
No matter where you are at the store or on the go, add new product using Shopify POS is done with ease. The management tools of Shopify ensures smooth operations and the business growth.
All you need is using your iPad/iPhone/Android device as your mobile store catalog and payment terminal and synchronizing all your data with your retail store.
In Shopify POS, from the Products screen, you can add new products if you want. If you update these products’ availability settings in Shopify, they will appear on your other sales channels. However, to create products in Shopify POS, you have to connect to the internet.
To help you get started, here are easy steps we have prepared for you.
Recommended Posts:
- Shopify POS Retail Package
- How to Add a Product Image on Shopify
- How to Edit a New Product on Shopify
- How to Remove a Product on Shopify
How to Add a new Product in Shopify POS
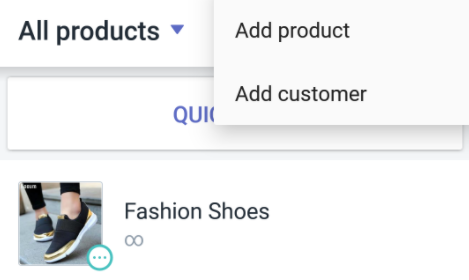
Step 1: Tap + button
Tap the + button on the Shopify POS checkout screen
Step 2: Click Add a product
Tap Add a product
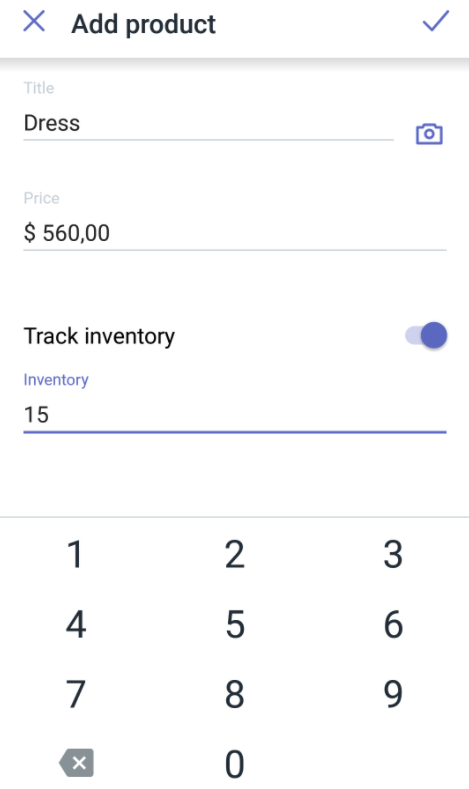
Step 3: Enter the new product information
Enter the product’s title, price, and inventory status
Step 4: Add image for new product
Tap the image button to add a product image
Step 5: Save new product
Tap Save product. The product appears on the Products page in Shopify and in the Shopify POS checkout screen in Shopify POS.
You need to open the product from the Products page in your Shopify admin if you want to edit or delete it.
To create a new product in Shopify POS for iPhone (Click here)
-
Step 1: Tap the
+button on theShopify POS checkoutscreen, and then tapCreate product -
Step 2: Tap
Add a product -
Step 3: Enter the product's title, price, and inventory status
-
Step 4: Tap the
imagebutton to add a product image -
Step 5: Tap
You need to open the product from the Products page in your Shopify admin if you want to edit or delete it.Saveproduct. The product appears on theProductspage in Shopify and in theShopify POS checkout screenin Shopify POS.
To create a new product in Shopify POS for Android (Click here)
-
Step 1: Tap the
+button on theShopify POS checkoutscreen, and then tapCreate product
-
Step 2: Tap
Add a product
-
Step 3: Enter the product's title, price, and inventory status

-
Step 4: Tap the
camerato add a product image
-
Step 5: Tap
Saveproduct. The product appears on theProductspage in Shopify and in theShopify POS checkout screenin Shopify POS.You need to open the product from the Products page in your Shopify admin if you want to edit or delete it.

However, on your POS device, your POS catalog is stored locally. However, some devices can only store a maximum number of products. Your device might not run the Shopify POS app as expected if your catalog has too many products.
</li>
Conclusion
The simple step-by-step instruction above is to help you add a new product using Shopify POS easily. Hope it can help you and your team in building your online shop.


