How to verify your domain with third-party services in Shopify
Domain name is the label that identifies a network domain. Using the Internet, domain names are formed by the rules and procedures of the Domain Name System (DNS). Any name registered in this system is called domain name. It is used in many networking contexts and for naming and addressing purposes. In general, a domain name represents an Internet Protocol resource, such as a personal computer used to access the Internet, a server computer hosting a web site, or the web site itself or any other service communicated that using the Internet.
In this case, the mentioned domain represent the website itself, your own business page.
Pinterest and Google Webmaster are considered as the third-party services that require you to verify your domain. This action is to assure that you have the copyright of your own Shopify store before they decide to supply you their services.
In order to verify your domain, the first thing you need to do is to disable password protection for your online store. You can disable password protection and then active it again after verifying your domain in case you are not ready to open your store.
In this article, we will give you more detail on How to verify your domain with third-party services in Shopify.
Notice that this tutorial works only if you are using a custom domain with your store. Your root domain must be set as your primary domain in Shopify admin. If you see any website that has the .myshopify.com URL as their only one domain, this domain will not able to be verified by the third party.
How to verify your domain with third-party services
- Verify your domain with third-party services in desktop
- Verify your domain with third-party services in app
Following are the steps for you to verify your domain with the third-party service:
Step 1: Open your third-party site
Open your third-party site, using a meta tag verification method to verify your site. Taking Google Webmasters as one example of third-party service, on the Alternate methods tab, you need to click the HTML tag option button.
Step 2: Paste Site Verification snippet
Next, on the third-party site, highlight the full meta tag and copy it to your clipboard, noted that on a Mac, use cmd + c and ctrl + c on a PC to copy the tag. You must assure that everything is selected, including the < and >. For instance:
<meta name="google-site-verification" content="IV7BPLESttSpBdxSWN1s4zlr4HIcuHkGQYmE3wLG59w" />
From now on, the step will has slight different in two version for desktop and app.
Verify your domain with third-party services in desktop:
Step 1:
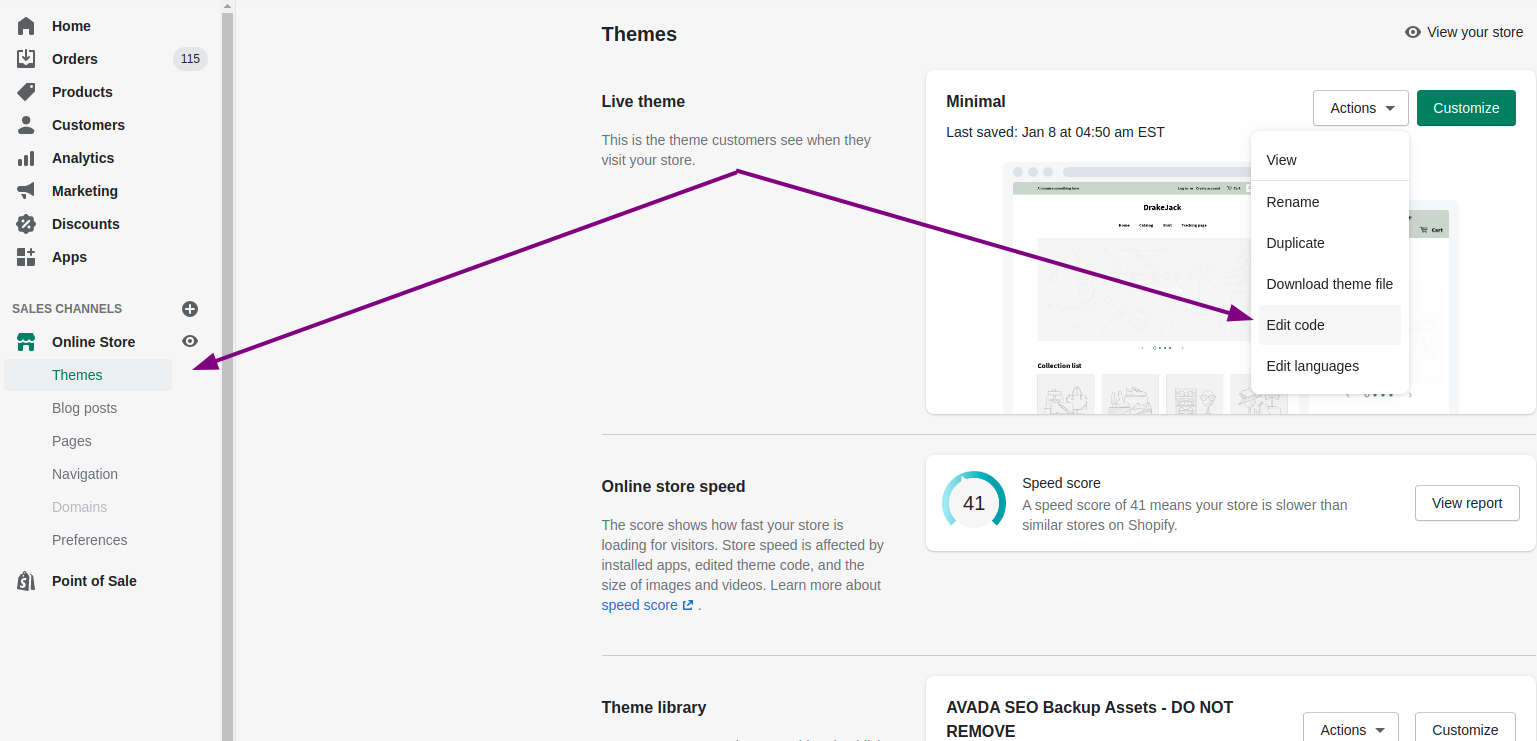
Go to your Shopify admin, click at Online Store > Themes.
Step 2:
At the theme you want to edit, and then hit the button Actions > Edit code.

Step 3:
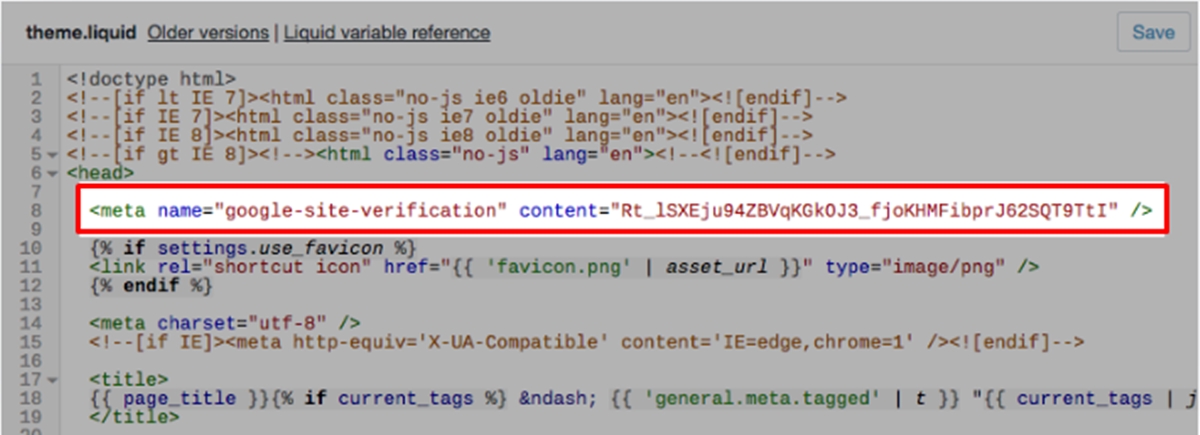
Click theme.liquid to open the file in the online code editor in the Layout section.
Click Save.
Step 4:
Remember your copied meta tag in step 2, now paste it on a blank line directly below the opening <head> tag.

Step 5:
Finally, the verification steps on the third-party site has been completed.
Verify your domain with third-party services in app
Similar to desktop version, you has the following tutorial:
Step 1:
Open your Shopify app then tap Store.
Step 2:
Tap Online Store in the Sales channels section.
Step 3:
Tap Manage themes.
Step 4:
At the theme you want to edit, and then tap Actions > Edit code.
Step 5:
Tap theme.liquid to open the file in the online code editor in the Layout section.
Tap Save.
Step 6:
Remember your copied meta tag in step b, now paste it on a blank line directly below the opening <head> tag.
Step 7:
Finally, the verification steps on the third-party site has been completed.
Conclusion
We hope that this tutorial will help you to cooperate well with other party service and make your business run smoothly. If you have any trouble with this tutorial, feel free to ask out with our support team.


