How to set up Email for BigCommerce stores?
Once you create your BigCommerce store, associating an email address is inevitable. Your customers want to contact you for either consultation or any support or questions about purchasing products from your store. Therefore, your email should use your store’s domain to build trust with your shoppers, to make them confident that they are communicating with a legal member of your store.
That is the reason why a custom domain is needed when setting up email hosting. You are allowed to get a domain name from BigCommerce as BigCommerce will automatically give you an address, so you can get started with your store’s email right away. BigCommerce will set up not more than five custom forwarding addresses. Moreover, you can also get the domain from a third-party domain like Gmail, then you must have pointed the domain to BigCommerce before bringing your DNS records up to date.
After purchasing the domain, you will be provided with many features such as webmails, support, greater storage, or filters. Besides, they will also help you to block spam and even augment when you grow your business.
How an email works
Before you jump in the guide on how to set up email for your BigCommerce store, it will be better and much easier for you if you spend time getting acquainted with some important definitions:
Nameservers
If you have purchased the domain, you will be given an essential DNS record known as a nameserver.
The nameserver consists of 2 types of records: the A record, which is also called website hosting, and the MX records, also known as email hosting. The nameserver will have charge of these 2 records and any other DNS record for that domain. However, you can direct a particular DNS record to a third party, which will let them respectively control your email and website hosting.
- Pointing - enabling a third party to take control of the host by directing a DNS record to a third party
- A record - the DNS record that has charge of website hosting
- MX record - the DNS record that has charge of email hosting
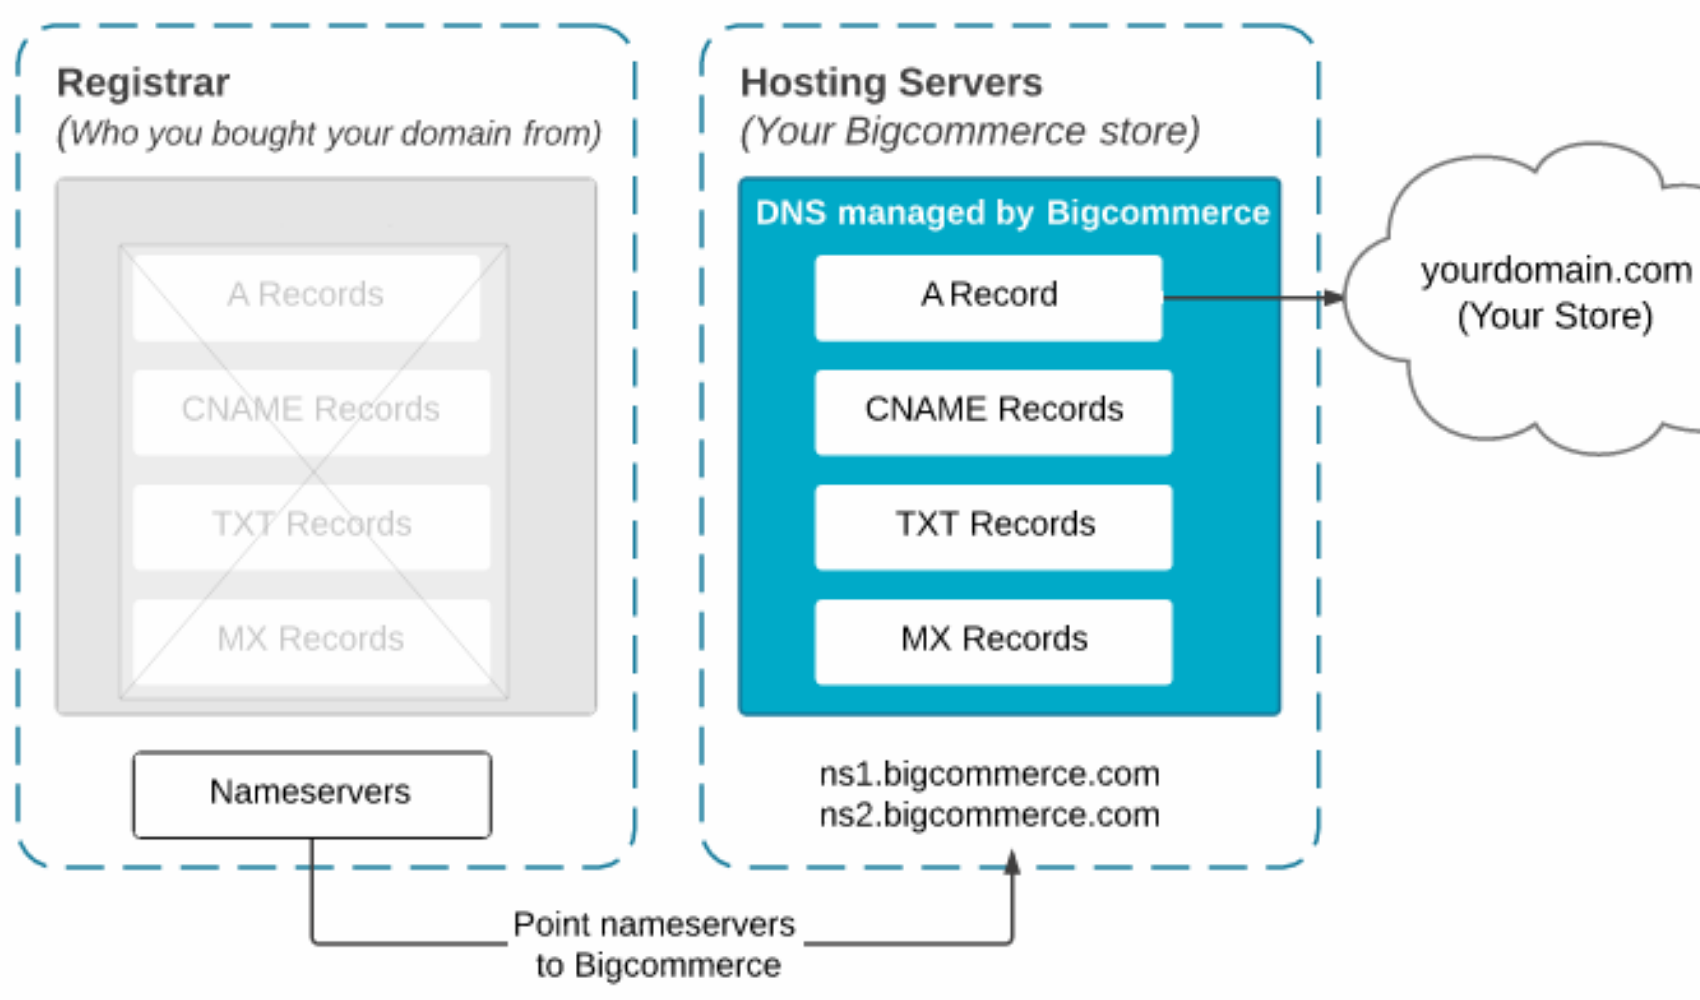
Nameservers had better be pointed to a hosting service such as BigCommerce. This means you will allow that service to control the A record and the MX record. Moreover, other locations, including the initial host are still acceptable, to which you are able to point to an individual DNS.
Nonetheless, business owners often point the nameservers to BigCommerce, and when it comes to MX records in BigCommerce, they will direct them back to the registrar or another email hosting service.
MX records
MX records (mail exchange) are the records that control email hosting by pointing to the server that receives and delivers emails.
An MX record is arranged in a structure:
- Type (MX) - what is being under the control of this record is email
- Fully Qualified Host (your domain) - host of what is being managed in real-time
- Value (third-party mail server) - the new host of what is being managed in real-time
- Mail server - the server that is in charge of managing the messages sent to and from the receiver’s domain
It is not strange that an email hosting service has various mail servers as a backup plan when one is down. This means you have to point to many MX records. Consequently, when there are various MX records, you have to identify priorities to decide the arrangement that mail servers are checked.
Priority - you select an MX record and give it a number to decide the arrangement that it will go through for availability. The smallest number is equivalent to the highest priority, and vice versa, the biggest number stands for the lowest priority.
For instance, you assign three numbers to three MX records. If your mail is delivered to domain.com, the email service will initially go through to determine if mail server 1 is working and ready for use. If it is not, the email service, hence, will turn to mail server 2. If mail server 2 also fails, it will try mail server 3.
Mail Servers
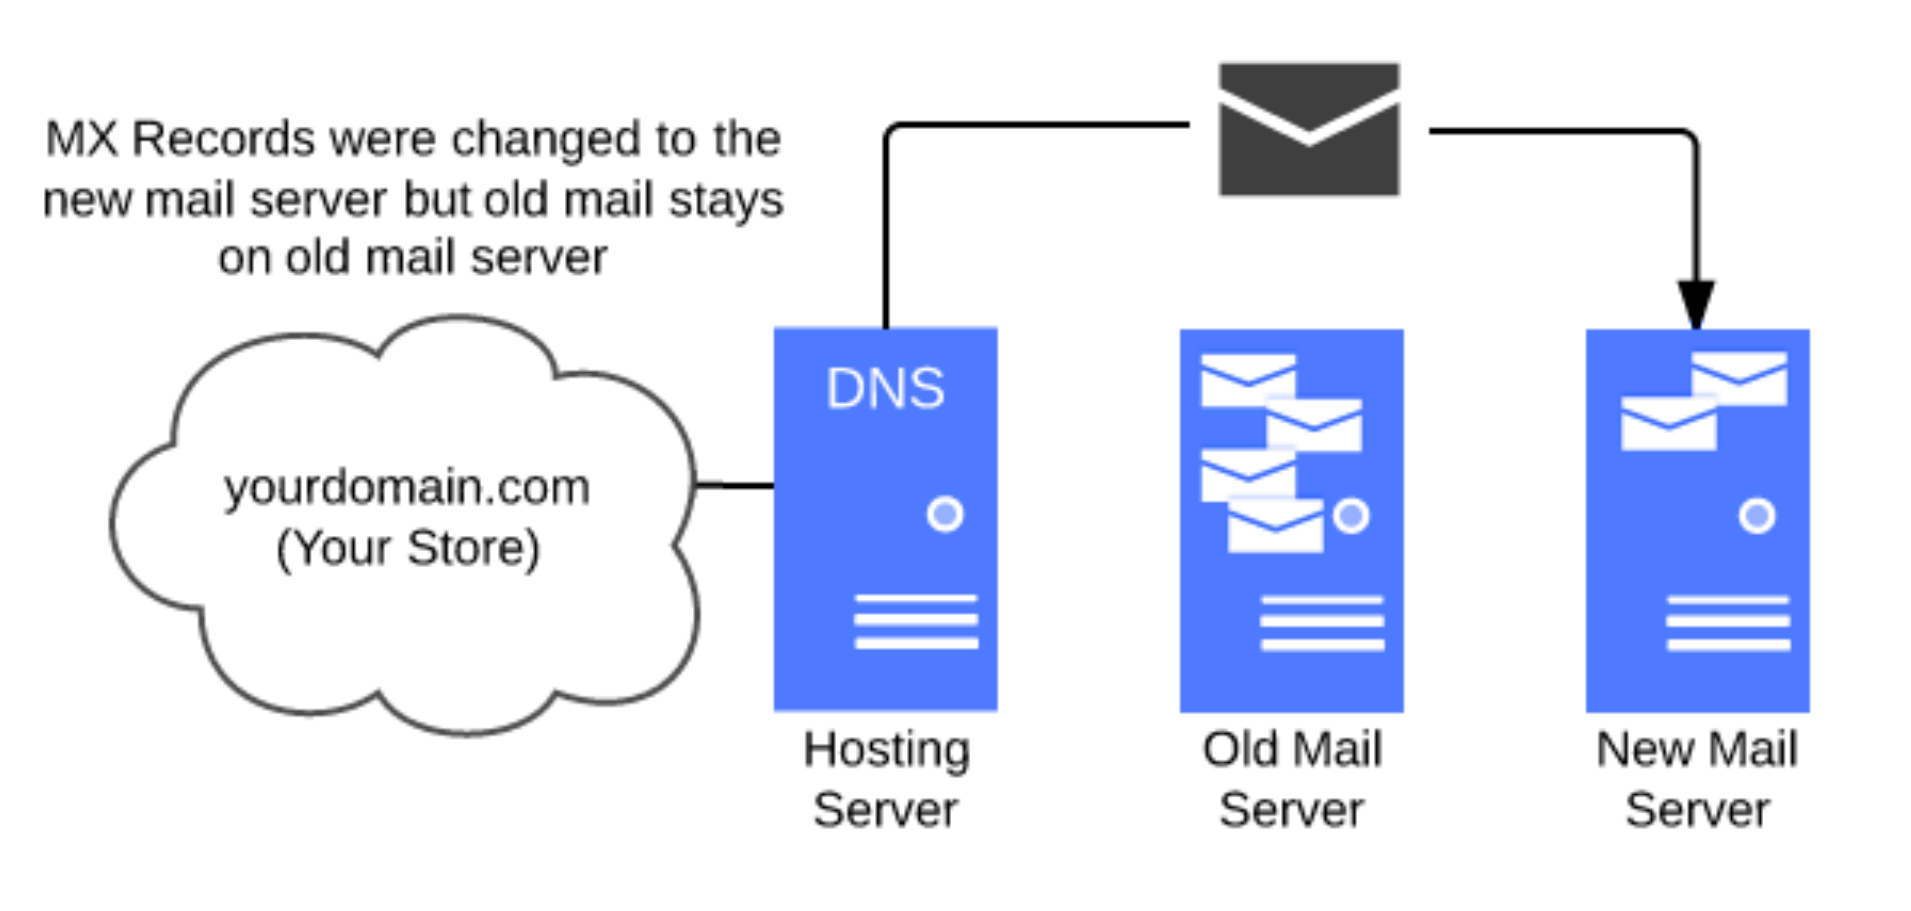
When sending an email, the mail server which it goes to will depend on MX records pointing. This mail server can save the email in its storage and keep saving any emails that are sent even though the MX records are pointed to some other servers later. The mail server is just like a piggy bank, if you no longer put money in there, it still saves everything that you put before.
Incoming mail servers
You may ask if you have already had mail servers, then why do you need an incoming mail server. Because a mail server is only capable of storing your mail, not sending mail or enabling someone to get access to the mail.
So as to approach the mail, an incoming mail server is needed to send the coming mail to an email client or webmail service. Then, you will use that email client or webmail service to read the email.
The incoming mail servers are usually compared to a letter carrier as it carries the mail to your digital doorstep. In reality, the incoming mail servers work the most with POP protocol, which means Post Office Protocol.
- Incoming mail server - responsible for mail delivery from the mail server to an email client
- Email client - an application software for email, e.g. Outlook, Apple Mail, or Windows Live Mail
- Webmail service - an online webpage for email, e.g. Gmail, Yahoo, or Hotmail
Protocol - a program that is responsible for mail delivery from the mail server to an email client
POP, which was created in 1986, is first used for email, and POP’s latest version is POP3. With POP, the emails’ duplicates will be downloaded to read and the originals will simply be removed from the server. For this reason, the device that is used to approach the email will attach the email message. However, this is just an optional choice as the email client can be quickly set up again to not delete the original from the server.
This feature has given POP an enormous benefit if you work with various email clients: you will not have to worry about the situation that one of your email clients deletes a valuable email as the other email clients will still keep a copy of it. Your incoming mail server is called POP server when using POP.
IMAP (Internet Message Access Protocol) is another common protocol for incoming servers. Internet Message Access Protocol can connect email clients with the mail server again and again so that they both have the latest data for various devices to access. Your incoming mail server is called an IMAP server when using IMAP.
For instance, you use two different devices to check the email: your smartphone and your computer. When there is a new message, both of your devices will receive that new message, and it is the same for the process of removing emails. You approach emails with your phone and remove some of the messages, then they will also disappear from your computer. What is needed to be careful here is that your removing action will make data on the server deleted.
- POP server - mean of retrieving mail, responsible for connecting email clients with the mail server at intervals
- IMAP server - mean of retrieving mail, responsible for connecting email clients with the mail server continuously
Outgoing mail servers
When it comes to delivering mail, you need an outgoing mail server. Outgoing mail servers are supported by a protocol known as SMTP (Simple Mail Transfer Protocol), which proves itself that it is beyond delivering mail. As a result, outgoing mail servers are called SMTP servers.
There is a series of activities that will happen as you deliver an email from your email client:
- Your email client of webmail get access to the SMTP server
- The email client gives the SMTP server the information about the email address of the sender (your email address), the recipient’s email address, and the message
- The SMTP server will go through the domain of the recipient’s email address then search for the associated MX records to decide the mail server that it will send to (of course, it will follow your order of priority that has been set up before)
- A list of unrelated SMTP will be carried with the message by the SMTP server until the message reaches the recipient’s SMTP server
- The recipient’s SMTP server then checks the email to determine if it identifies the domain and the username. Moreover, the SMTP server also goes through the authority of the server that sent the email. When everything is done, it delivers the message to the incoming mail server; if not, the person who sent the email will receive a bounceback email
Ports
Connecting your email client is always along with pointing out ports for the incoming and outgoing mail servers. Separate programs will run inside these ports, which are located in the mail server (just take units in an apartment building as an example)
To help you become clearer about these ports, suppose that mails are sent through Port 25 (SMTP), and then they are transferred to storage. Whenever you want to read an email message, it will be taken from another port, such as Port 995 for POP or Port 993 for IMAP.
When building up an email on an email client, it is necessary that you point out which port that the email client should interact with to deliver and receive the email messages. If you do not, the email client will not determine where to search for the information on the mail server.
Make sure that you know how your email will work because we are about to find out how to set up Email for BigCommerce stores.
How to set up Email for BigCommerce stores?
The following instruction will provide you with a step-by-step guide that helps you create your own store’s email account with BigCommerce email service.
Step 1: Add in the domain name
You may wonder why we should add in the domain name as there are many email service providers like Gmail and Hotmail. Two main reasons will explain this:
First and foremost, if you go to Gmail or Hotmail, your business email will end in a generic domain name, which is often connected with some illegal plan for making money, especially ones that involve tricking people. This will make your customers hesitate when they are about to process a purchase at your store.
The second reason is that an email address with your own domain will make your business more professional so that people feel more trusted and secure when shopping for your products. A separate domain will make your company more established and prove that you are serious about this business. Moreover, you ought to pay attention to the username at the front of the email address as well.
For instance, a general email address can be named ‘[email protected]’. With this email address, people are likely to connect the word ‘admin’ with busy administration departments in their mind and think that they will take a long time to reply to their queries or even their queries will be lost in that huge system. Therefore, creating an alternative image for your branch is a much more profitable choice. We recommend some of the following usernames that are more direct and caring: ‘help’, ‘help me’ or ‘myquery’…
Step 2: Create the email account
The next thing you need to do is create email accounts with your business domain. Do not be worried as the BigCommerce email service will help you with this, and then you will be able to arrange your email accounts in Outlook, Thunderbird, or your mobile device.
- You enter your BigCommerce store and go to the control panel
- Choose ‘Setup and Tools’, which is at the top of the page, and click on ‘Email Accounts’ from your menu
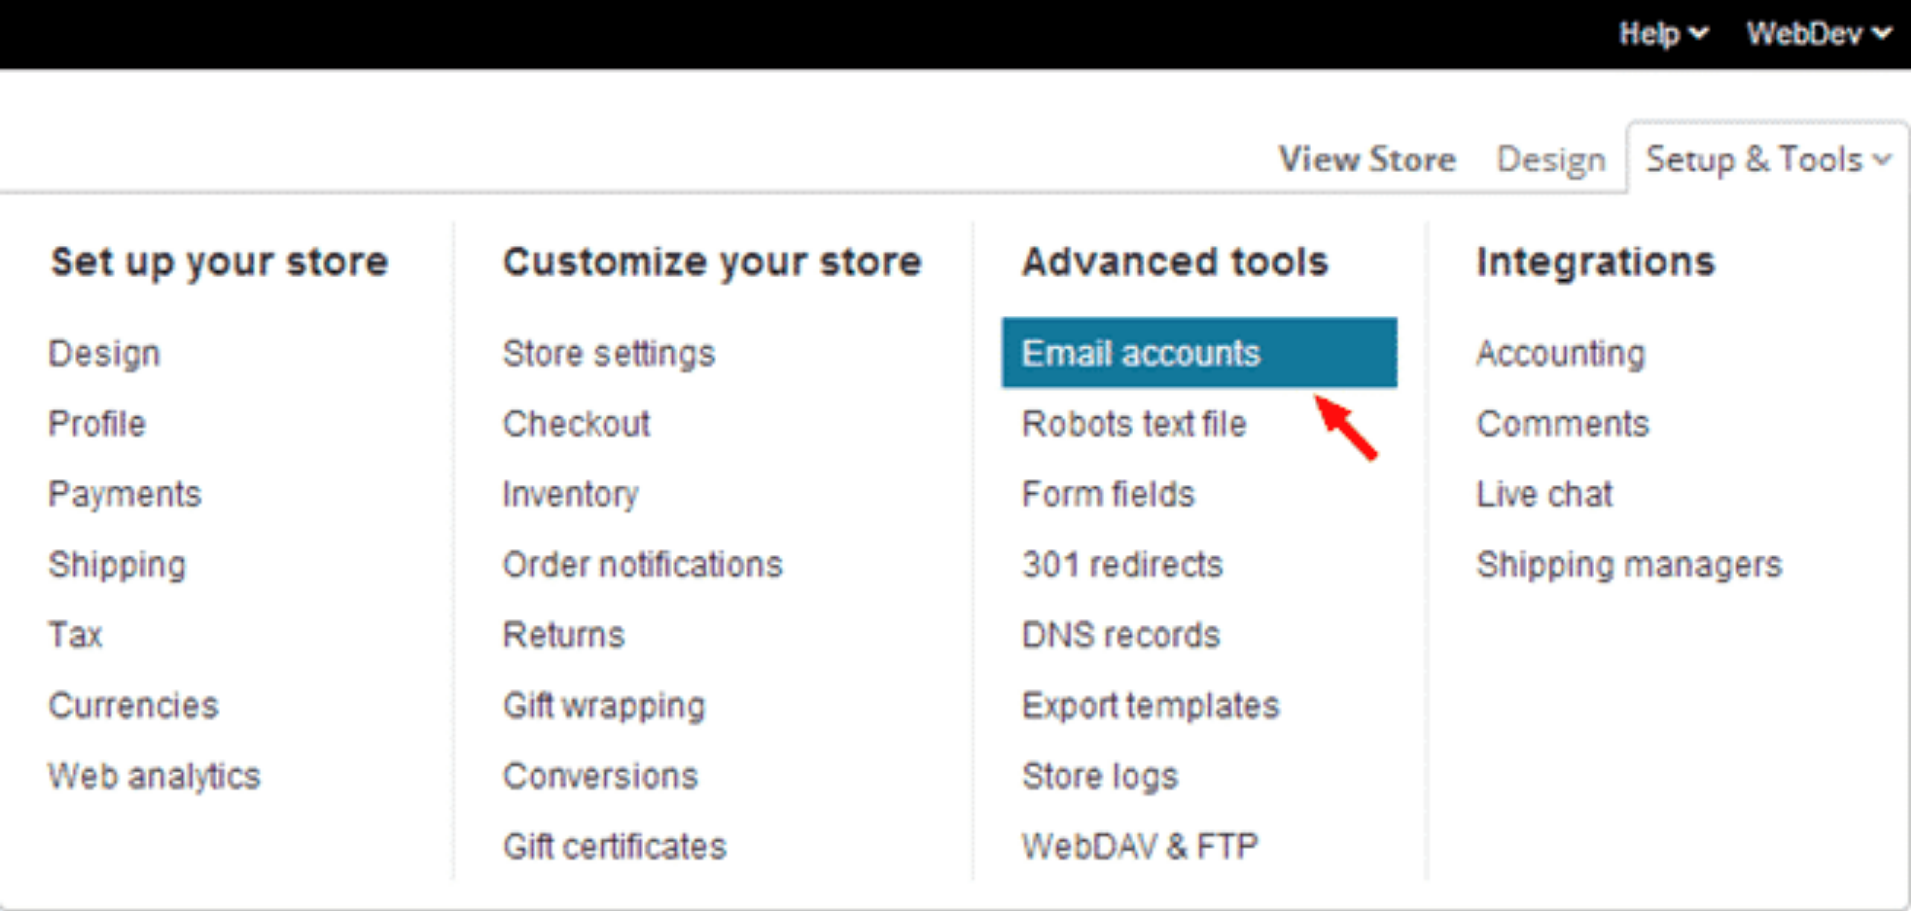
- Select ‘Create an Email Account…’
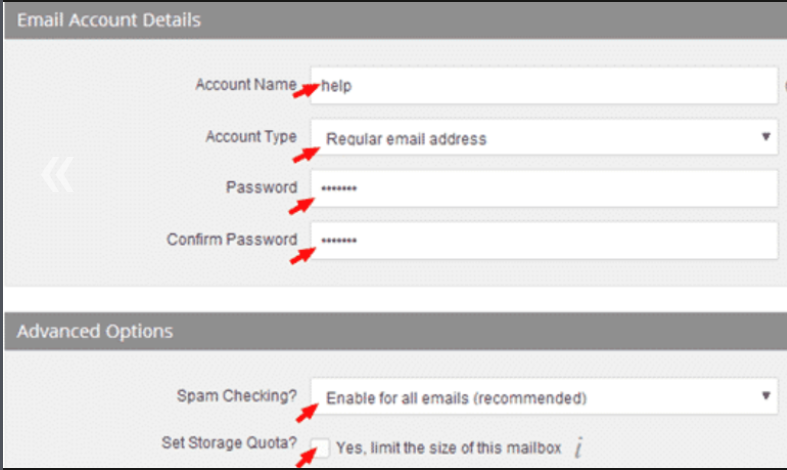
- Put in the information that Email Account Details request
Account name: choose the name that you prefer. After that, BigCommerce will determine whether it is unique or not. If it is another account namesake, just redo it.
Account type: There are two types of accounts - Regular Email Address and Forward Email Address. You need to fill in the type that is suitable for your business as this email type decides where emails will be forwarded to another account or a personal account.
Password/Confirm Password: Enter your password and confirm it. There is a recommendation that the password should not be too difficult as you possibly forget it, and it should also not be too easy.
- Put in the Advanced Options
Spam checking? - It is not necessary to change this as disabling the spam checking option may lead to trouble
Set Storage Quota? - This advanced option will help you save a whole bunch of space on the disk. However, you should know that once the max number of emails is reached, they will be sent back to where they came from. Hence, it is important to clean up your mailbox regularly.
- Click on the ‘Save & Exit’ button or the ‘Save & Add Another’ button if you want to set up a second email account. If you do not, this option is not necessary now.
Note: Google apps and third-party email services
The fact is that BigCommerce does not give you a mail interface, as a result, an account with a third-party email provider is necessary. There are various choices that are suggested by BigCommerce, including Gmail, AppleMac, Windows Mail, and iPhone, with the guide on how to arrange a BigCommerce email account. However, Google Apps is an alternative choice.
If you choose Google, you no longer have to worry about your store’s storage as the mailbox needs no space on your store. Hence, the number of emails will not be limited. To use the Google Apps inbox, you need to set up your domain again, which means creating and adding MX records (7), a CNAME record, and a TXT record.
Step 3: Install Google Apps as the email service provider
-
Come to your store control panel
-
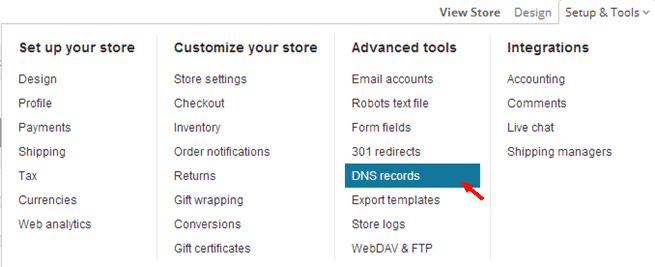
Choose the button ‘Setup and Tools’ at the top of the page and then click on ‘DNS Records’
-
Add the new MX records with the format following: ‘mail.randomizedstore.com – MX – ASPMX.L.GOOGLE.COM’. Then follow with ‘ALT1.ASPMX.L.GOOGLE.COM’, ‘ALT2.ASPMX.L.GOOGLE.COM’, then ‘ASPMX2.L.GOOGLEMAIL.COM’ etc.
- Arrange the Priority Rating
- Add CNAME record in the format: ‘mail.randonizedstore.com – CNAME – ghs.google.com’.
- Add a TXT record (or SPF record) in the form: ‘randomizedstore.com – TXT – v=spf1 +a +mx include:_spf.bigcommerce.com include:_spf.google.com ~all’.
- Delete 2 of the original MX records to get rid of malfunctions due to conflicting addresses. Then you click the red minus
Step 4: Set up the SMTP mail server
You need to set up the SMTP again if you can transform from BigCommerce to Google as your business email service provider. To be more detailed, you should change the SMTP server to Google as this mail server will help you deal with outgoing messages such as order confirmations or order status updates, customer requests.
- Click on ‘Store Setting’ on your control panel
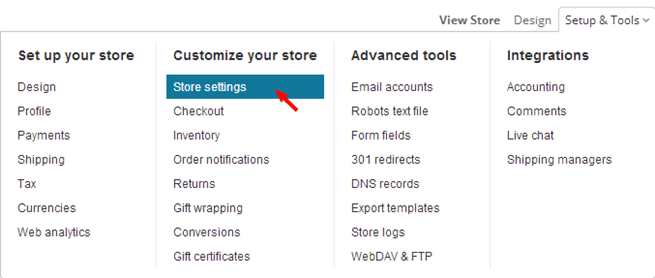
- Select ‘Miscellaneous’ from the menu
- From ‘Use SMTP Server’, choose ‘Let Me Specify My Own SMTP Server Details’
- Put ‘ssl://smtp.googlemail.com’ in ‘SMTP Hostname’ box
- Fill in ‘SMTP Username’ - this one is your full email address on Google Apps
- Fill in ‘SMTP Password’ - SMTP password is as same as your Google Apps account password
- Change ‘SMTP Port’ to 465
- Then select ‘Save’
Final thoughts
Your BigCommerce business can not be complete if you have not set up your email. Email connects you and your customers, turning the shopping process into a clear, easy, and quick process. Moreover, email also makes your business professional and helps you build up a notable first impression.
This is the end of this article, we hope you will find it helpful and applicable to your business. Good Luck


