How to insert breadcrumb navigation to your store in Shopify
Breadcrumbs, also known as breadcrumb trail, is a 2nd navigation system which can display any user’s location on website or web app. The fact is that the term itself came from a fairy tale called Hansel and Gretel, in which the 2 main characters did create a trail of breadcrumbs so that they could track back to their house. However, please keep reading our instructional writing on How to insert breadcrumb navigation to your store to know more deeply about one this topic.
Free 1:1 Shopify consultation & 30-day all-app trial FREE
- Shopify Plus Strategy and Consultation
- Personalized E-commerce Solutions
- Conversion Rate Boosting Techniques
- Inventory Management Hacks
How to insert breadcrumb navigation to your store
What is Breadcrumb Navigation?
To go more into details, we would like to give you more information about Breadcrumb Navigation.
To be clear, Breadcrumb Navigation is a list of links that can tell not only what page they are currently on for your customers but also all the pages that are above that page in the store’s content.
The breadcrumb navigation will look similar to this:

Please kindly note that you are allowed to add breadcrumb navigation to your store easily with a Liquid snippet. This snippet will produce a list of links that can display the where your users are in your website (like **Home > Categories > Cupcake).
How to insert breadcrumb navigation to your store
Step 1:
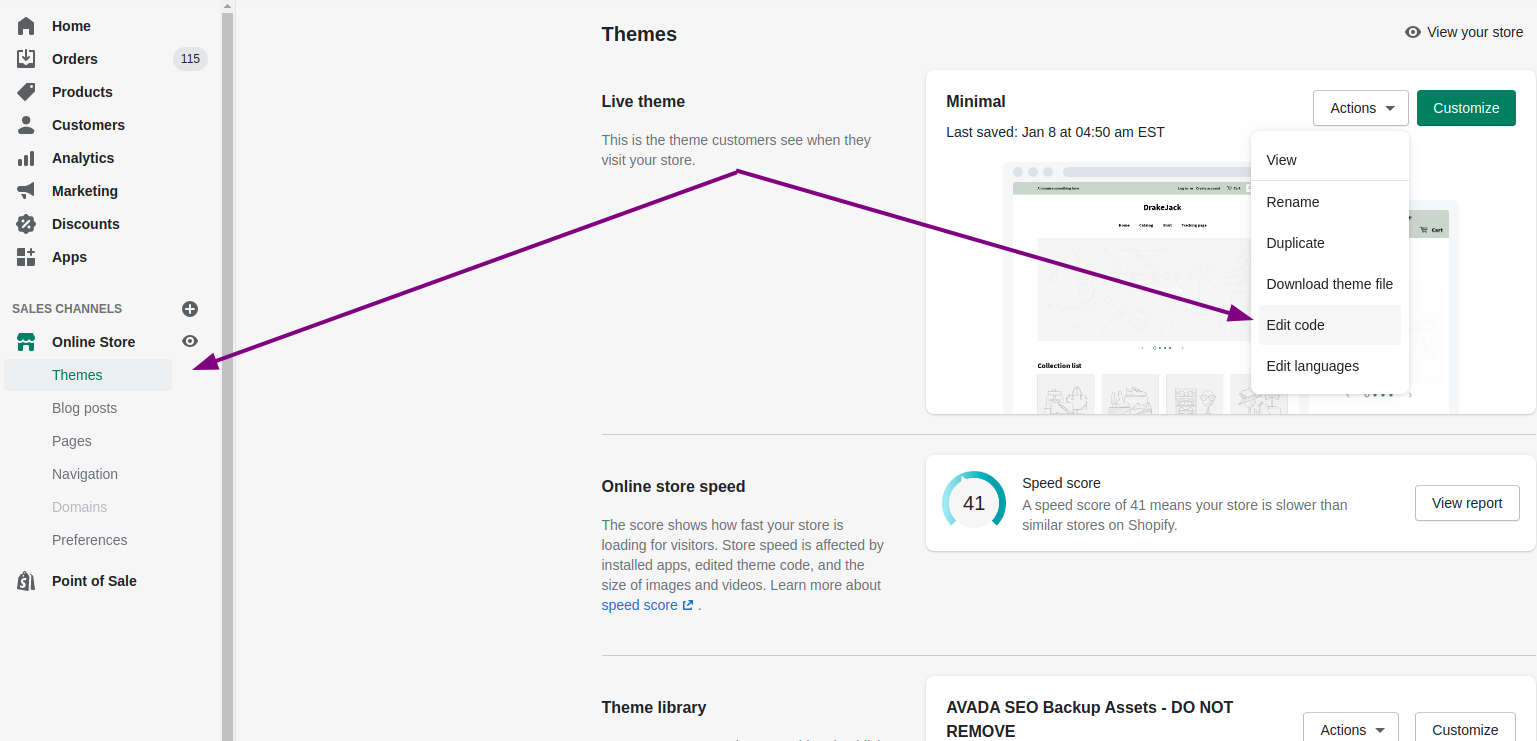
Go to Online Store > Themes from your Shopify Admin panel.
Step 2:
Choose the theme that you need to adjust and click Actions > Edit code.

Step 3:
Generate a brand-new snippet for the breadcrumbs code:
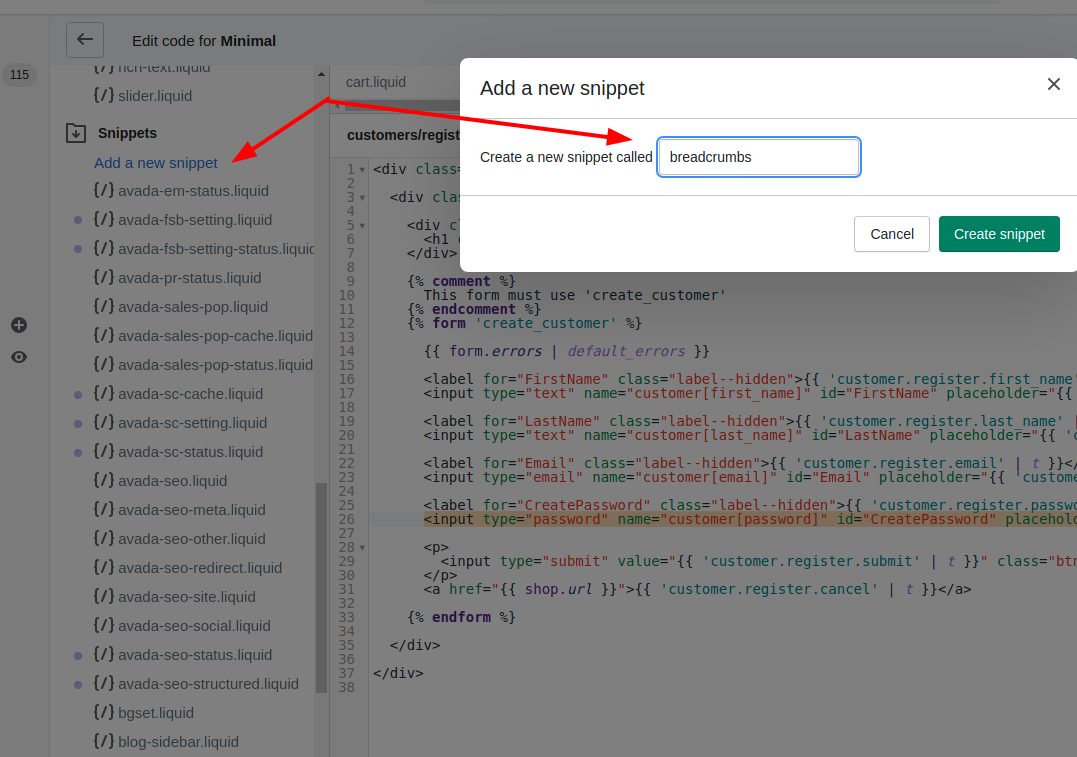
- Tap the Snippets folder, then tap Add a new snippet.
- Name the snippet
breadcrumbs. Be certain that the name is completely note capitalized otherwise your theme will be unable to find the new file. - Tap Create snippet.

Step 4:
Copy the Liquid code given below and paste it into the code editor for the breadcrumbs.liquid snippet:
{% unless template == 'index' or template == 'cart' or template == 'list-collections' %}
<nav class="breadcrumb" role="navigation" aria-label="breadcrumbs">
<a href="/" title="Home">Home</a>
{% if template contains 'page' %}
<span aria-hidden="true">›</span>
<span>{{ page.title }}</span>
{% elsif template contains 'product' %}
{% if collection.url %}
<span aria-hidden="true">›</span>
{{ collection.title | link_to: collection.url }}
{% endif %}
<span aria-hidden="true">›</span>
<span>{{ product.title }}</span>
{% elsif template contains 'collection' and collection.handle %}
<span aria-hidden="true">›</span>
{% if current_tags %}
{% capture url %}/collections/{{ collection.handle }}{% endcapture %}
{{ collection.title | link_to: url }}
<span aria-hidden="true">›</span>
<span>{{ current_tags | join: " + " }}</span>
{% else %}
<span>{{ collection.title }}</span>
{% endif %}
{% elsif template == 'blog' %}
<span aria-hidden="true">›</span>
{% if current_tags %}
{{ blog.title | link_to: blog.url }}
<span aria-hidden="true">›</span>
<span>{{ current_tags | join: " + " }}</span>
{% else %}
<span>{{ blog.title }}</span>
{% endif %}
{% elsif template == 'article' %}
<span aria-hidden="true">›</span>
{{ blog.title | link_to: blog.url }}
<span aria-hidden="true">›</span>
<span>{{ article.title }}</span>
{% else %}
<span aria-hidden="true">›</span>
<span>{{ page_title }}</span>
{% endif %}
</nav>
{% endunless %}
Step 5:
Choose Save to get your changes confirmed and applied to breadcrumbs.liquid.
Step 6:
Tap theme.liquid to open it in the code editor.
Step 7:
Paste the code given below in theme.liquid wherever you want your breadcrumbs to be displayed:
{% include 'breadcrumbs' %}
Step 8:
Tap Save to save all of your changes to theme.liquid.
If you feel comfortable to use Liquid, you can customize the breadcrumbs’ snippet to configure what it displays or to use various separator characters for the links.
Conclusion
Let’s employ the breadcrumb navigation as a navigator for your users now!


