How to Use a Custom Banner on Apple Wallet Passes on Shopify
This post is about how to use custom banners on Apple Wallet Passes on Shopify. Through the gift cards on Apple Wallet Passes, customers can assess your online store to some extent. That’s why you should care about your gift card’s appearance once you have allowed the use of Apple Wallet Passes. You can design your gift card by changing text and card colors or edit new logo and banner. In this article, I will focus on the adjustment for the banner. If you keep the default setting for the banner, your gift card will display:

It is an unfashioned banner that you do not want it. By using your creativity combine with following these below steps, you will get a beautiful, catchy banner for your gift cards on Apple Wallet Passes.
How to use a custom banner on Apple Wallet Passes
Step 1: Go to Gift cards
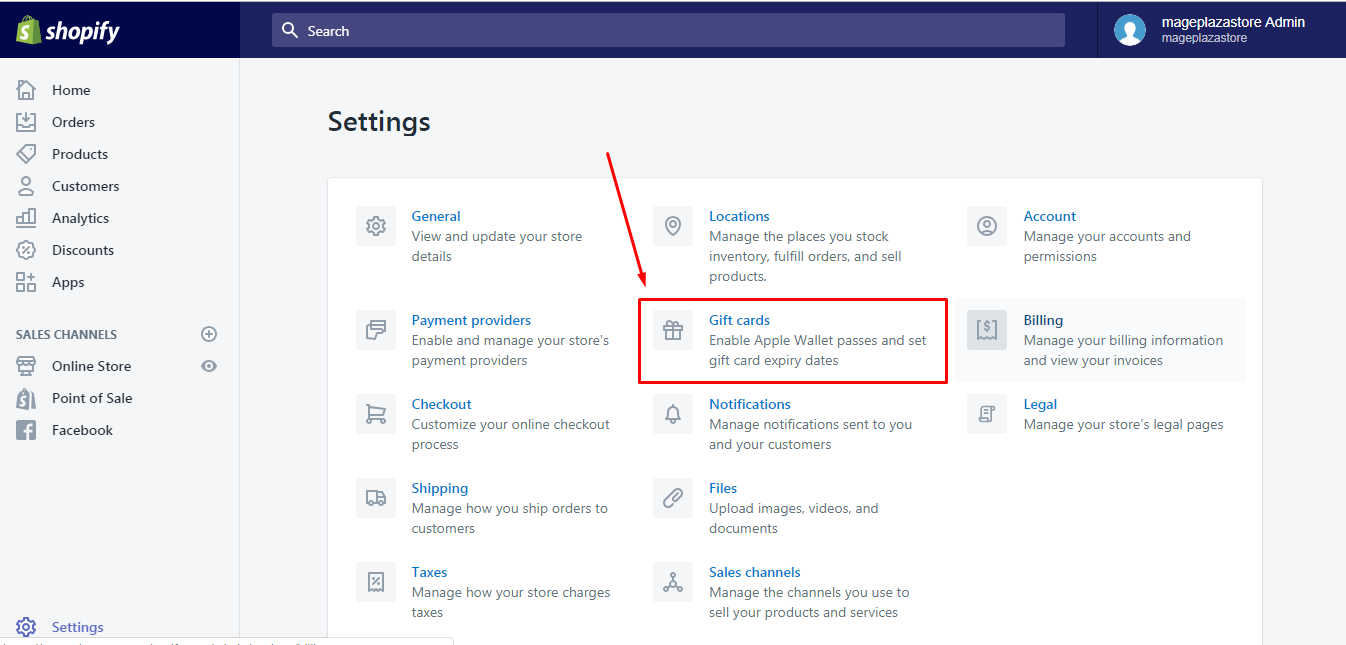
After log-in to your Shopify account, select Settings and head to Gift cards

Step 2: Enable custom banner
In the Apple Wallet, you will find the option Use a custom banner at the end of the page. Tick on the box to enable this setting.
Step 3: Upload picture for banner
Under the option, a Choose file button will appear, which allows you to upload a picture for your banner. After clicking on that button, another dialog box will present that you can pick your needed photo. Moreover, you also know how it looks like by looking at the phone screen next to the settings. There is a note that the default size for a banner is set as 1125px x 432px and all photo will be resized to fit this dimension.

Step 4: Save the custom banner
If you have completed choosing your banner image, do not forget to press Save to end the action and help the customers see your result.
To use a custom banner on Apple Wallet Passes on iPhone (Click here)
-
Step 1: Get access to your account on Shopify app, go to
StorethenSettings -
Step 2: A list of settings will appear on your screen. Scroll down and find
Gift cards -
Step 3: In
Gift cards, there are two more parts, which areAuto-expirationandApple Wallet. If you have already enabled the use of Apple Wallet Passes, you have to check on theUse a custom bannerat the end of the settings. -
Step 4: Choose a banner photo from your gallery.
-
Step 5: Tap
Saveto finish
To use a custom banner on Apple Wallet Passes on Android (Click here)
-
Step 1: Open the Shopify app on your smartphone or tablet, select
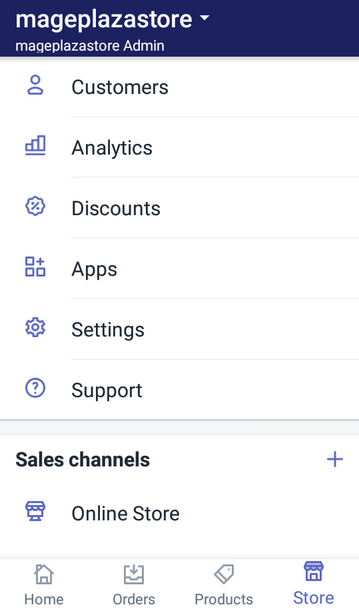
StoreandSettingsrespectively
-
Step 2: There are three smaller categories in
SettingsincludingApp settings,Store settingsandAbout. Find and click onGift cardswhich stays nearly at the end of theStore settingslist.
-
Step 3: Under the
Apple Walletsection, tap on the box next toUse a custom bannerto activate it -
Step 4: Press on the newly appeared button,
Choose fileto replace the default banner with yours.
-
Step 5: To complete the process, tap
Save
Summary
In short, I have introduced to you the process of how to use a custom banner on Apple Wallet Passes on Shopify. A tip for customizing banner is that you can use additional software or app to edit your photo before using it so its content will follow your want. Hope that you can take benefit from this topic.
Related Posts:


