How to Customize Shopify Themes
Setting up an online store is always considered a pivotal role in eCommerce business growth. On many occasions, it could be so complicated if the website administrator has no idea about coding, design, customization and web administration. However, modifying online store themes has never been easier with Shopify - one of the most common e-commerce platforms, serving a beginner-friendly environment and a user interface that makes things turn out much more simple for you to manage your webstore.
In this writing today, we are giving you guidance in detail on How to Customize Shopify Themes. Specifically, we will show you how to modify a Shopify theme to personalize your web design. In fact, Shopify does offer a lot of ways to design your own store theme. However, they are mostly limited. Don’t worry, now let’s figure out the solution by taking a quick look at our table of content below to see what you are going to go through!
Related Posts
- Find the Right Theme - A Complete Guide
- How to Add an Updated Version of your Theme to your Online Store
- Download Themes in 5 Simple Steps
- How to Publish Themes from the Theme Editor
- 3 Steps to Publish a Theme from the Admin
Where to find quality themes
When you first start a Shopify store, the theme will be displayed to you like the default one. That default theme is already customized, well-designed, and of course, ready to be in use. However, to have a productive, healthy website and a huge number of traffics, especially target customers, there are so many more things for you to get done than just uploading, listing your products and personalizing the administration information. It will not work in the best way to help you stand out among a whole lot of component websites as you expect, so you may wonder what the solution is. Let us show you!
Shopify’s theme store
To make sure of proper function and compatibility, the Theme Store on Shopify does offer a collection that comprises free and premium themes.
Although the implementation of personalization on default Shopify themes is kind of simple, then it is a must to have a more vision-focused theme to match your business’s direction and style if you are in need of increasing unique viewers and showing how professional your website is.
To buy a theme from Shopify theme store right from your dashboard, just go to the Themes section of Online Store in the left-handed menu. Scroll down a little bit to find the Theme Library. Now you are offered with 2 options as below:
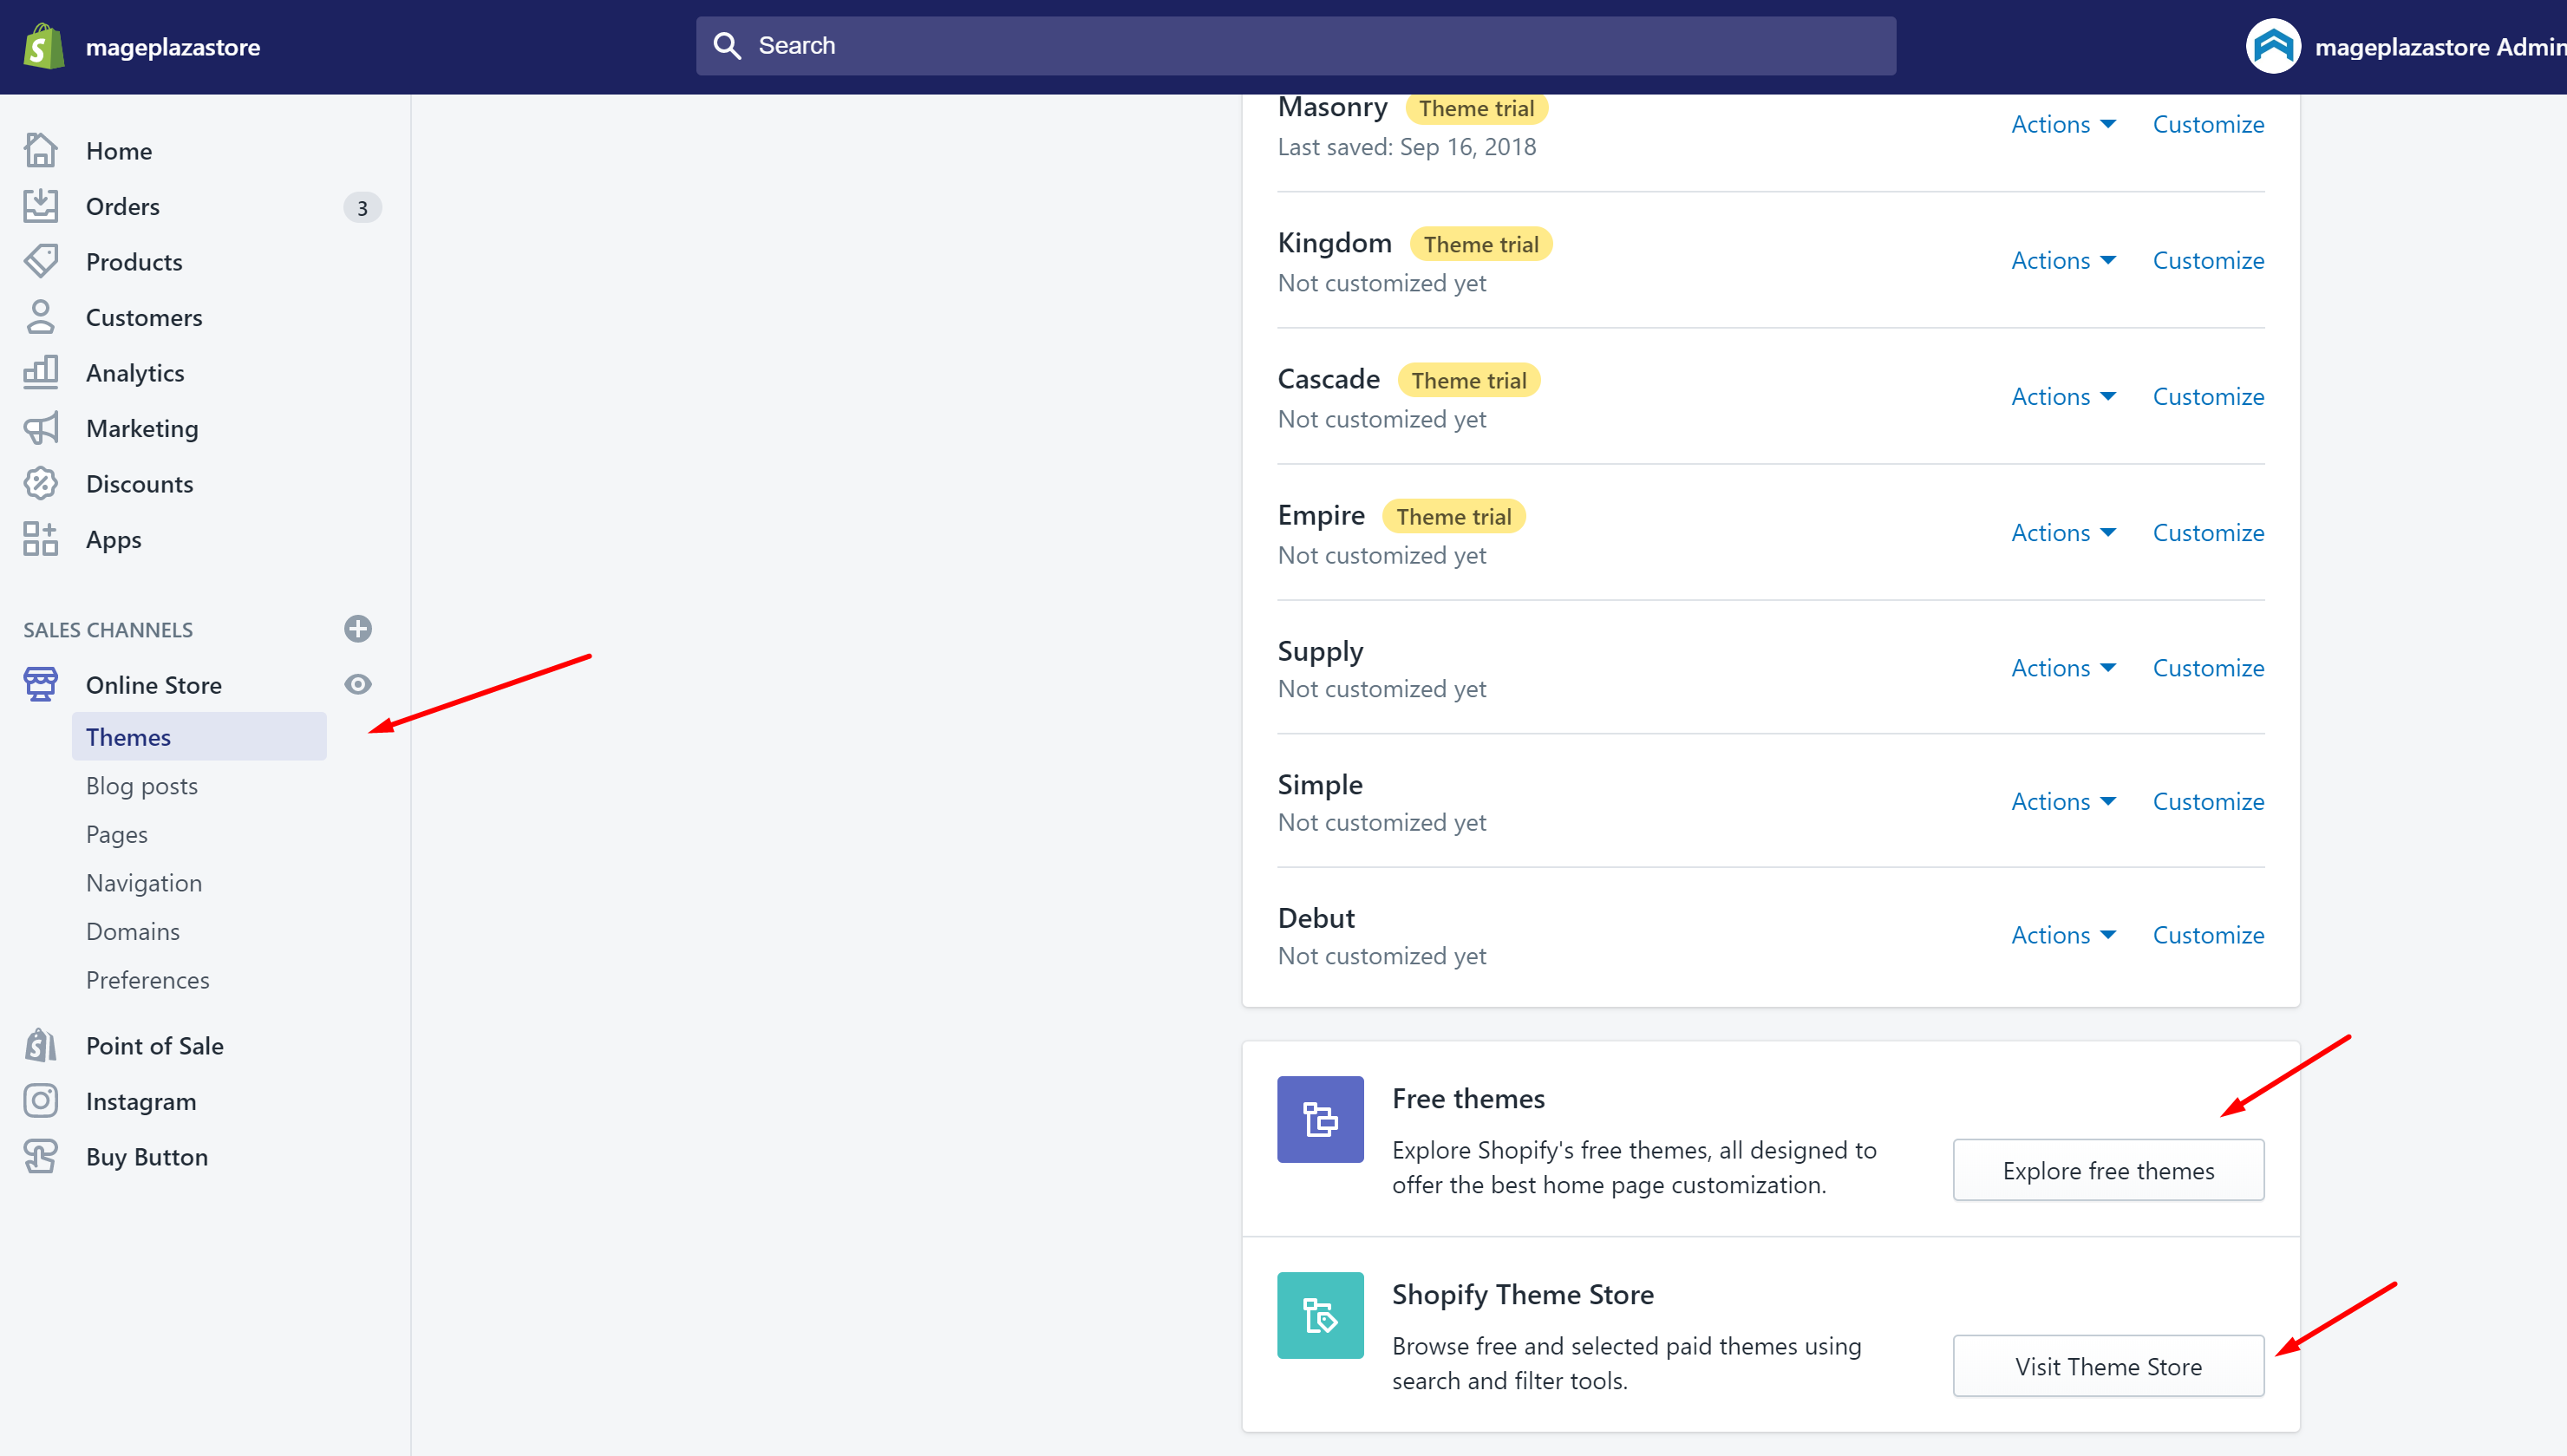
Displayed themes on Shopify are filtered and categorized to help you quickly find the most suitable one. There are some options for you to search and get themes filtered by:
- Your inventory’s size (is it large or small?)
- Particularly industry-focused themes
- Visual purposes (modern, vintage, minimal, etc. )
- Large photography emphasis
- Types of layouts (grid or column)
Choosing ready-to-use Shopify themes not only makes it much easier for you to have a very first sense of what to be done but also saves a lot of time to spend on many other elements also essential such as content instead of starting from scratch.
3rd party websites and developers
If you find that there are no choices in the Shopify Theme Store that would suit the desired look of your online store, you can take a look at many other 3rd party websites that taking care of Shopify themes’ visual is their job.
One of those must be Theme Forest, a 3rd party developer. In such marketplaces, you are allowed to sort out all the themes by their popularity and rating. And of course, it’s very objective and impersonal!
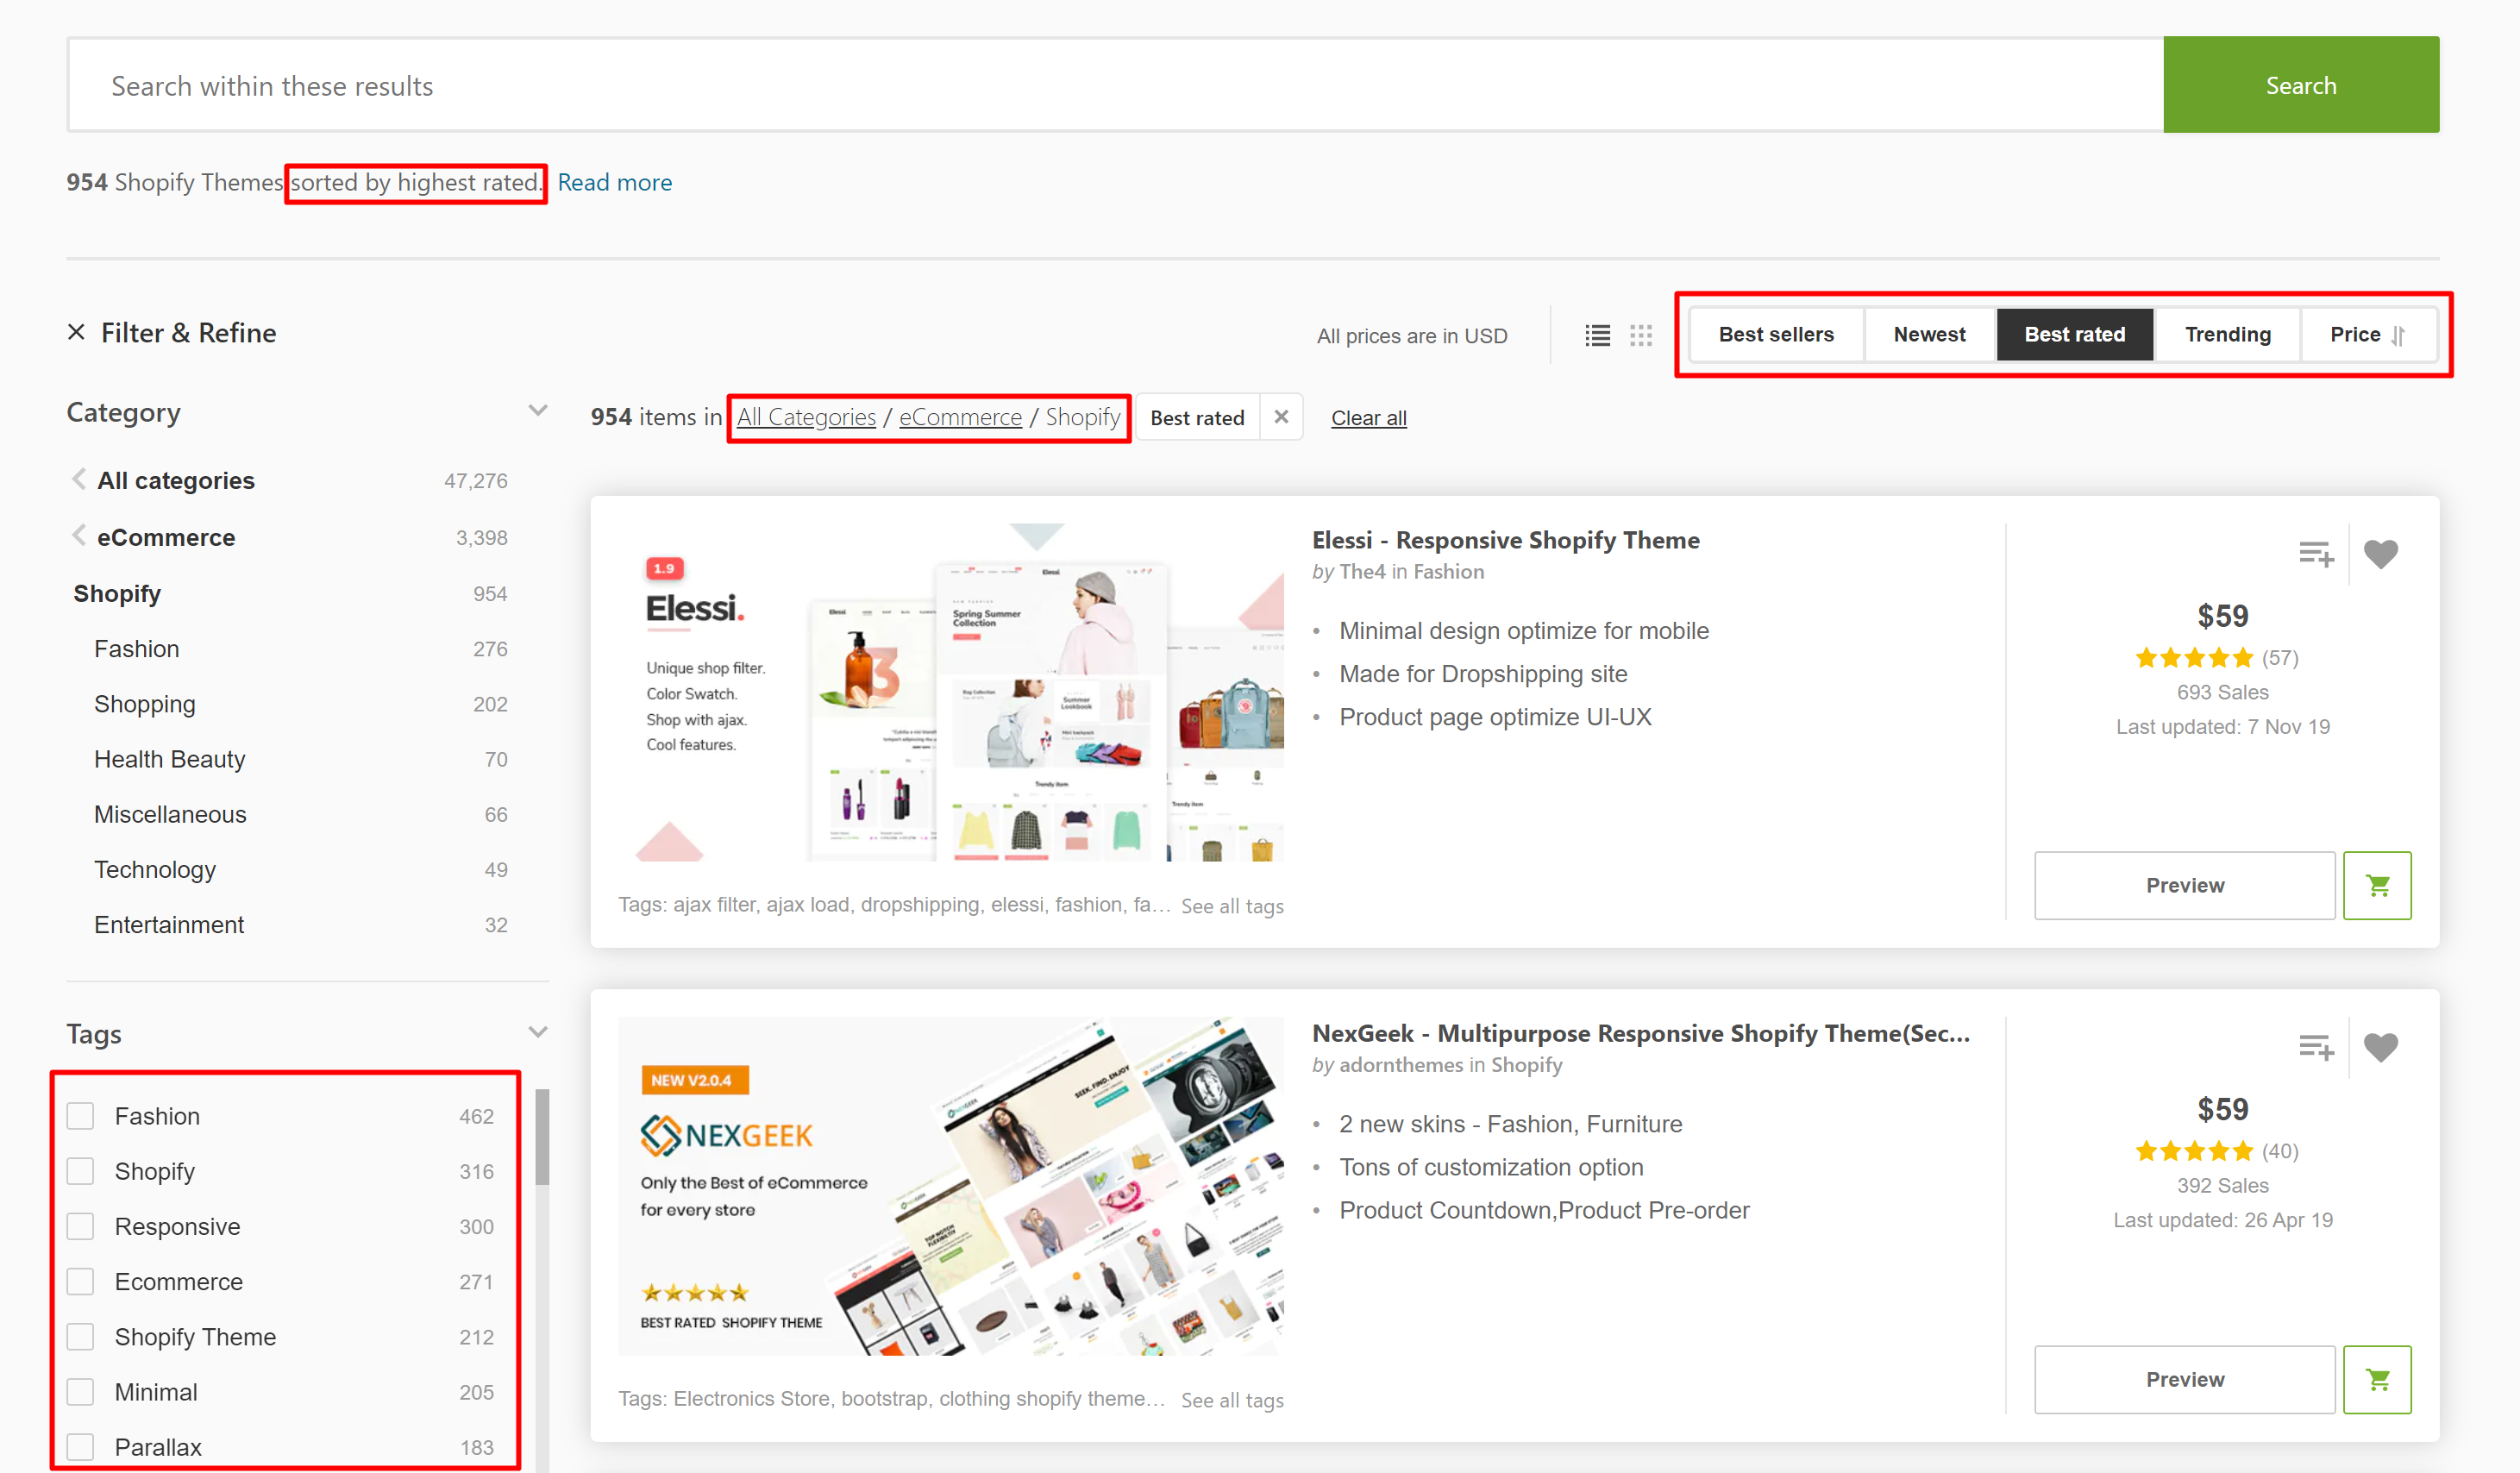
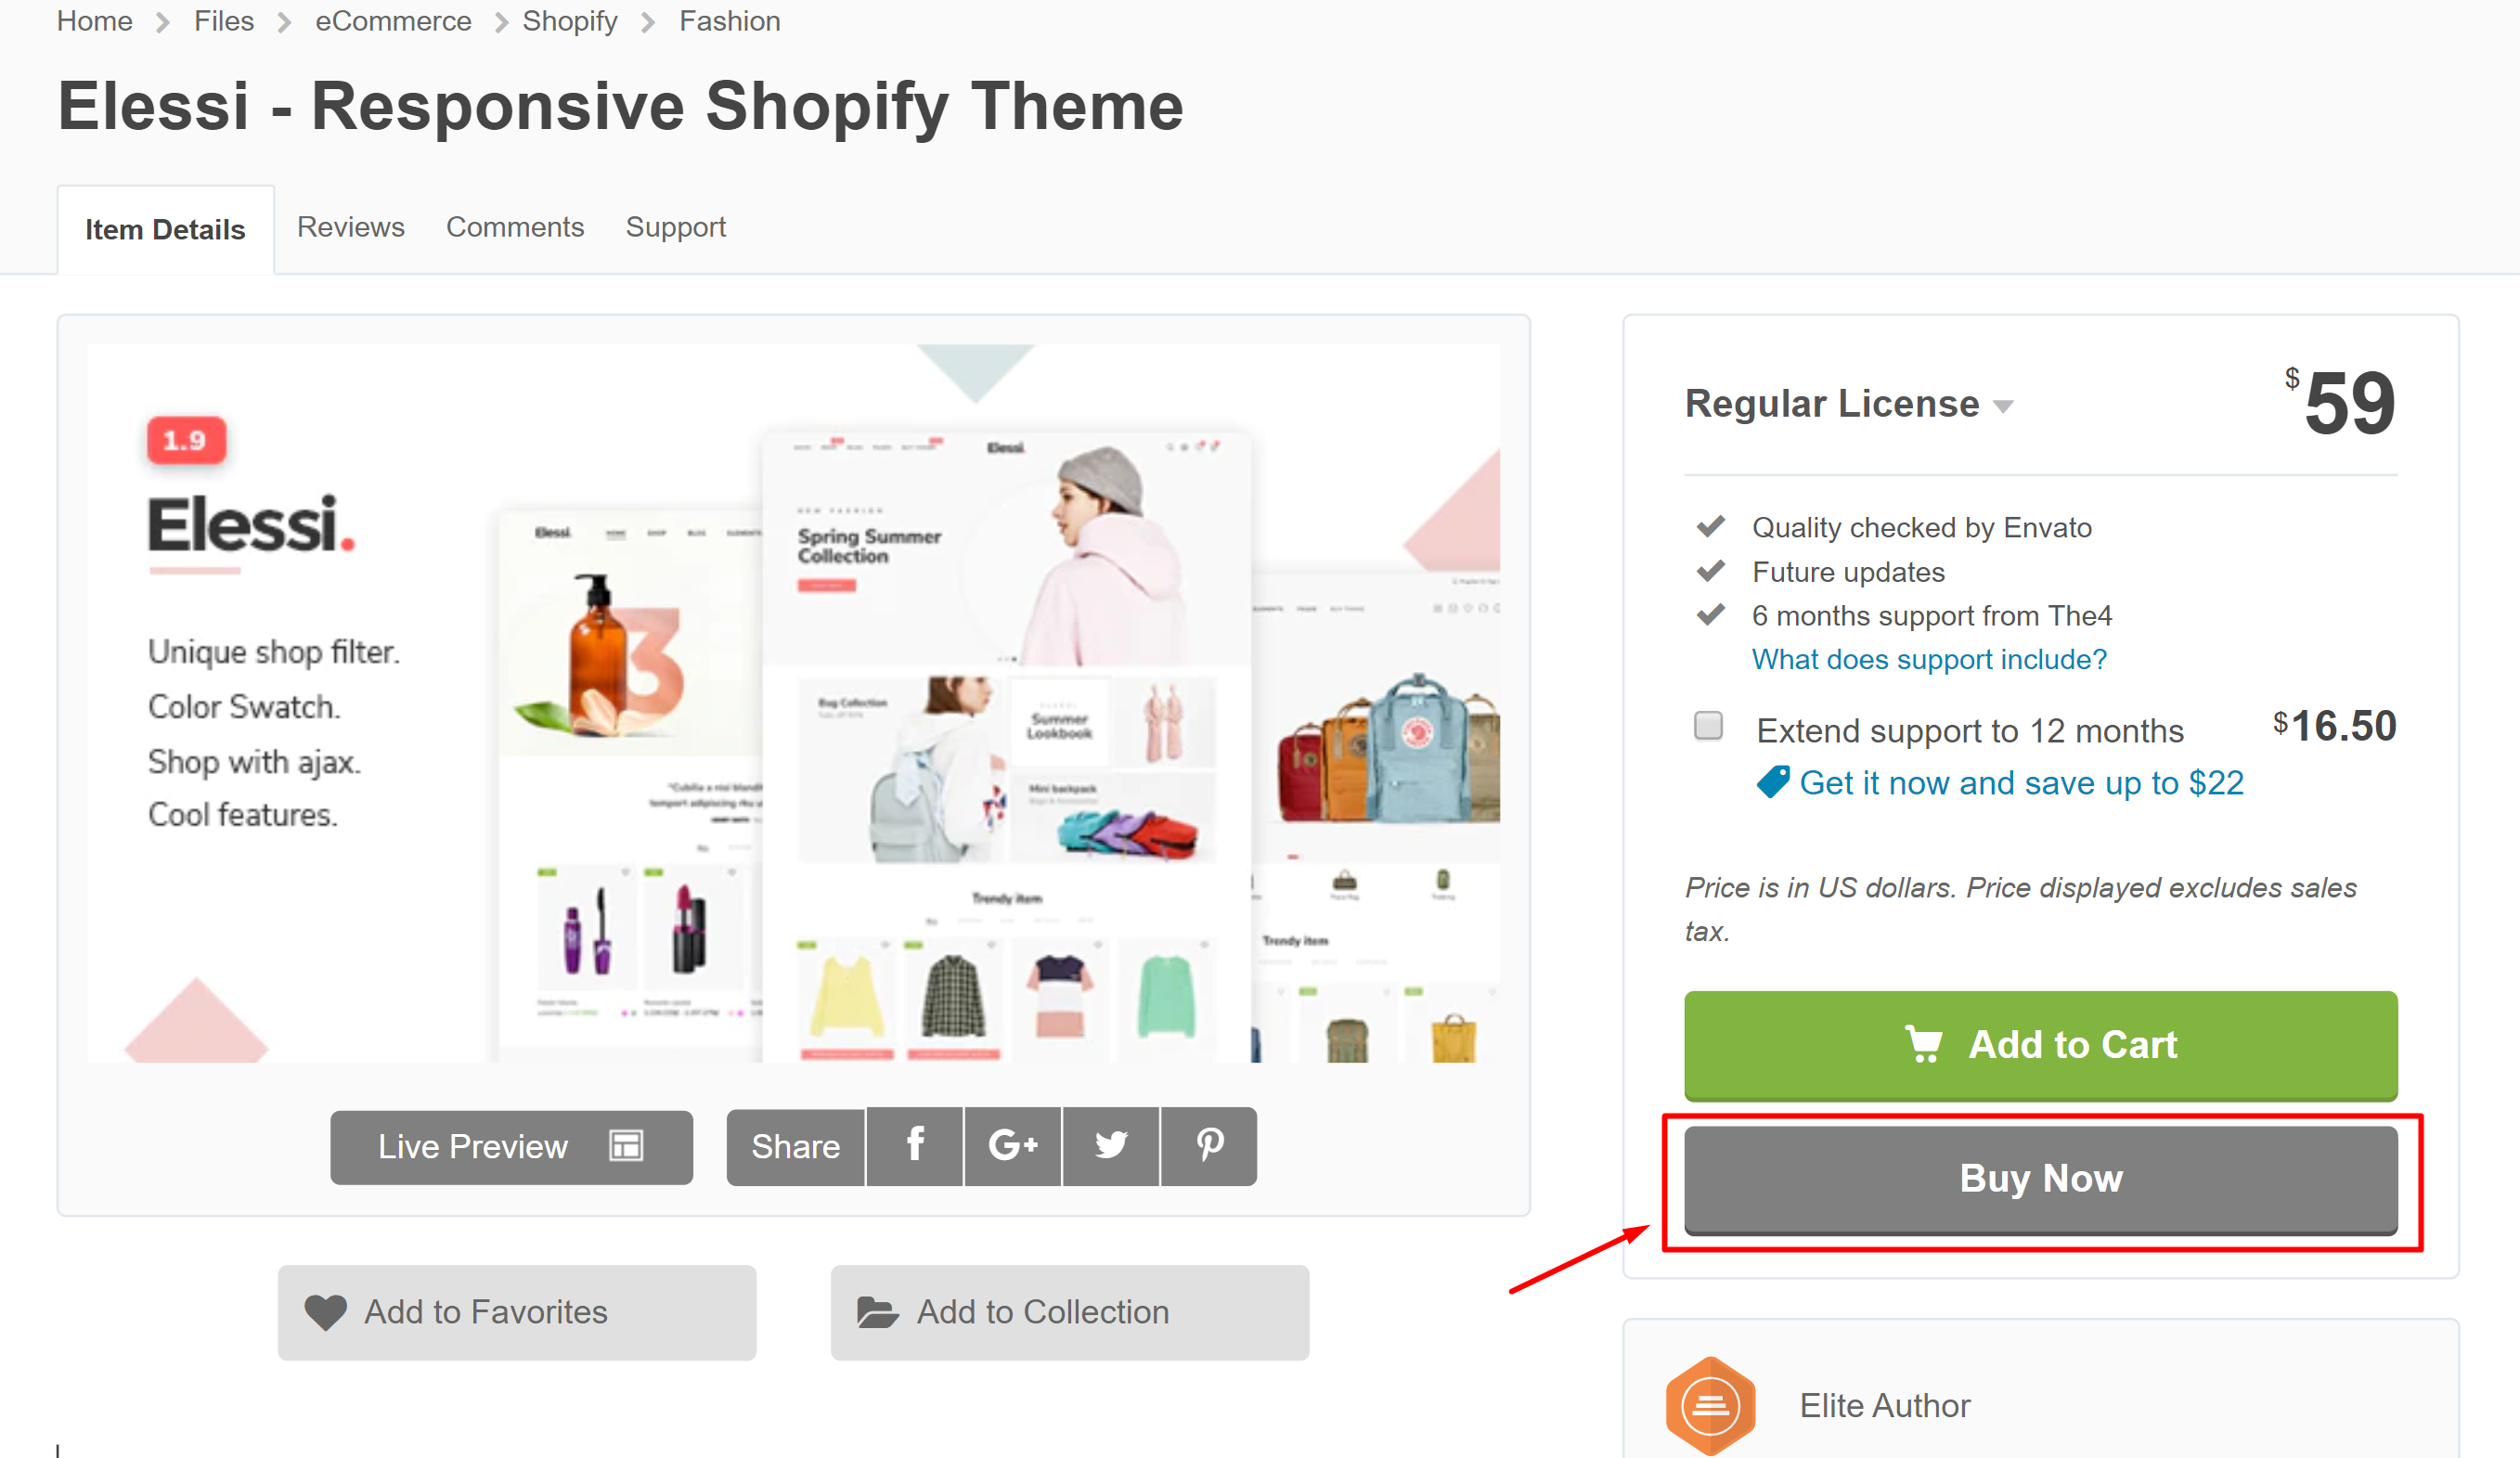
Similar to the way you install a theme in the Shopify Theme Store, you can customize your chosen theme once you acquire and load it into your store by clicking the Buy Now button just as below:
Last but not least, you can contact any developers, experts from the Shopify team to have the best version of your theme. Shopify does offer an increasing network of partners specializing in theme customization. However, kindly remember that it could be by far pricey than customizing a pre-made theme, so we recommend you to take it into consideration seriously.
How to customize Shopify Themes
If you want to find the theme that you have just added from the Shopify Theme Store, it is right in your Theme Library within your Shopify dashboard. Once you find it in, it’s ready to be customized. Yet if you purchase a theme from a 3rd developer or from any other marketplaces, then you will have to upload the theme before customizing or activating it.
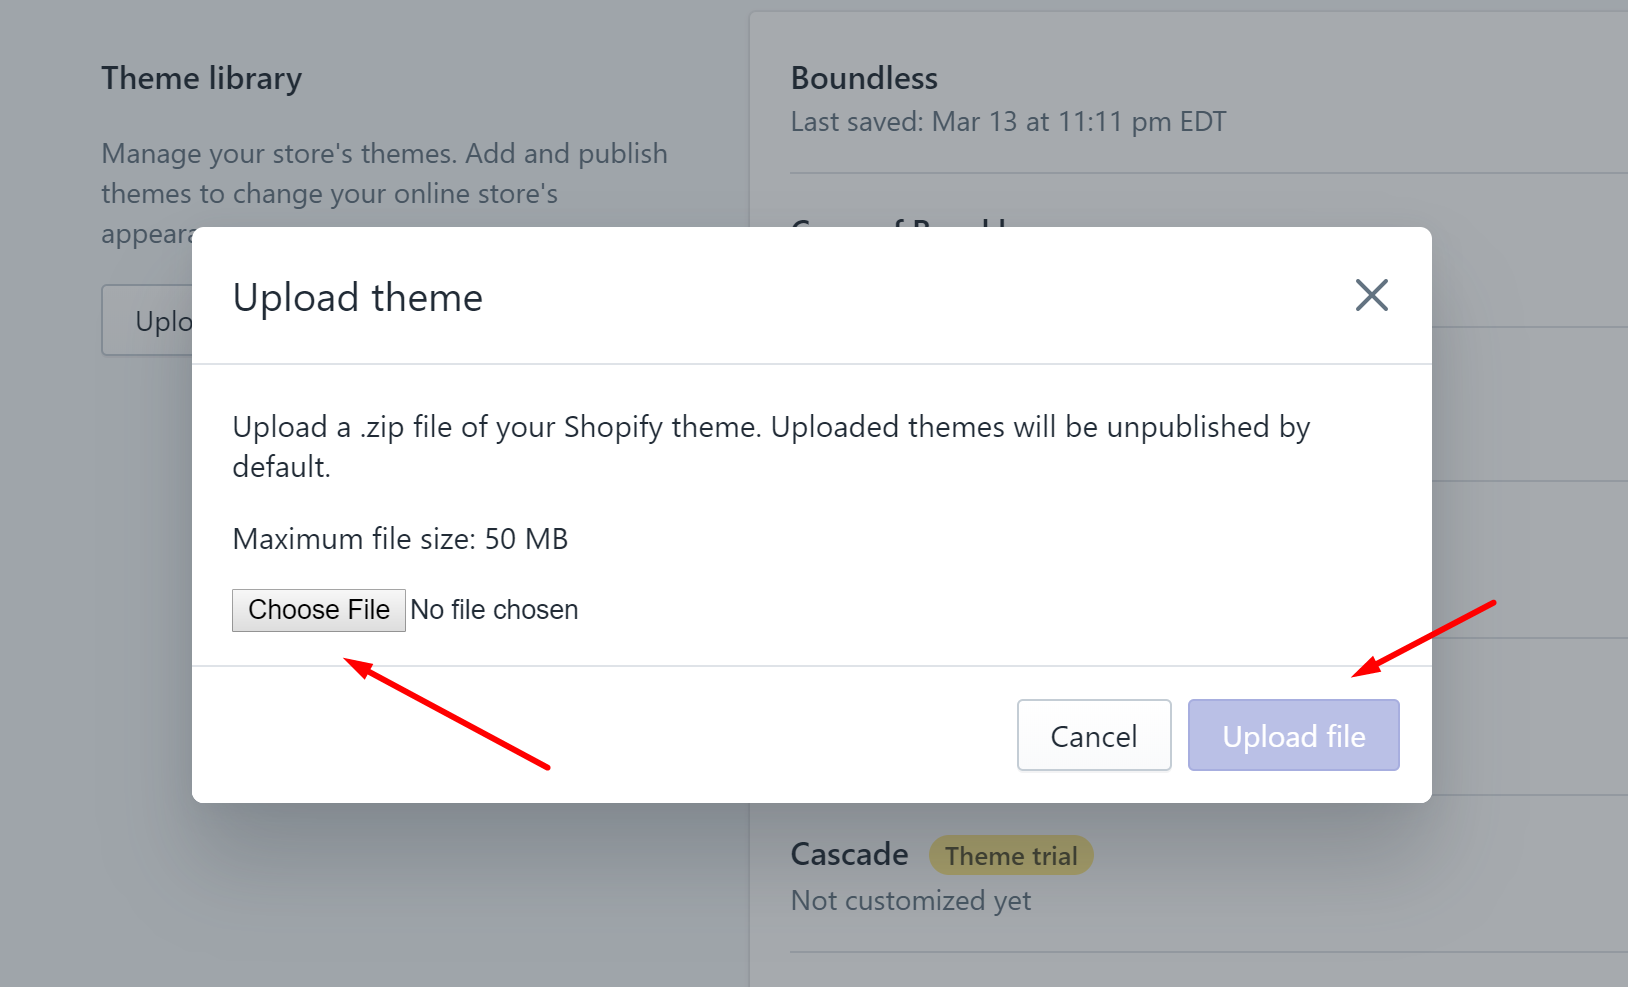
To get your theme uploaded, in your dashboard, go to the Themes window and click the Upload Theme button under the Theme Library.
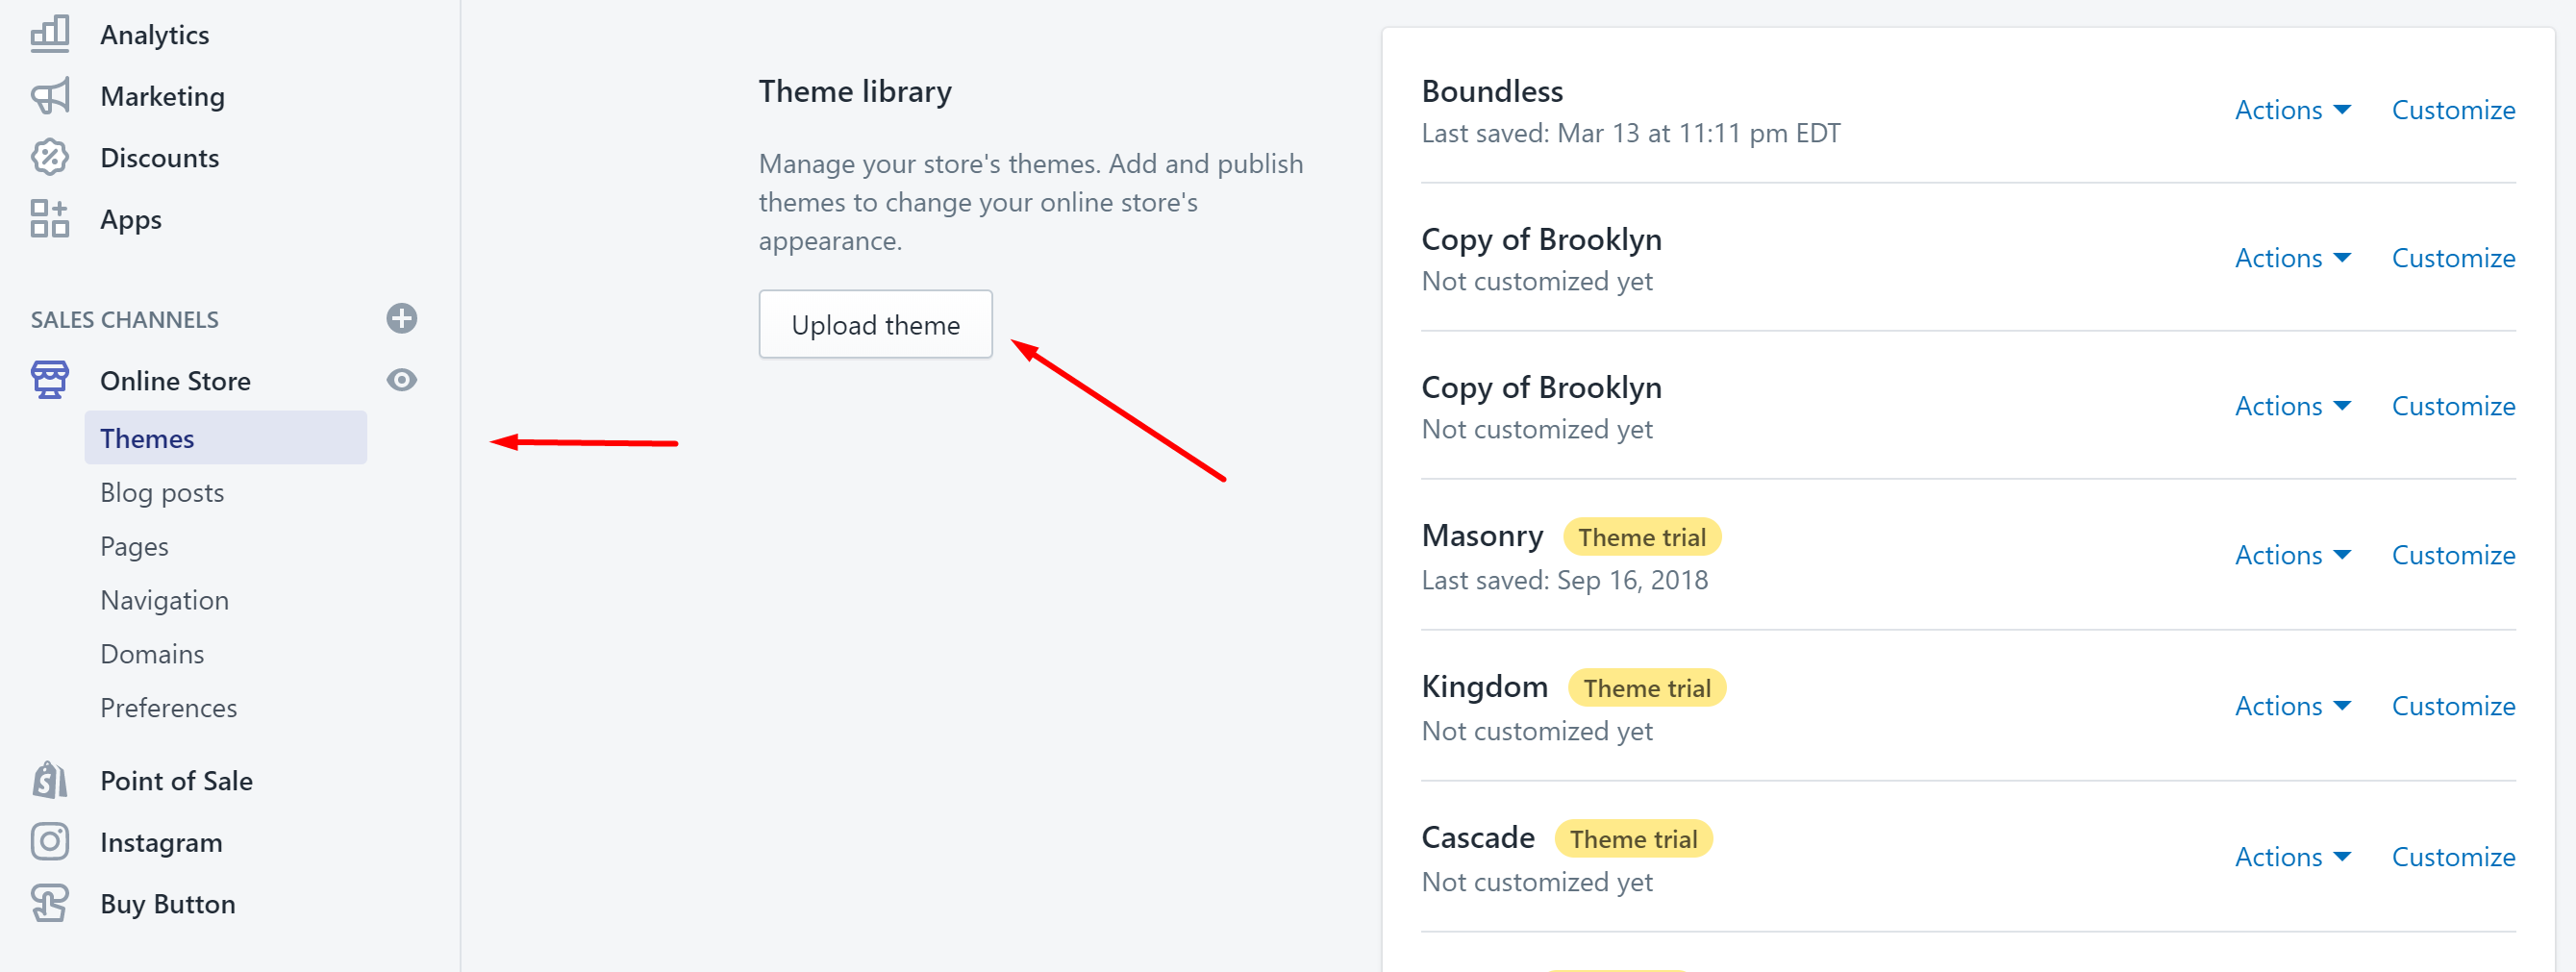
Then a window will pop up immediately asking you to choose the .zip file associated with your theme. The theme will show up in your theme library after being selected and uploaded.
After getting your theme uploaded, you can make it your own. Your currently applied theme will be shown under the Themes segment of your dashboard with its preview look just like this:
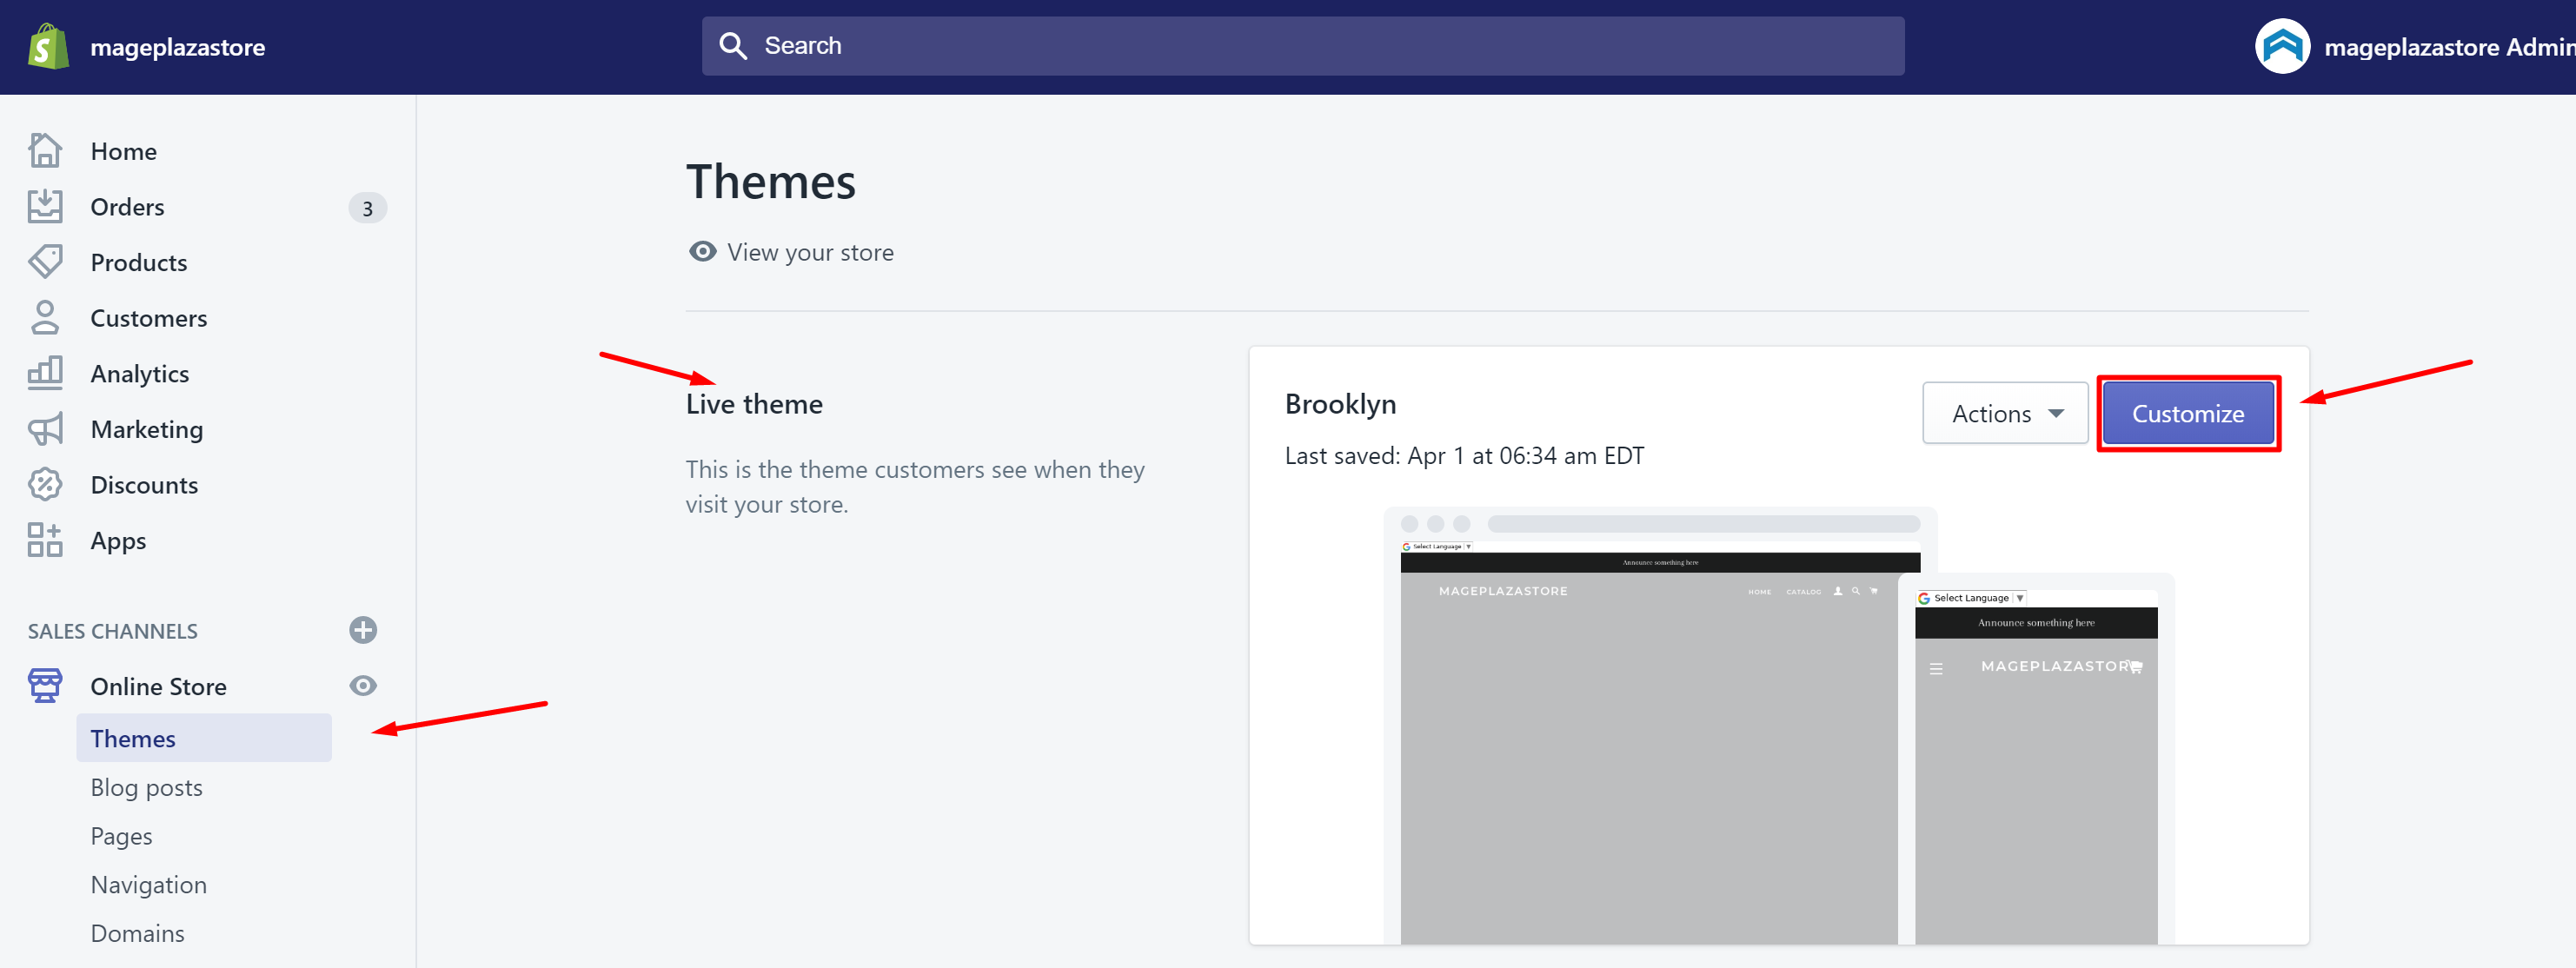
Click on the Customize button when you are ready to get your Shopify theme customized. Then you will see there are 2 approaches that theme customization in Shopify is categorized in: Template Customization & Overall Theme Settings.
Custom Shopify Template
First, there is a drop-down menu located at the top of the Shopify theme customization window. It is for you to select a page template. With that drop-down menu, you are allowed to change each page template’s customization that you have used.
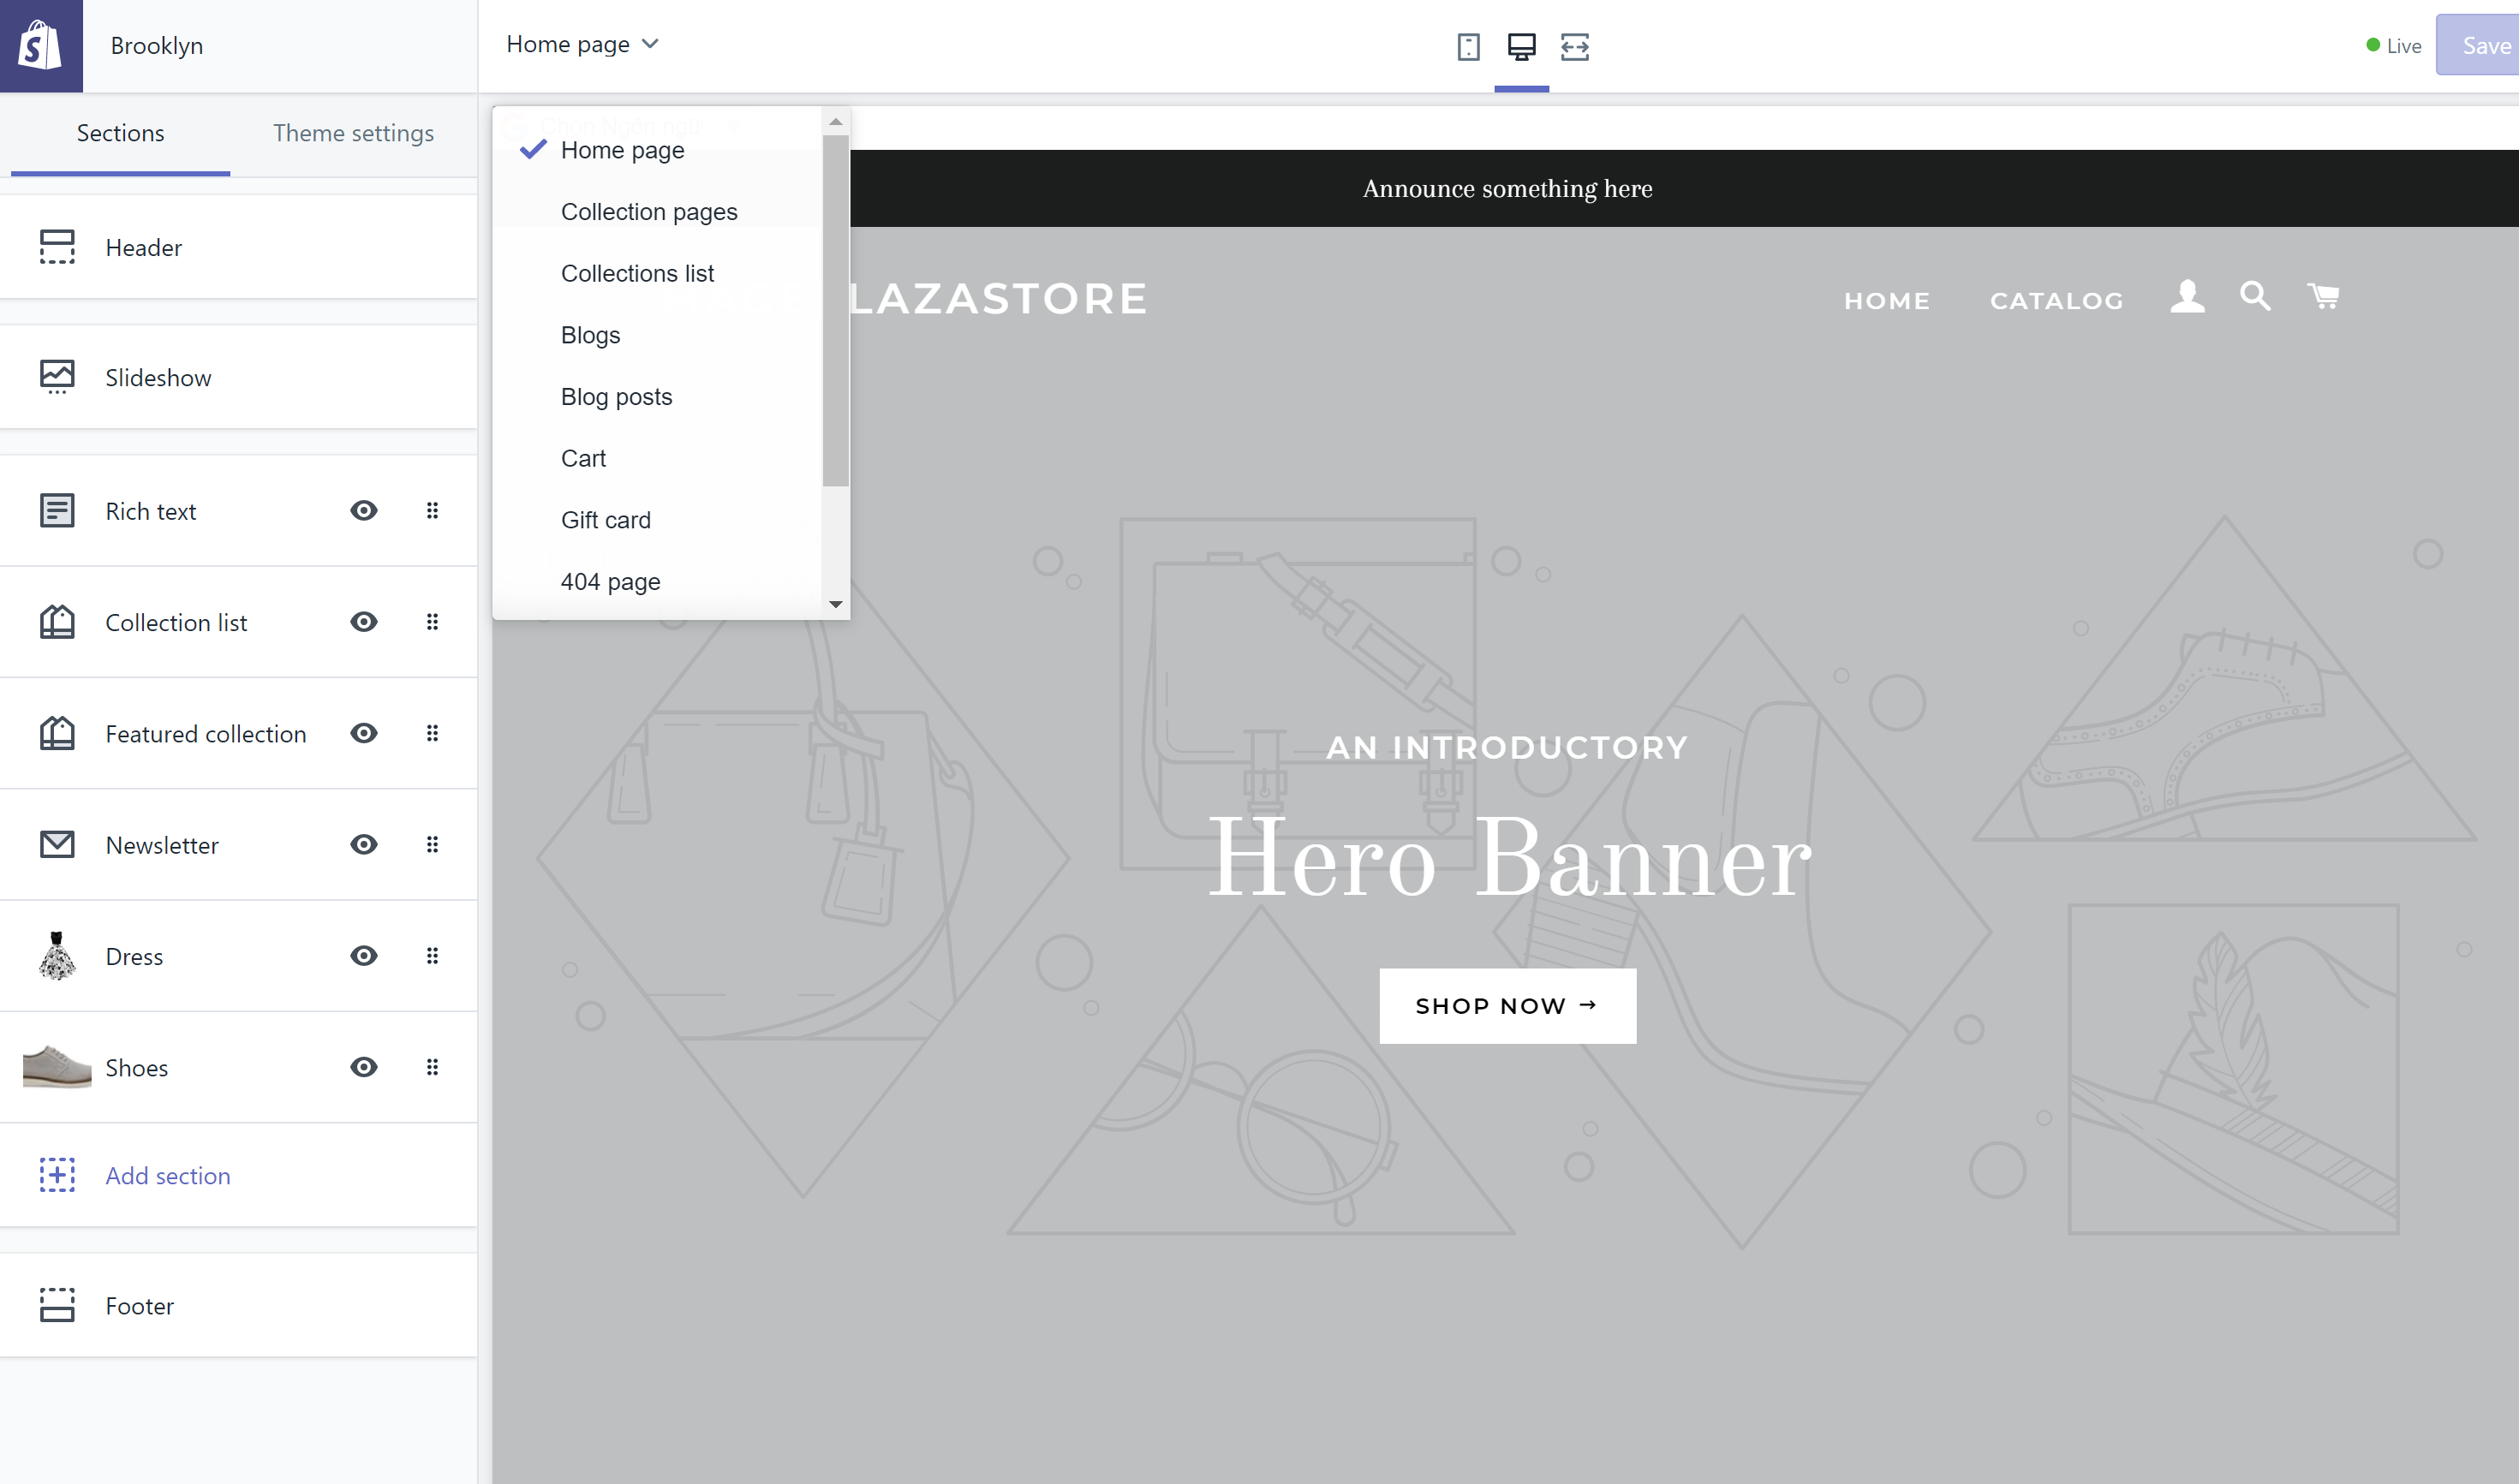
What will be previewed is dependable on what template you have currently selected.
The Sections tab is comprised of many sections, including content modules that are used by your selected page template. You may see you have more or fewer sections than ours, but it’s okay because the fact is that the number of sections varies from page to page.
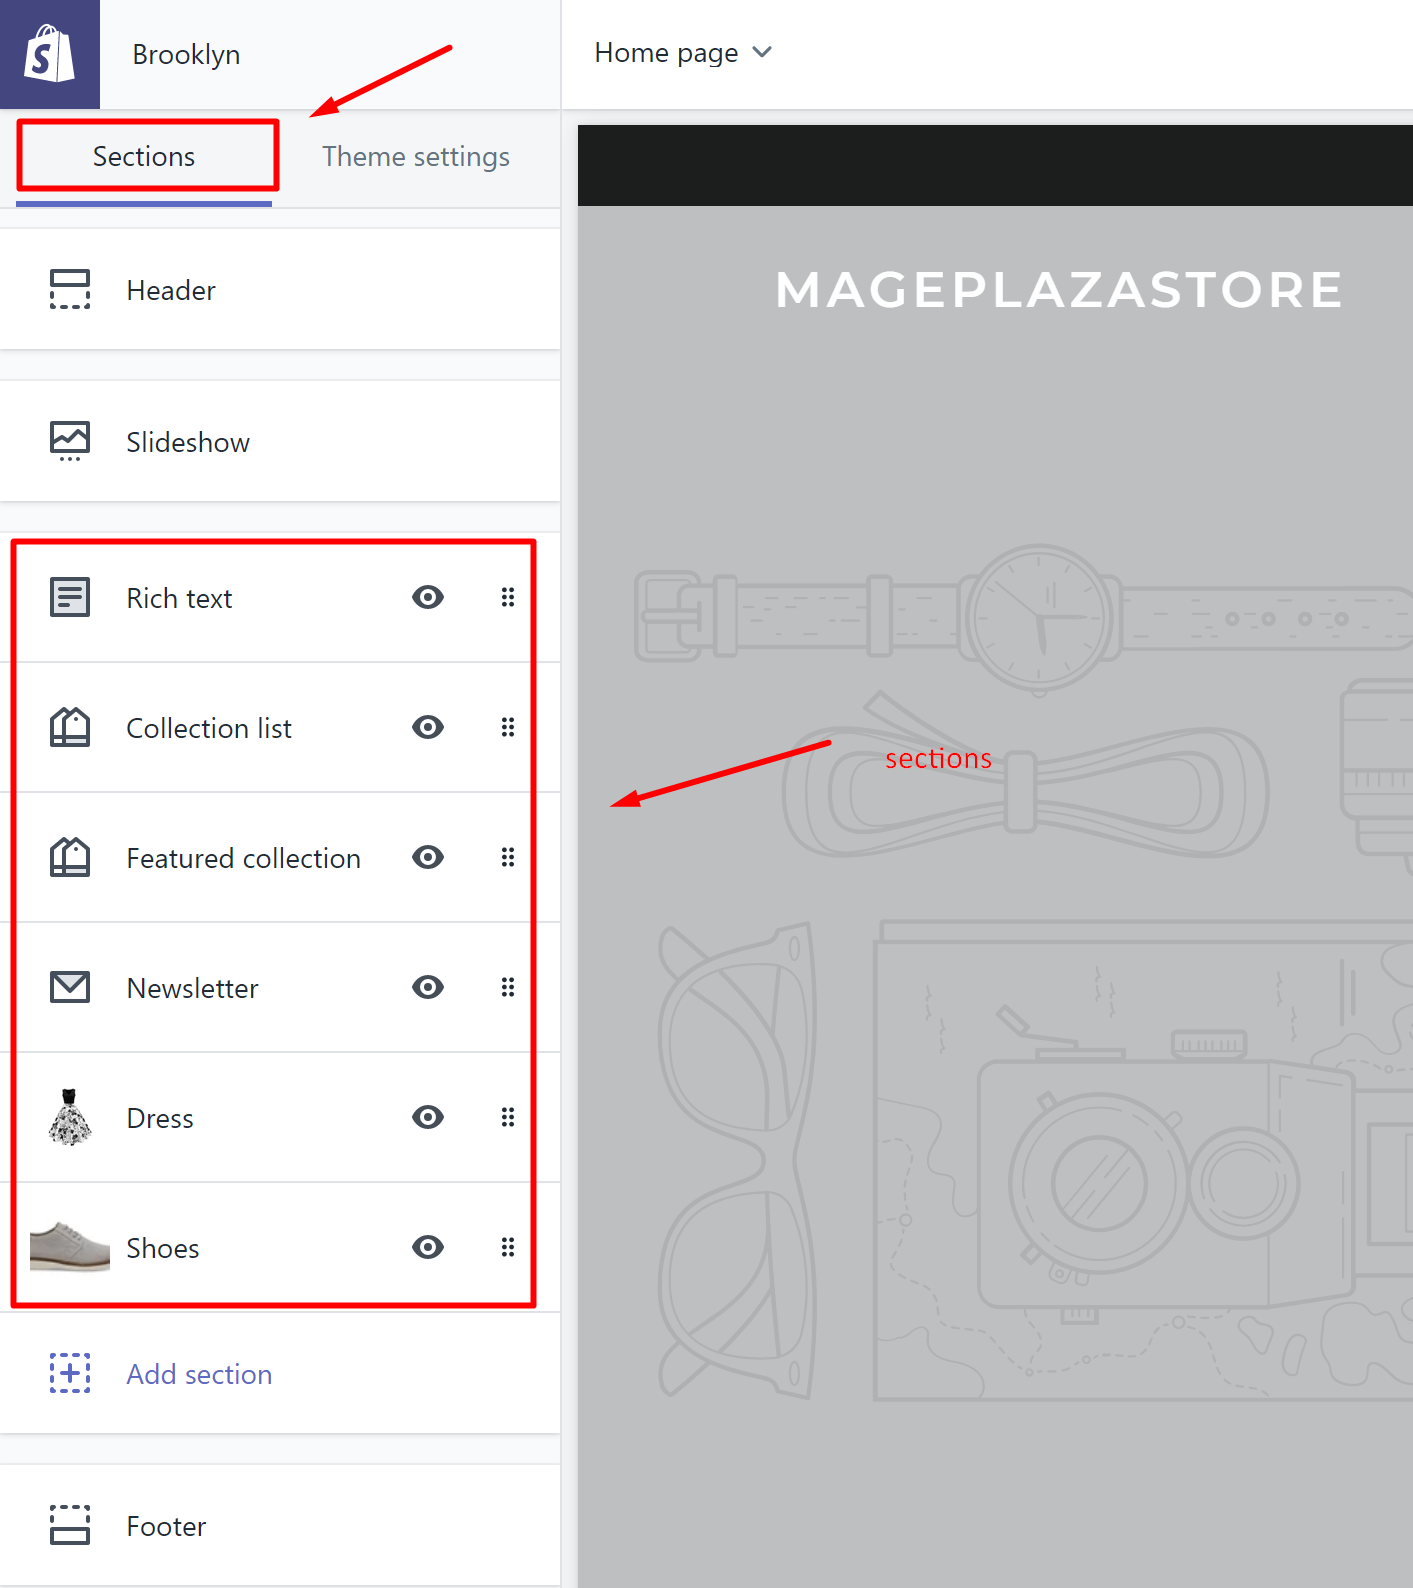
Another note to keep in mind: any changes you make to the theme template will be displayed exactly in all pages using the same template.
Custom Shopify theme settings
Customizing Sections settings
Customize Page header
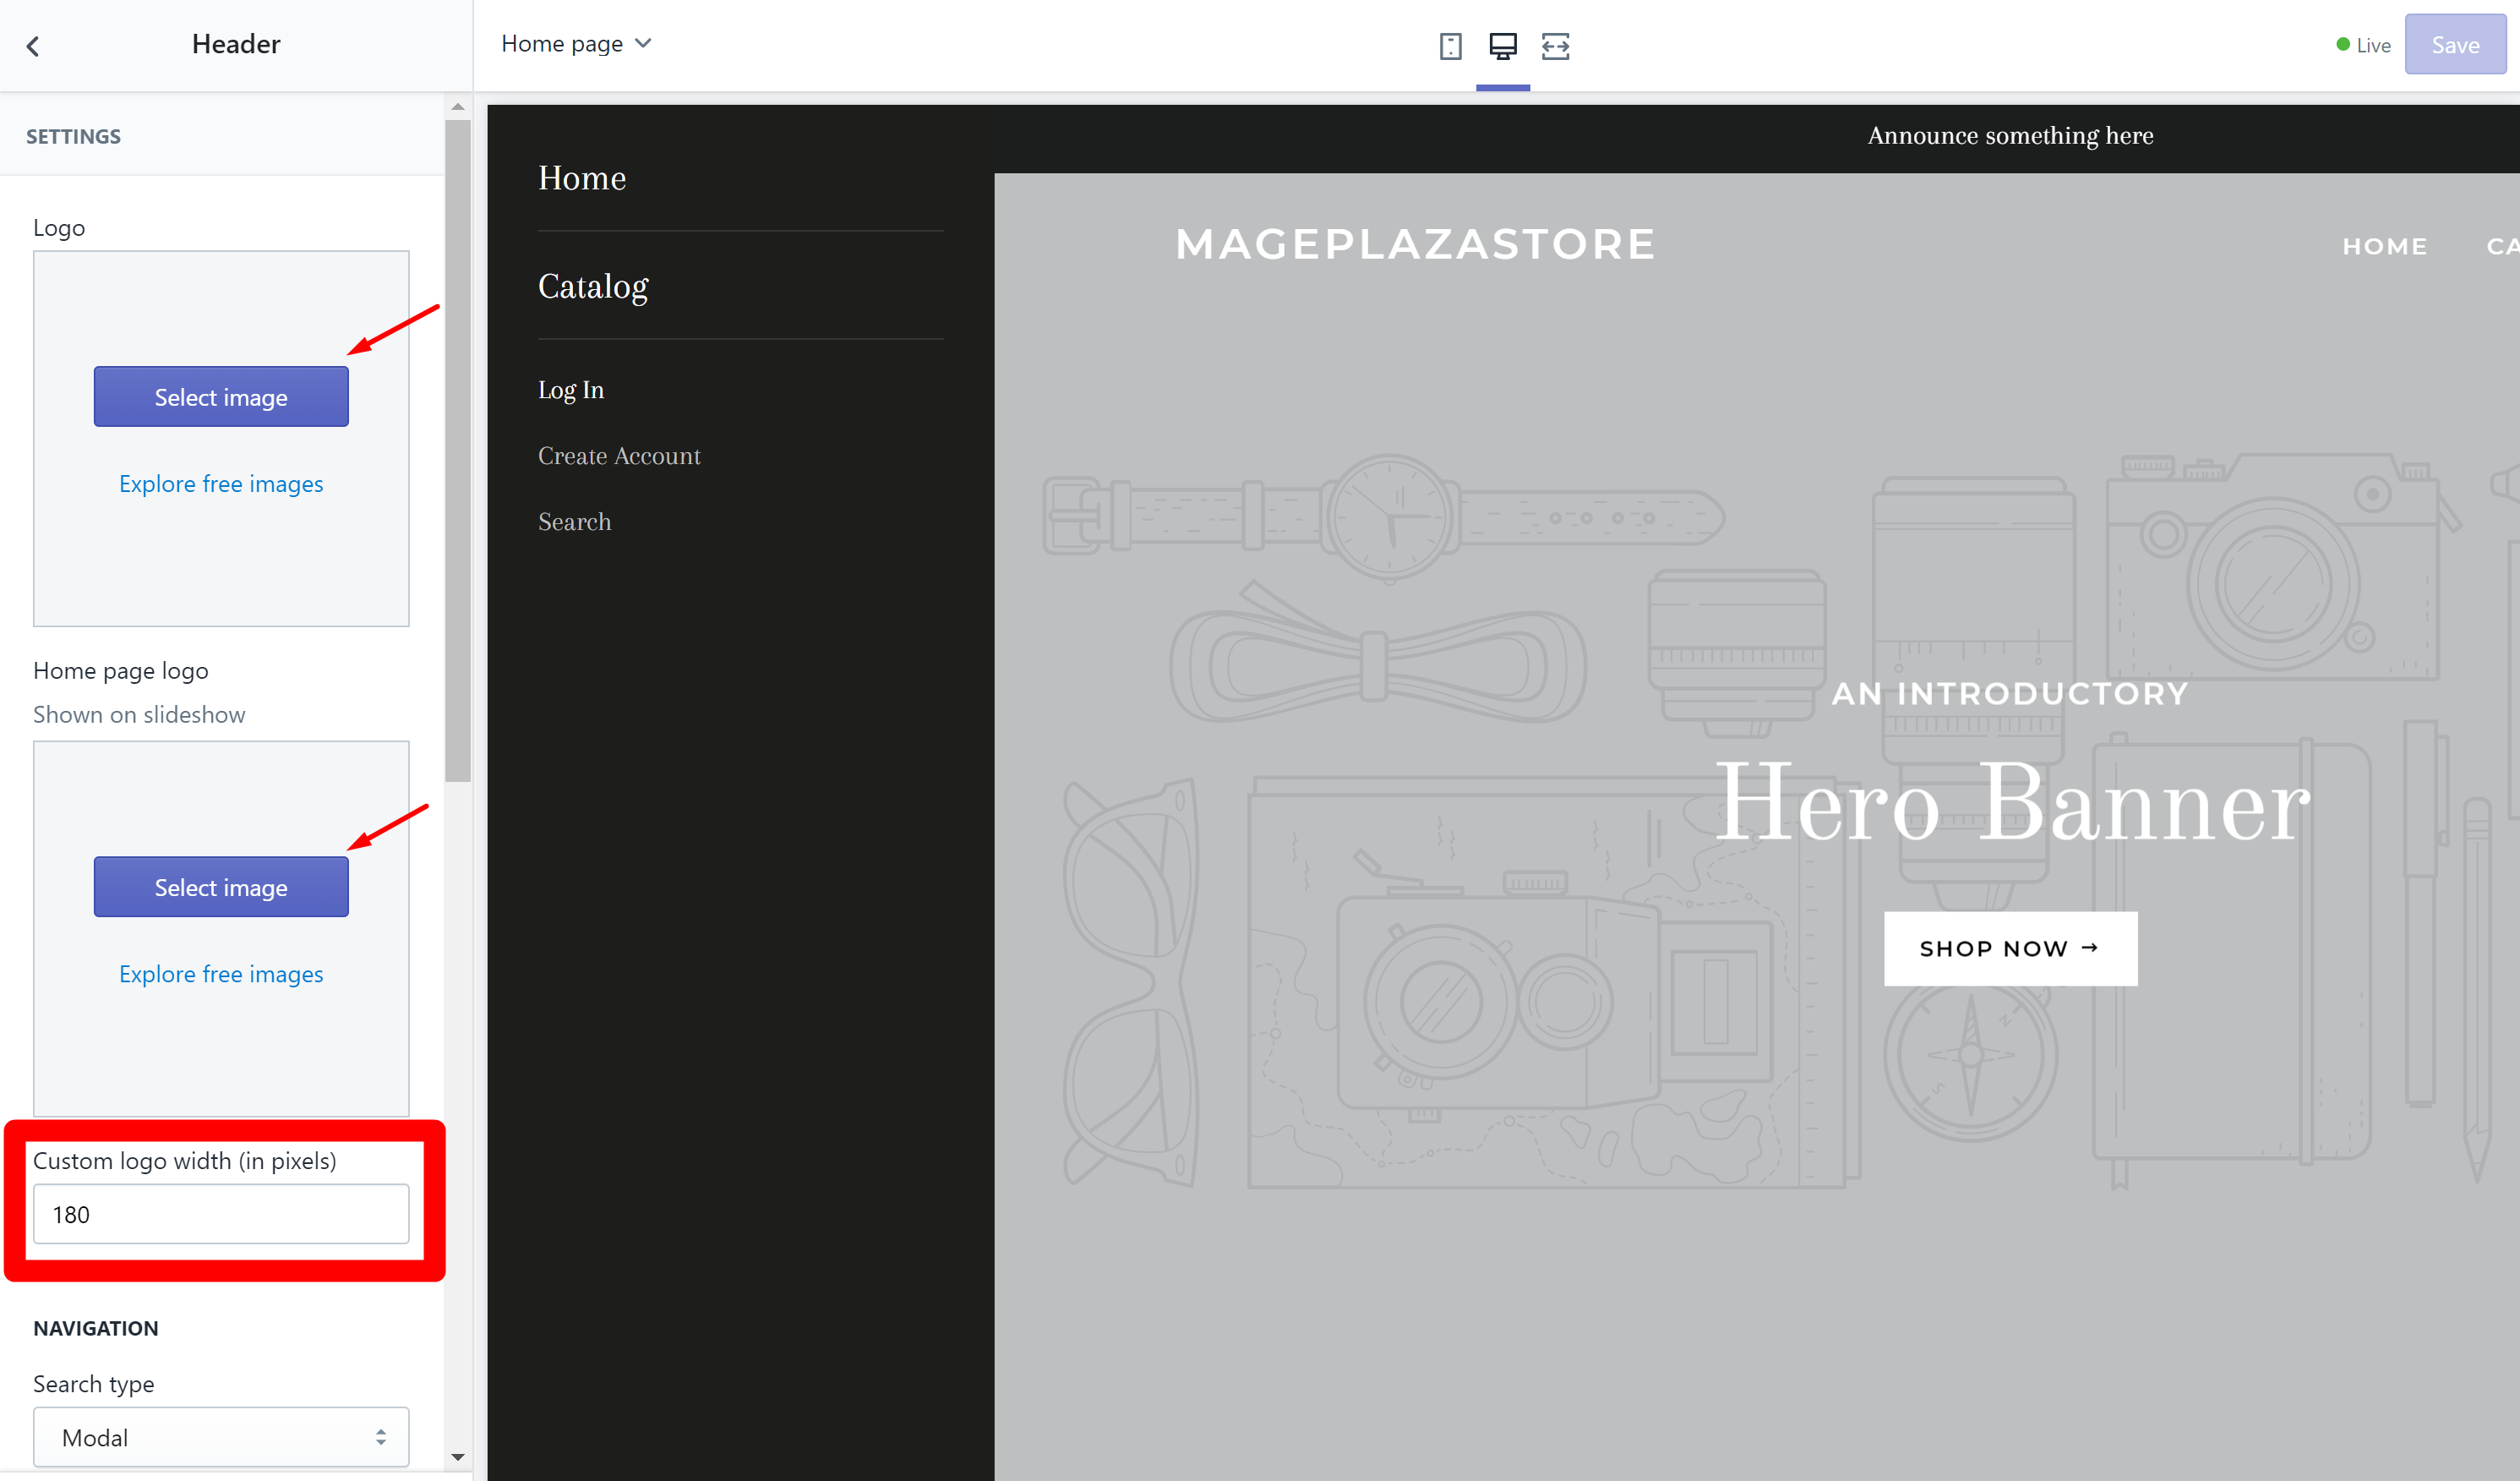
A number of options are included in the Header section. You are able to make any changes to the look of it to capture visitors’ attention at first sight.
Upload your Logo and modify the way it looks on your website now. You can align it to the center place and custom the width of it. Also, the change you make is automatically applied to all pages your visitors are on, so don’t worry it would take your time.
Customize Page Footer
Similar to what you have known about Page Header customization, any Footer customizations you make will be displayed sitewide.
For instance, you are allowed to customize which quick links are displayed, take control over the content, and modify things about newsletter within the footer in the Debut theme.
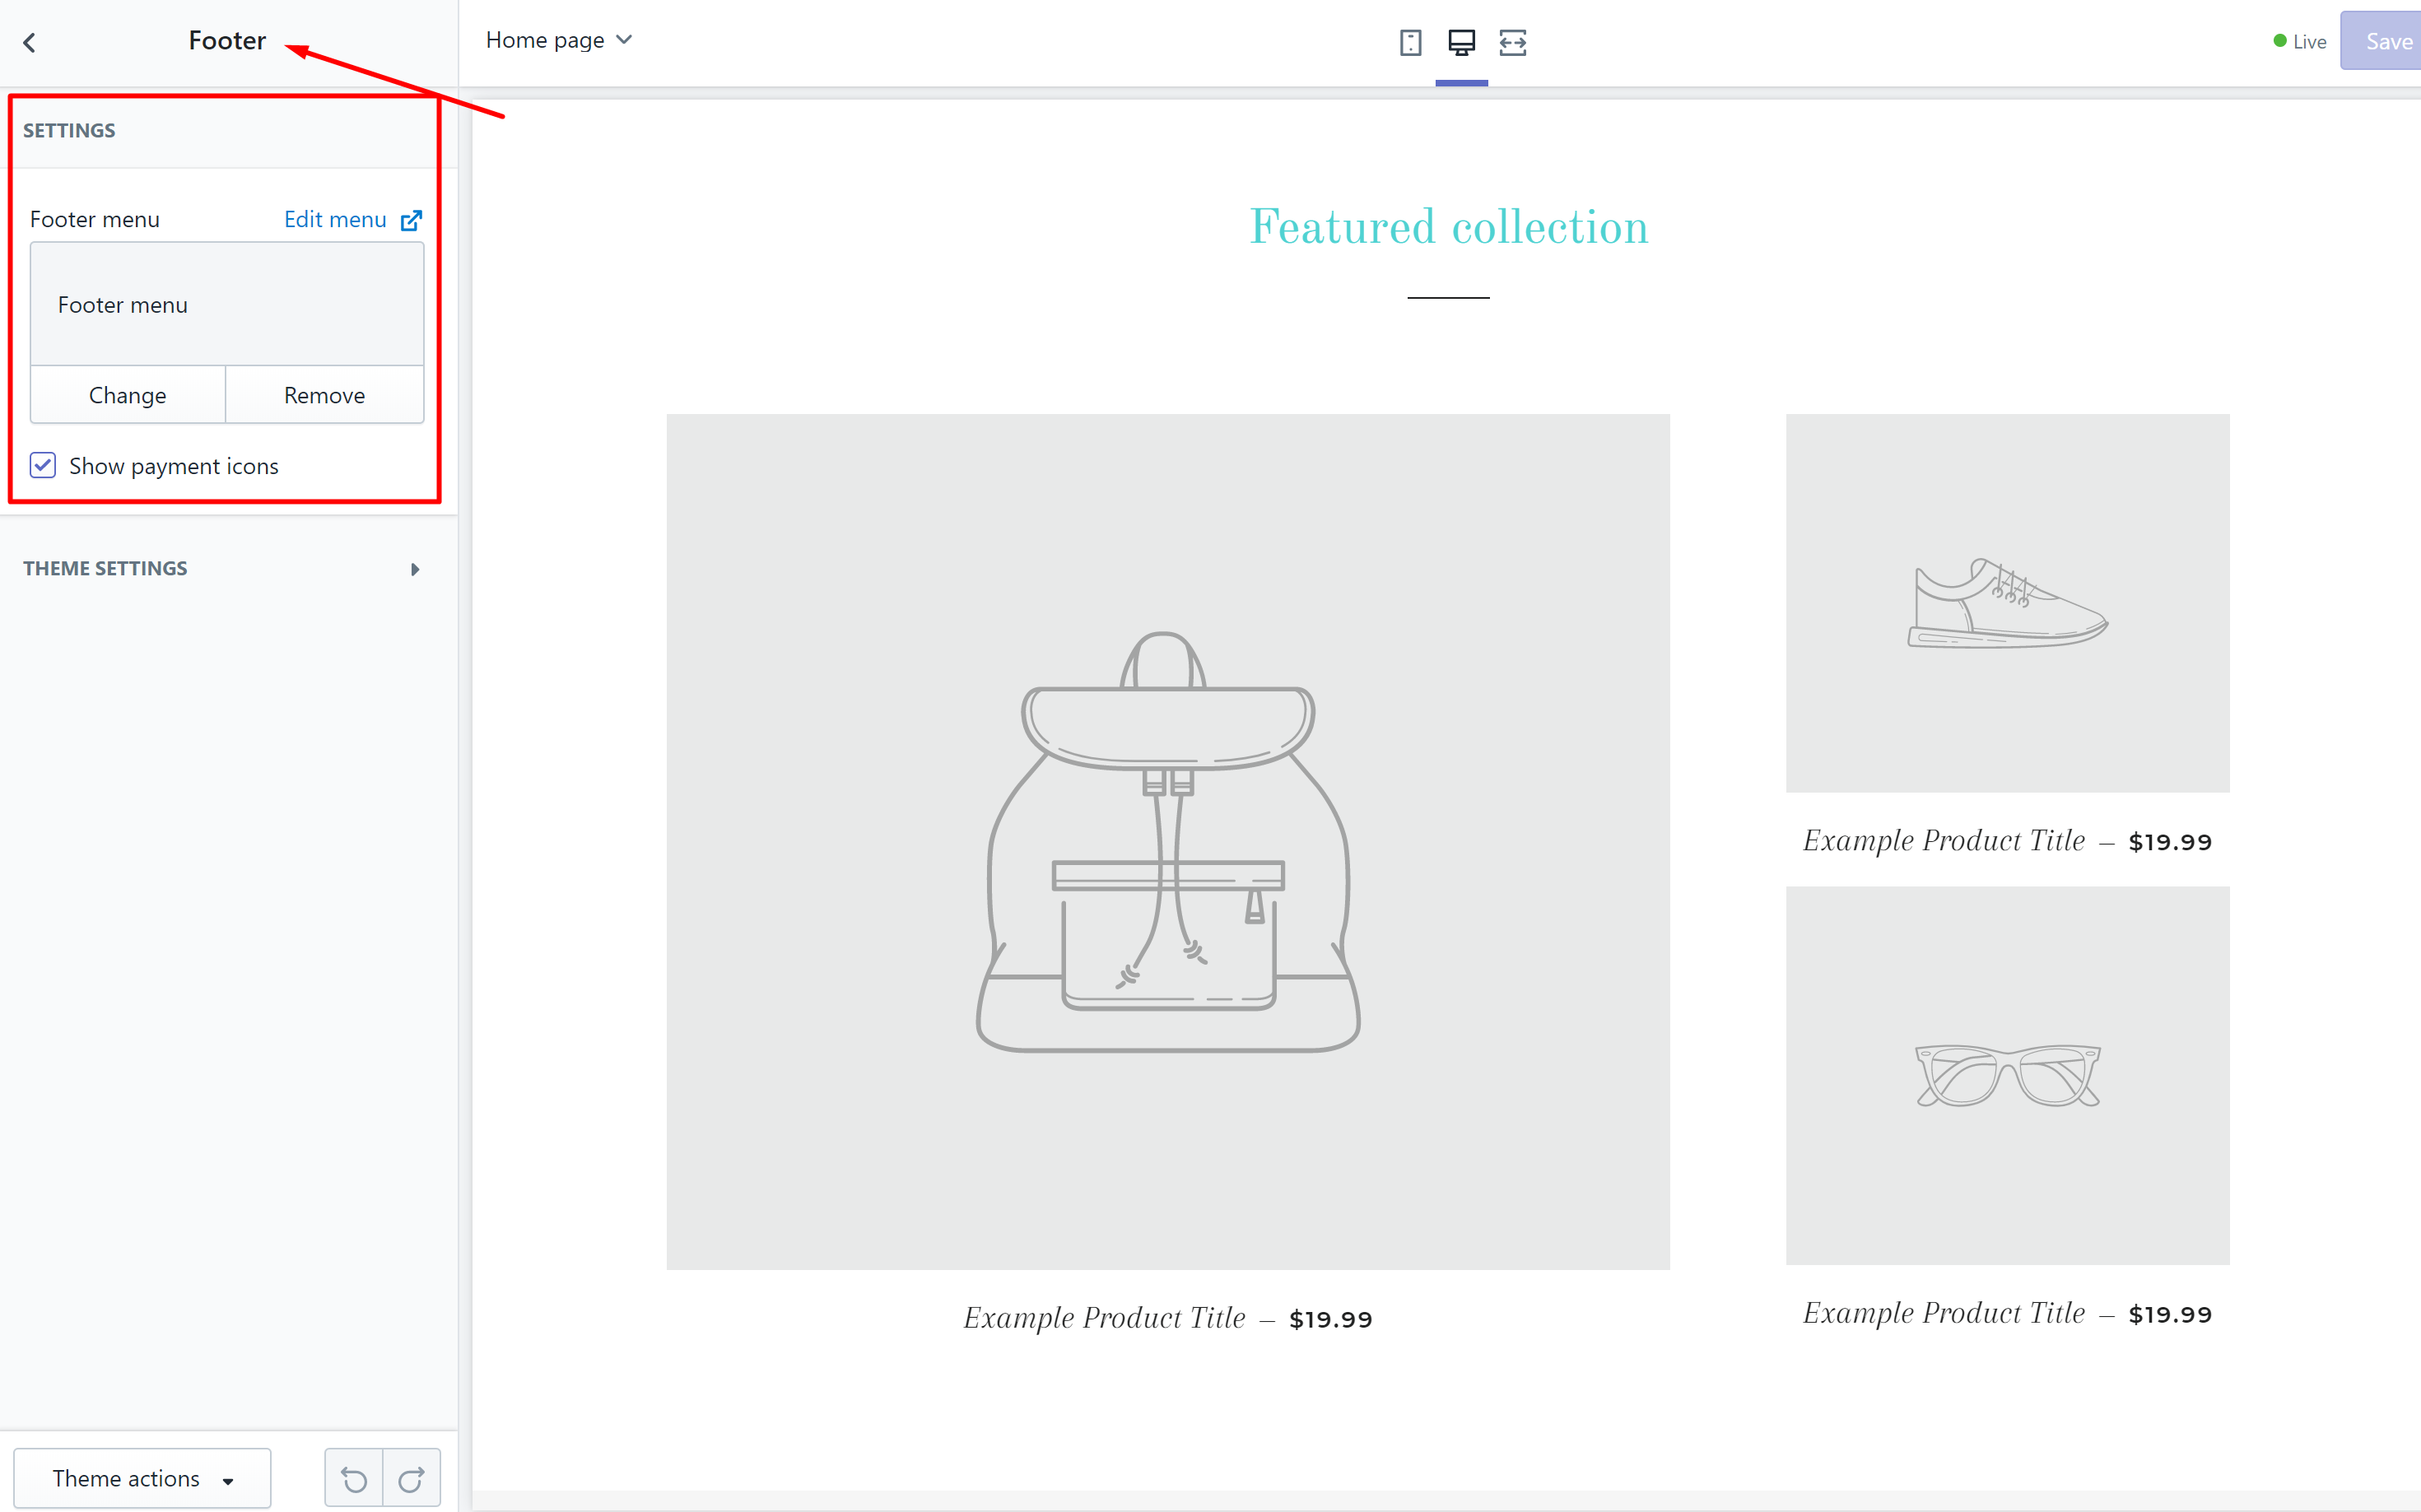
If you want to expand what your footer includes, feel free to add more content!
Modifying individual sections
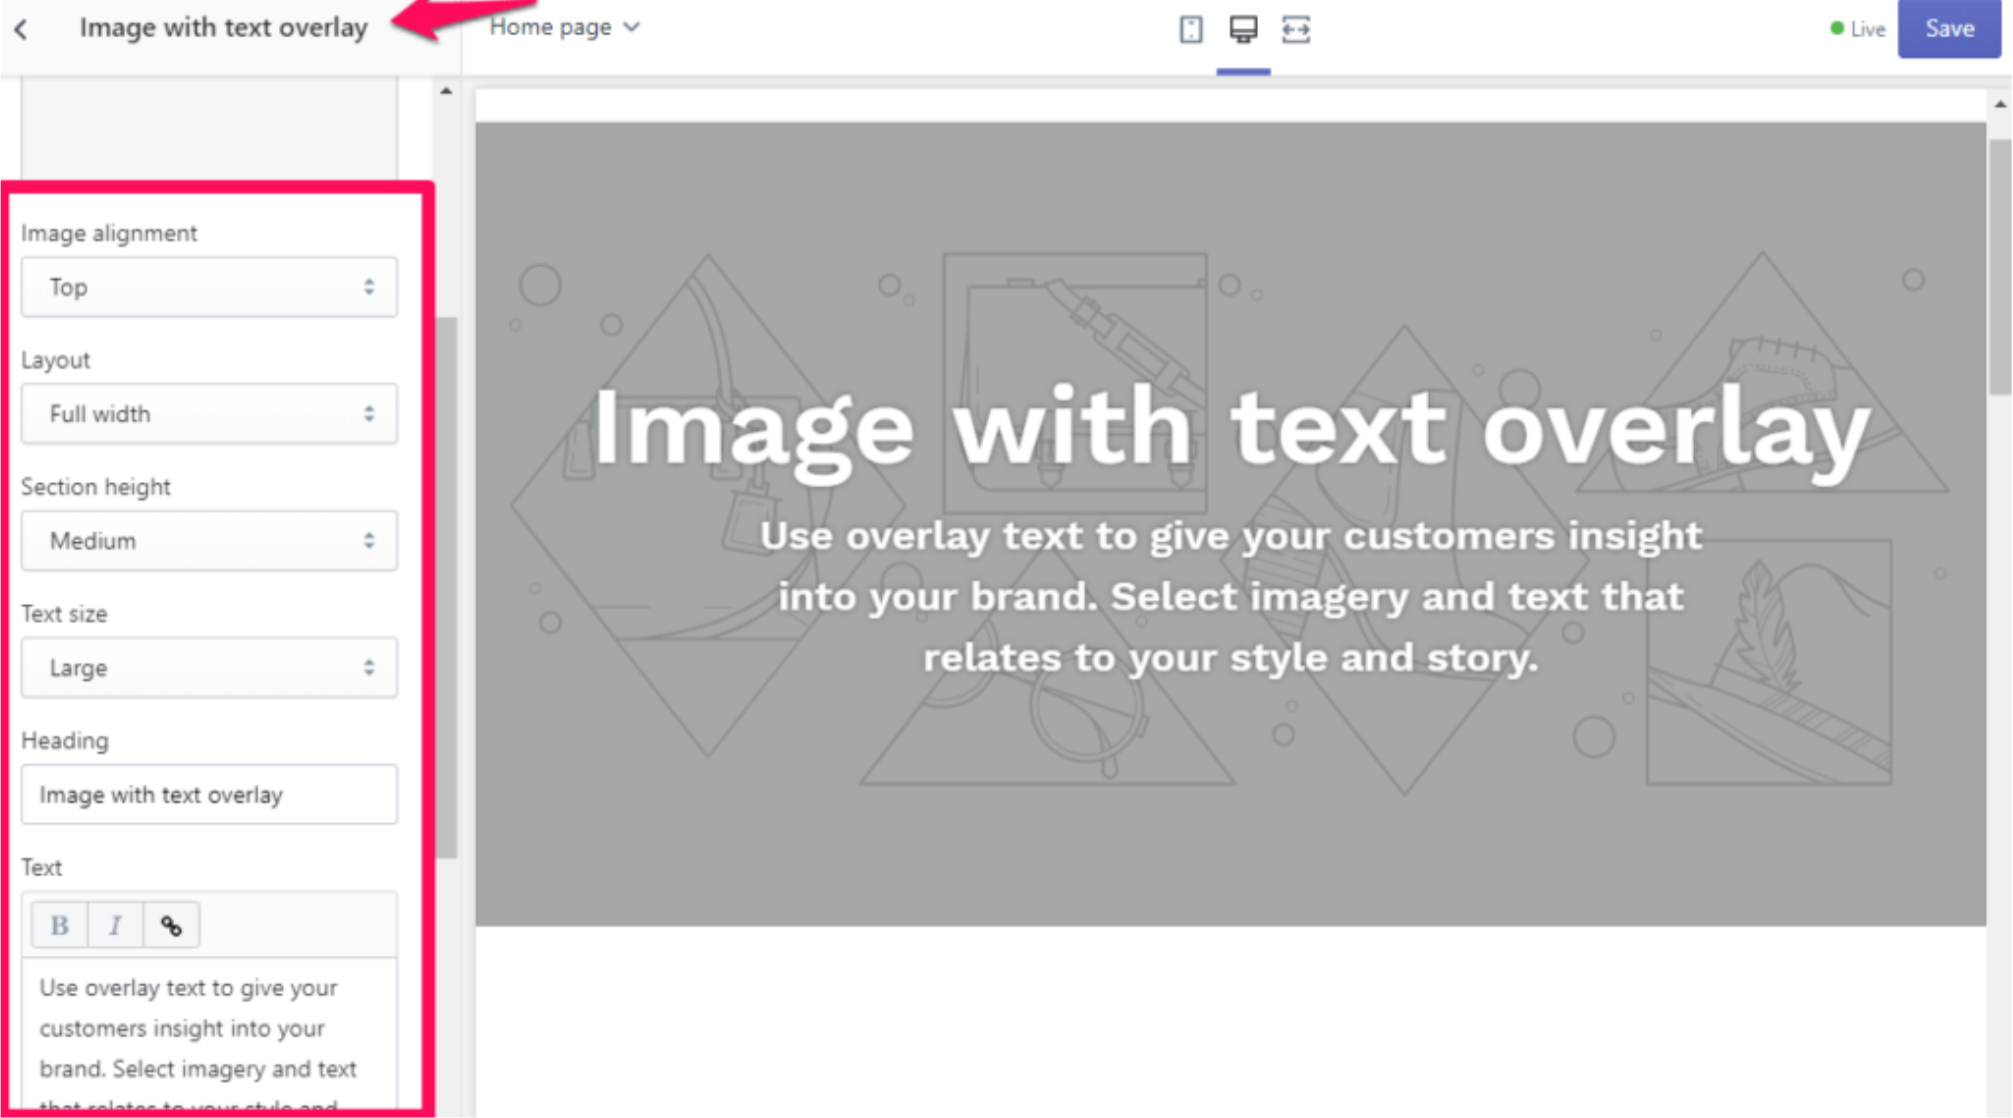
It is possible for you to customize each section in the page template you currently selected (just by clicking on that section). The preview will scroll to show the section you are editing when you click into any section. Depending on the section you have chosen, options will vary. For instance, you will have options to adjust alignment (left, right, or center), text size, layout, text, and many more.
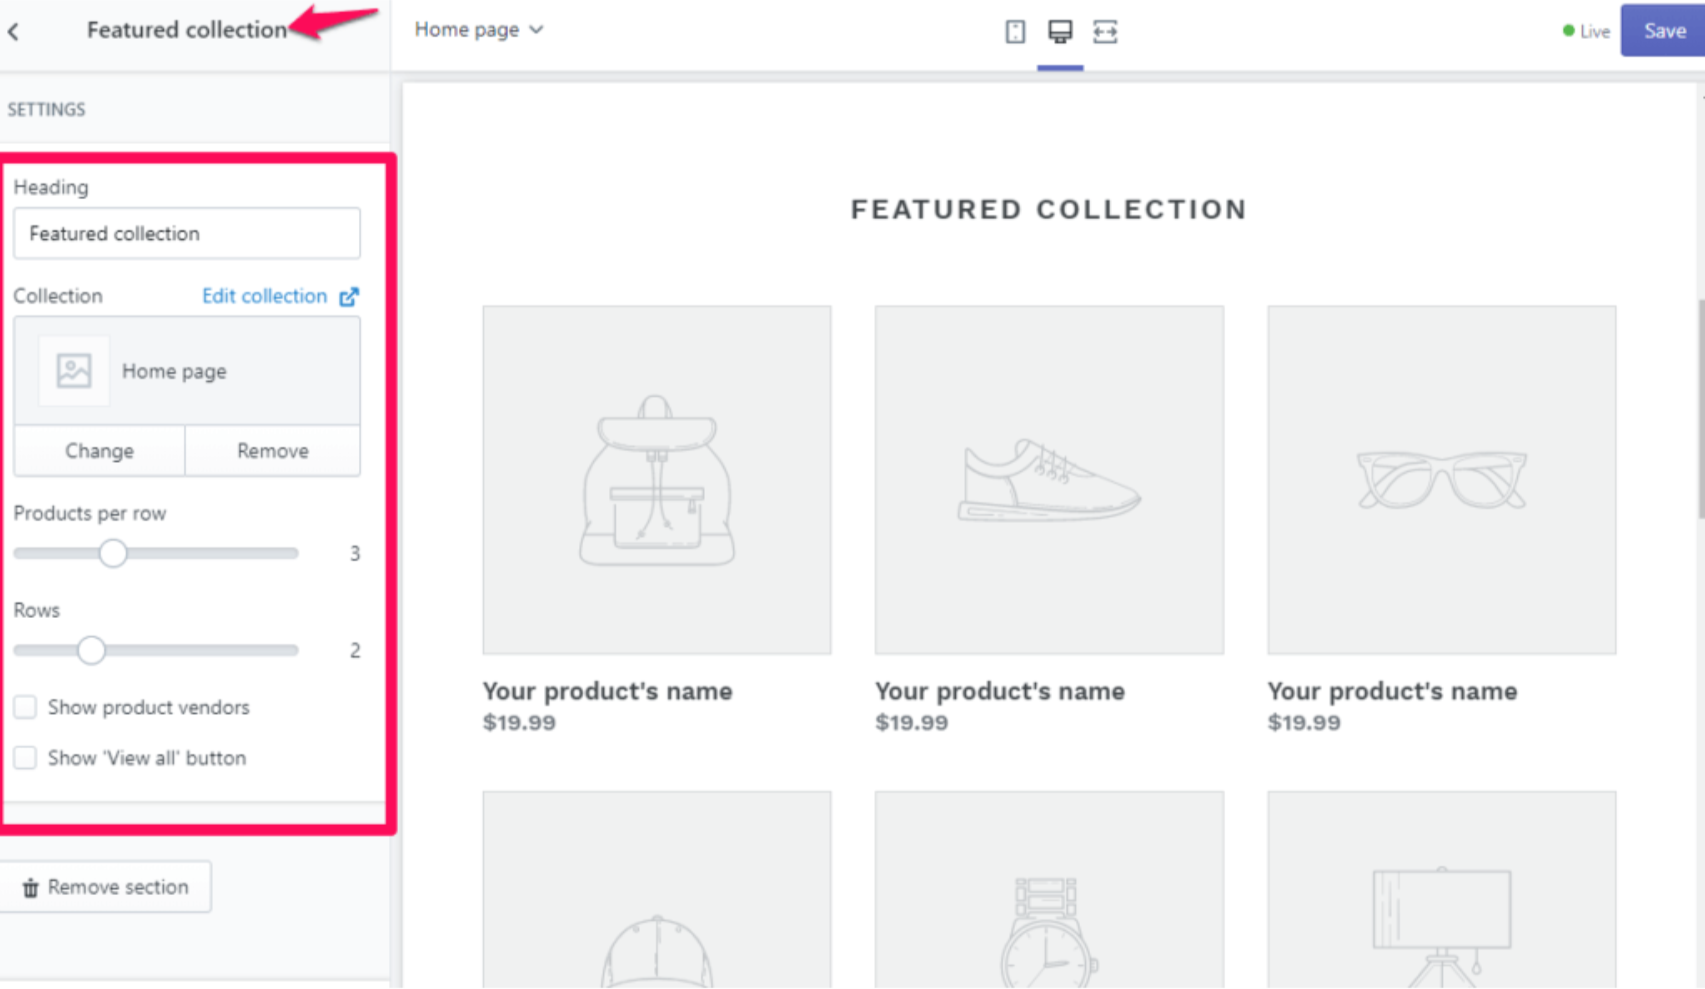
However, the Featured Collection section includes a lot of options to modify the way your product collections will be displayed on the website.
Add a section to theme?
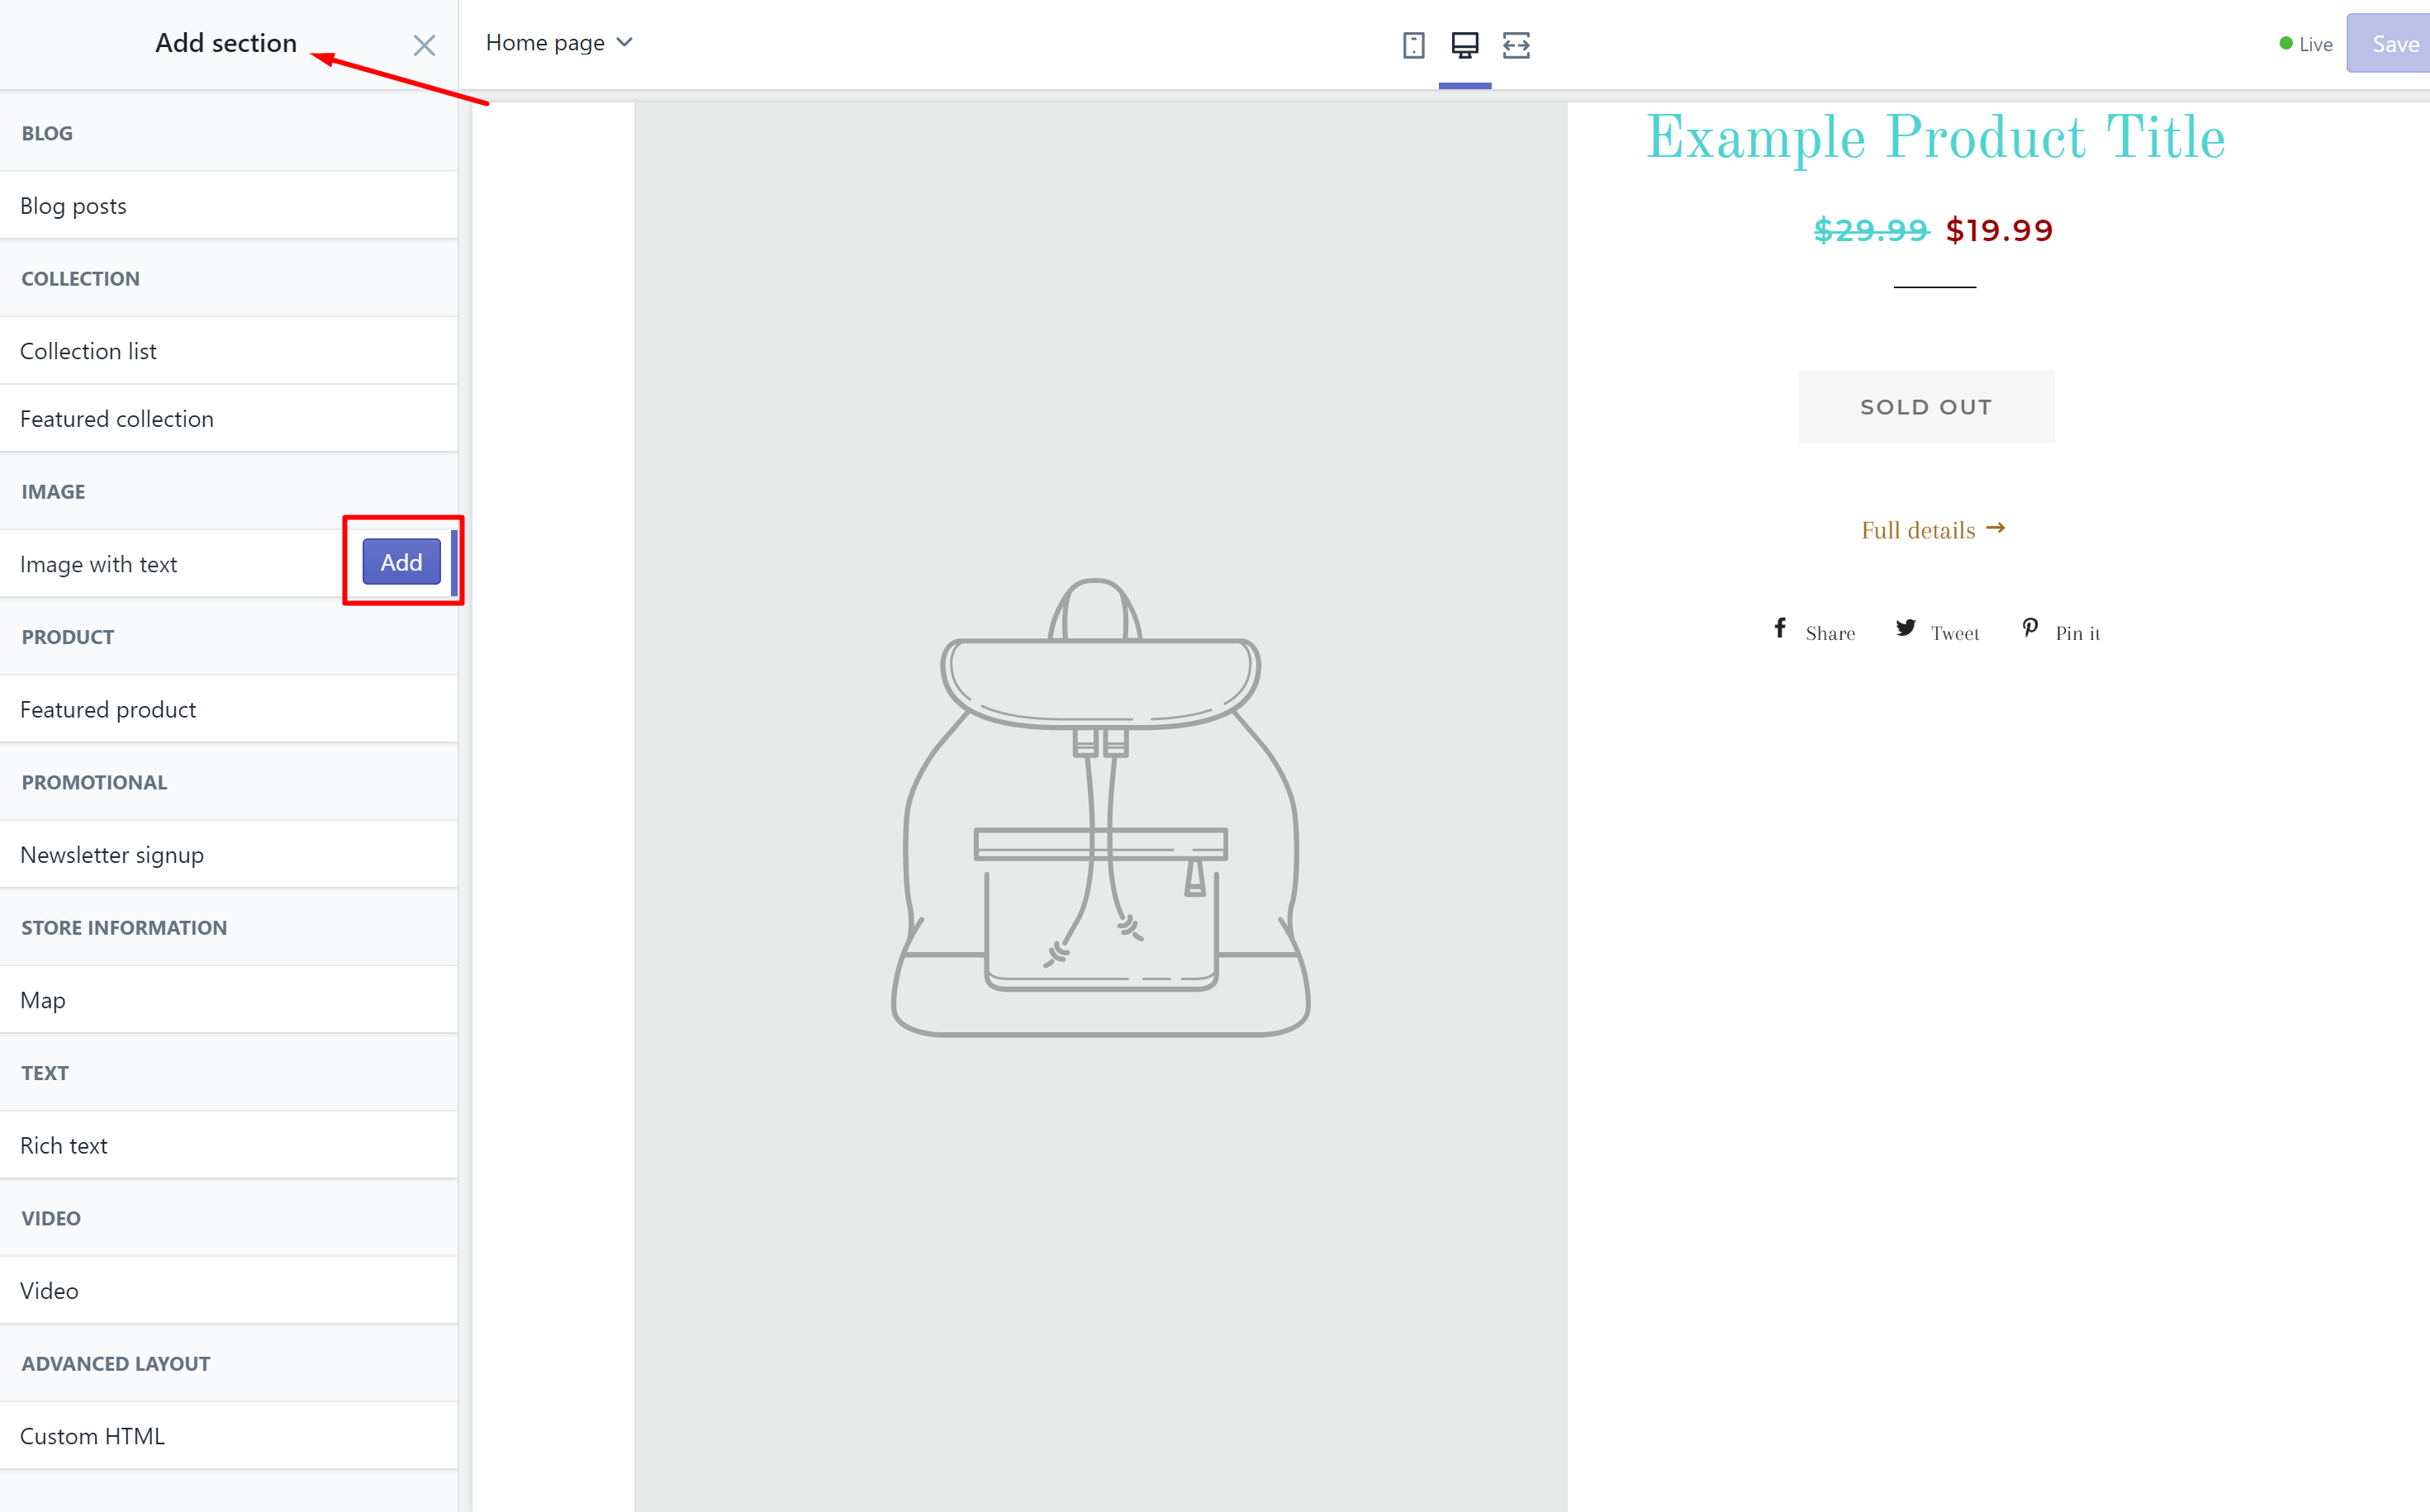
Everybody does want to add a lot of necessary content to a page template, so the Add Section button is what you need if you desire the same thing. More into detail, that button will let you enlarge the content which is displayed in the template. Click and you will see a list of content modules that are all available and ready to be added to the currently selected template.
If you want to know how that section will look like, you can click into any sections that are available then it will be added into the preview. The Add button is to add that section to the page template if you feel okay with it.
How to rearrange a section
Sections will be ordered automatically by Shopify once they are added. According to it, the new section will be at the bottom of the section list. However, you are allowed to re-order those sections by dragging the six-dot icon on the right side of every section and drop it in the place that you want.
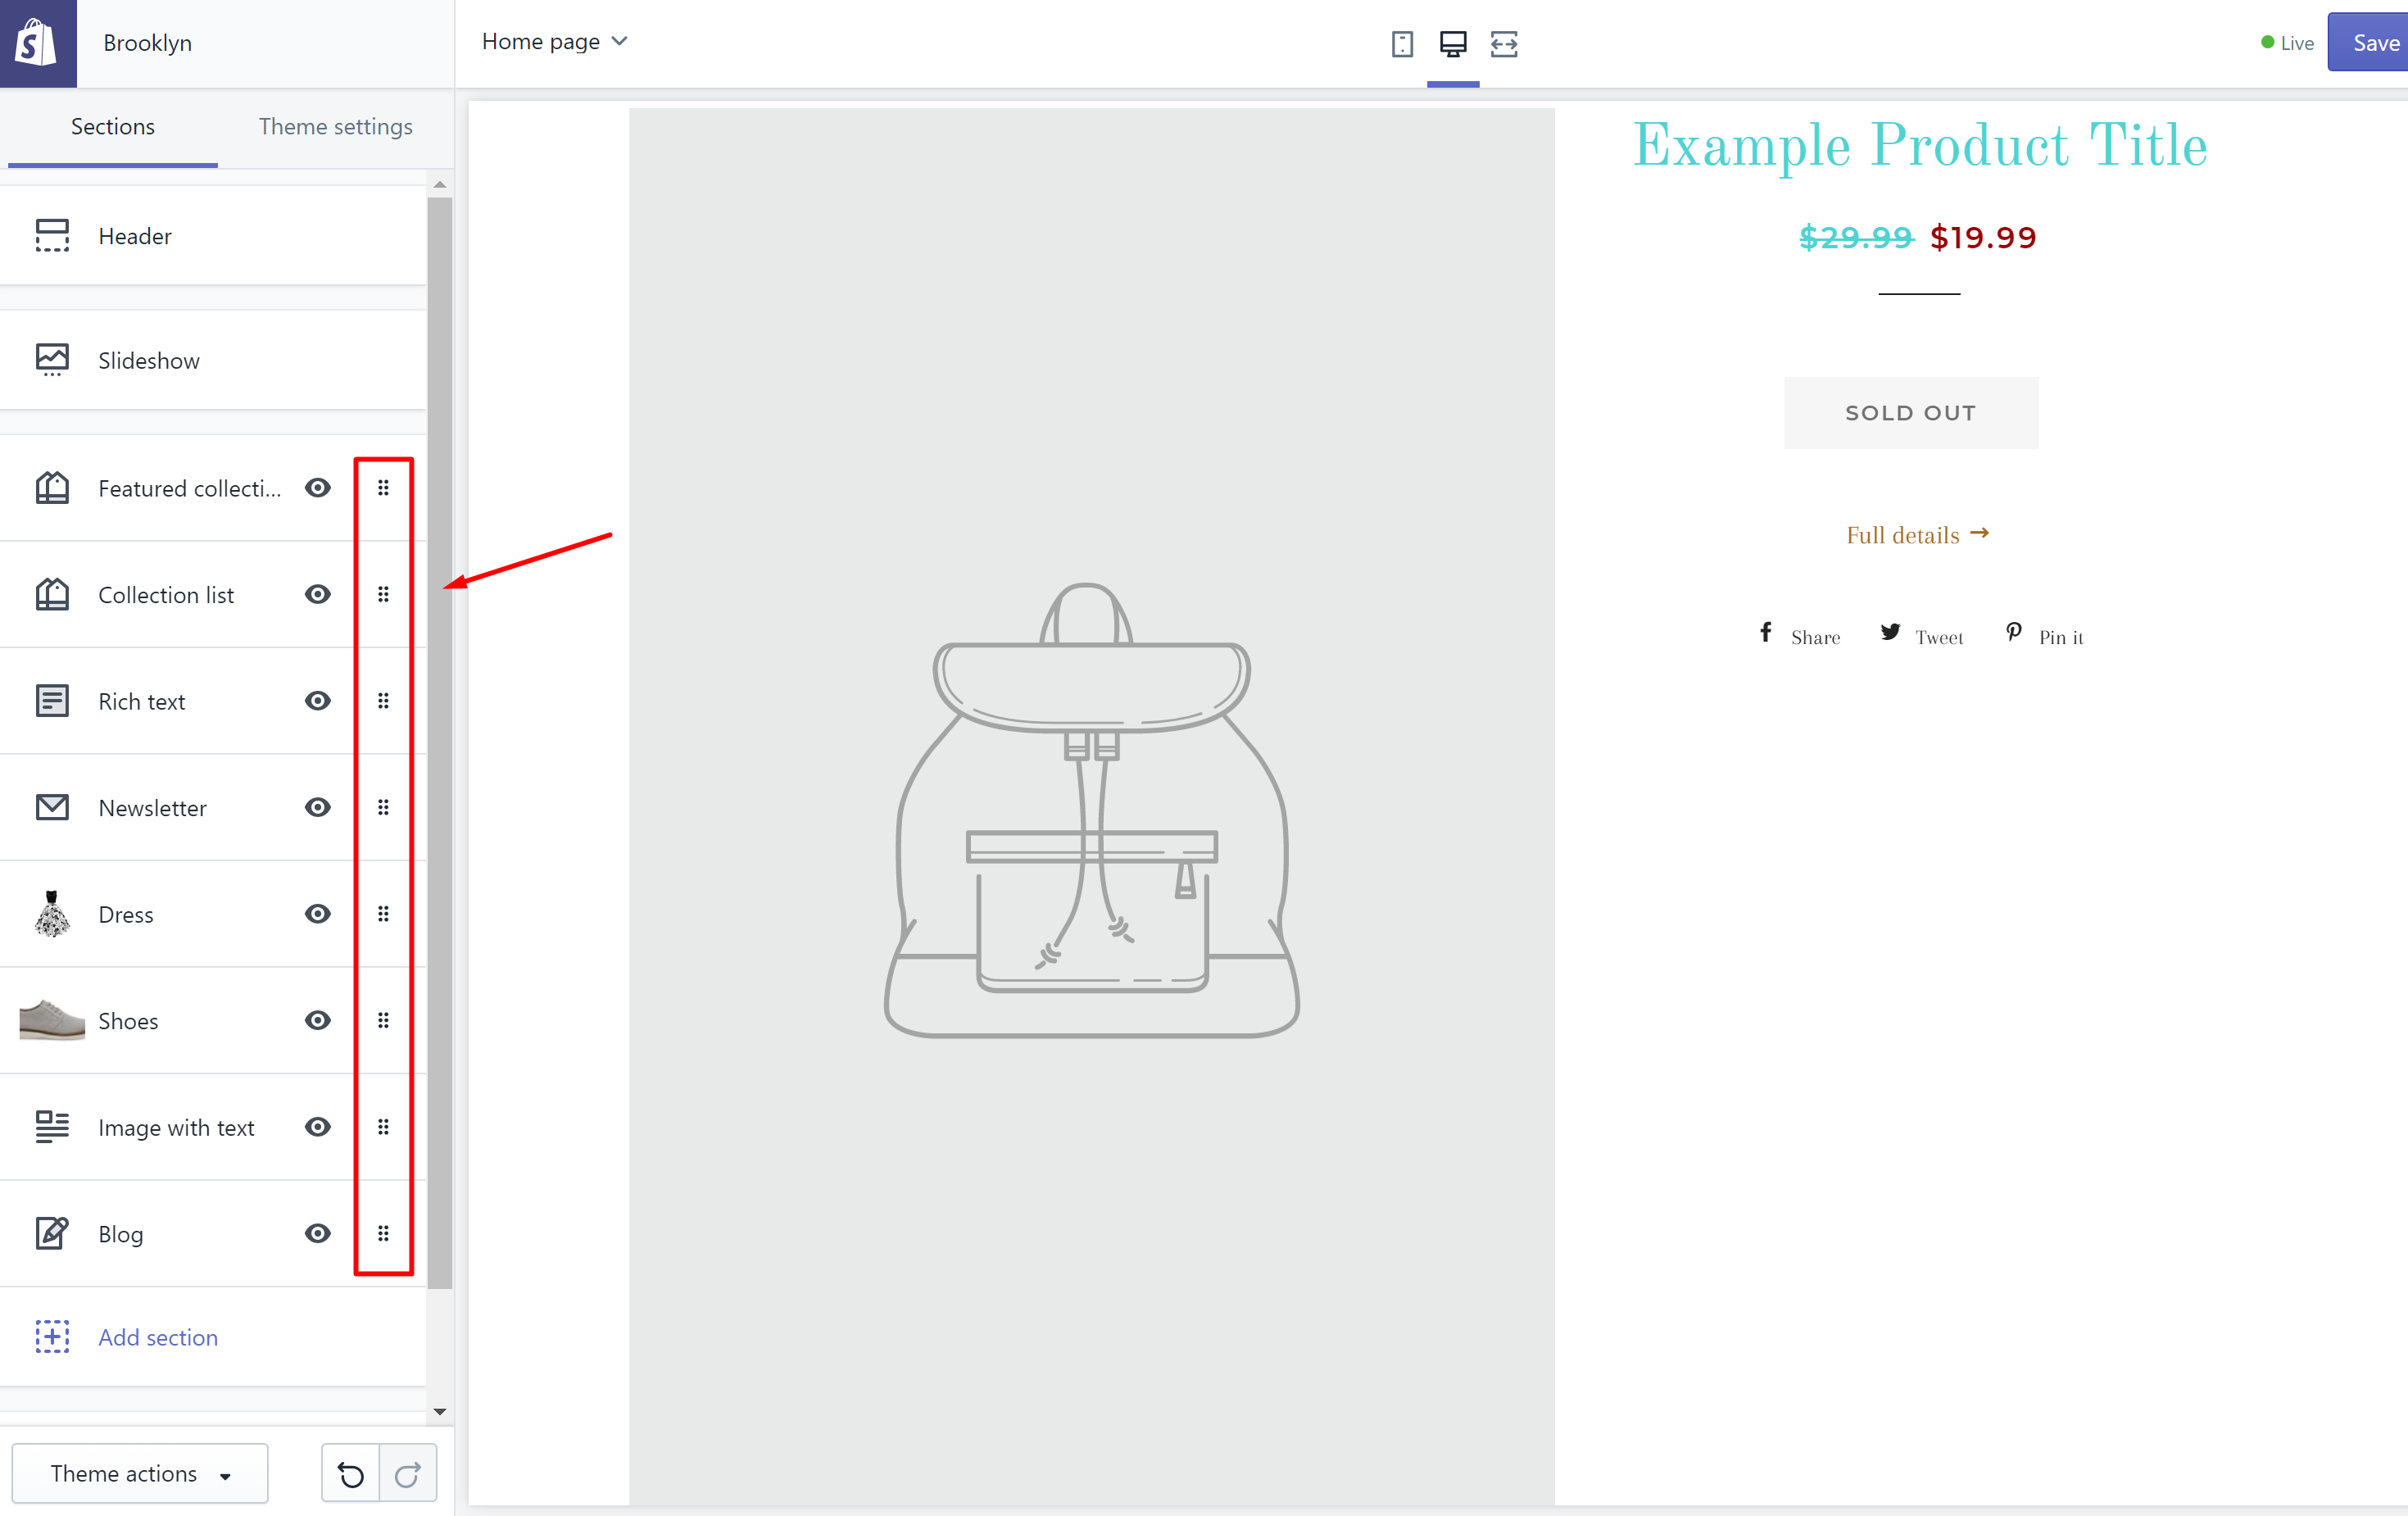
Just keep on dragging and dropping til’ they are all in the order they are meant to be. On re-ordering the sections, you will see changes in the preview window. They are how the new order looks!
Hide a section
Some of you may ask what the eye icon is for. In fact, it is to hide those sections that you no longer want to display on your website. So the question is: what kind of sections should you hide? Actually, you should hide the sections that are not finished yet or not ready to be published. For instance, you may want to have a slideshow of new or incoming products but do not want to show it yet. Then you can choose to hide it until you feel that it’s time to go public. Or, creating a section that advertises a seasonal discount and then hiding it to activate later is also an option!
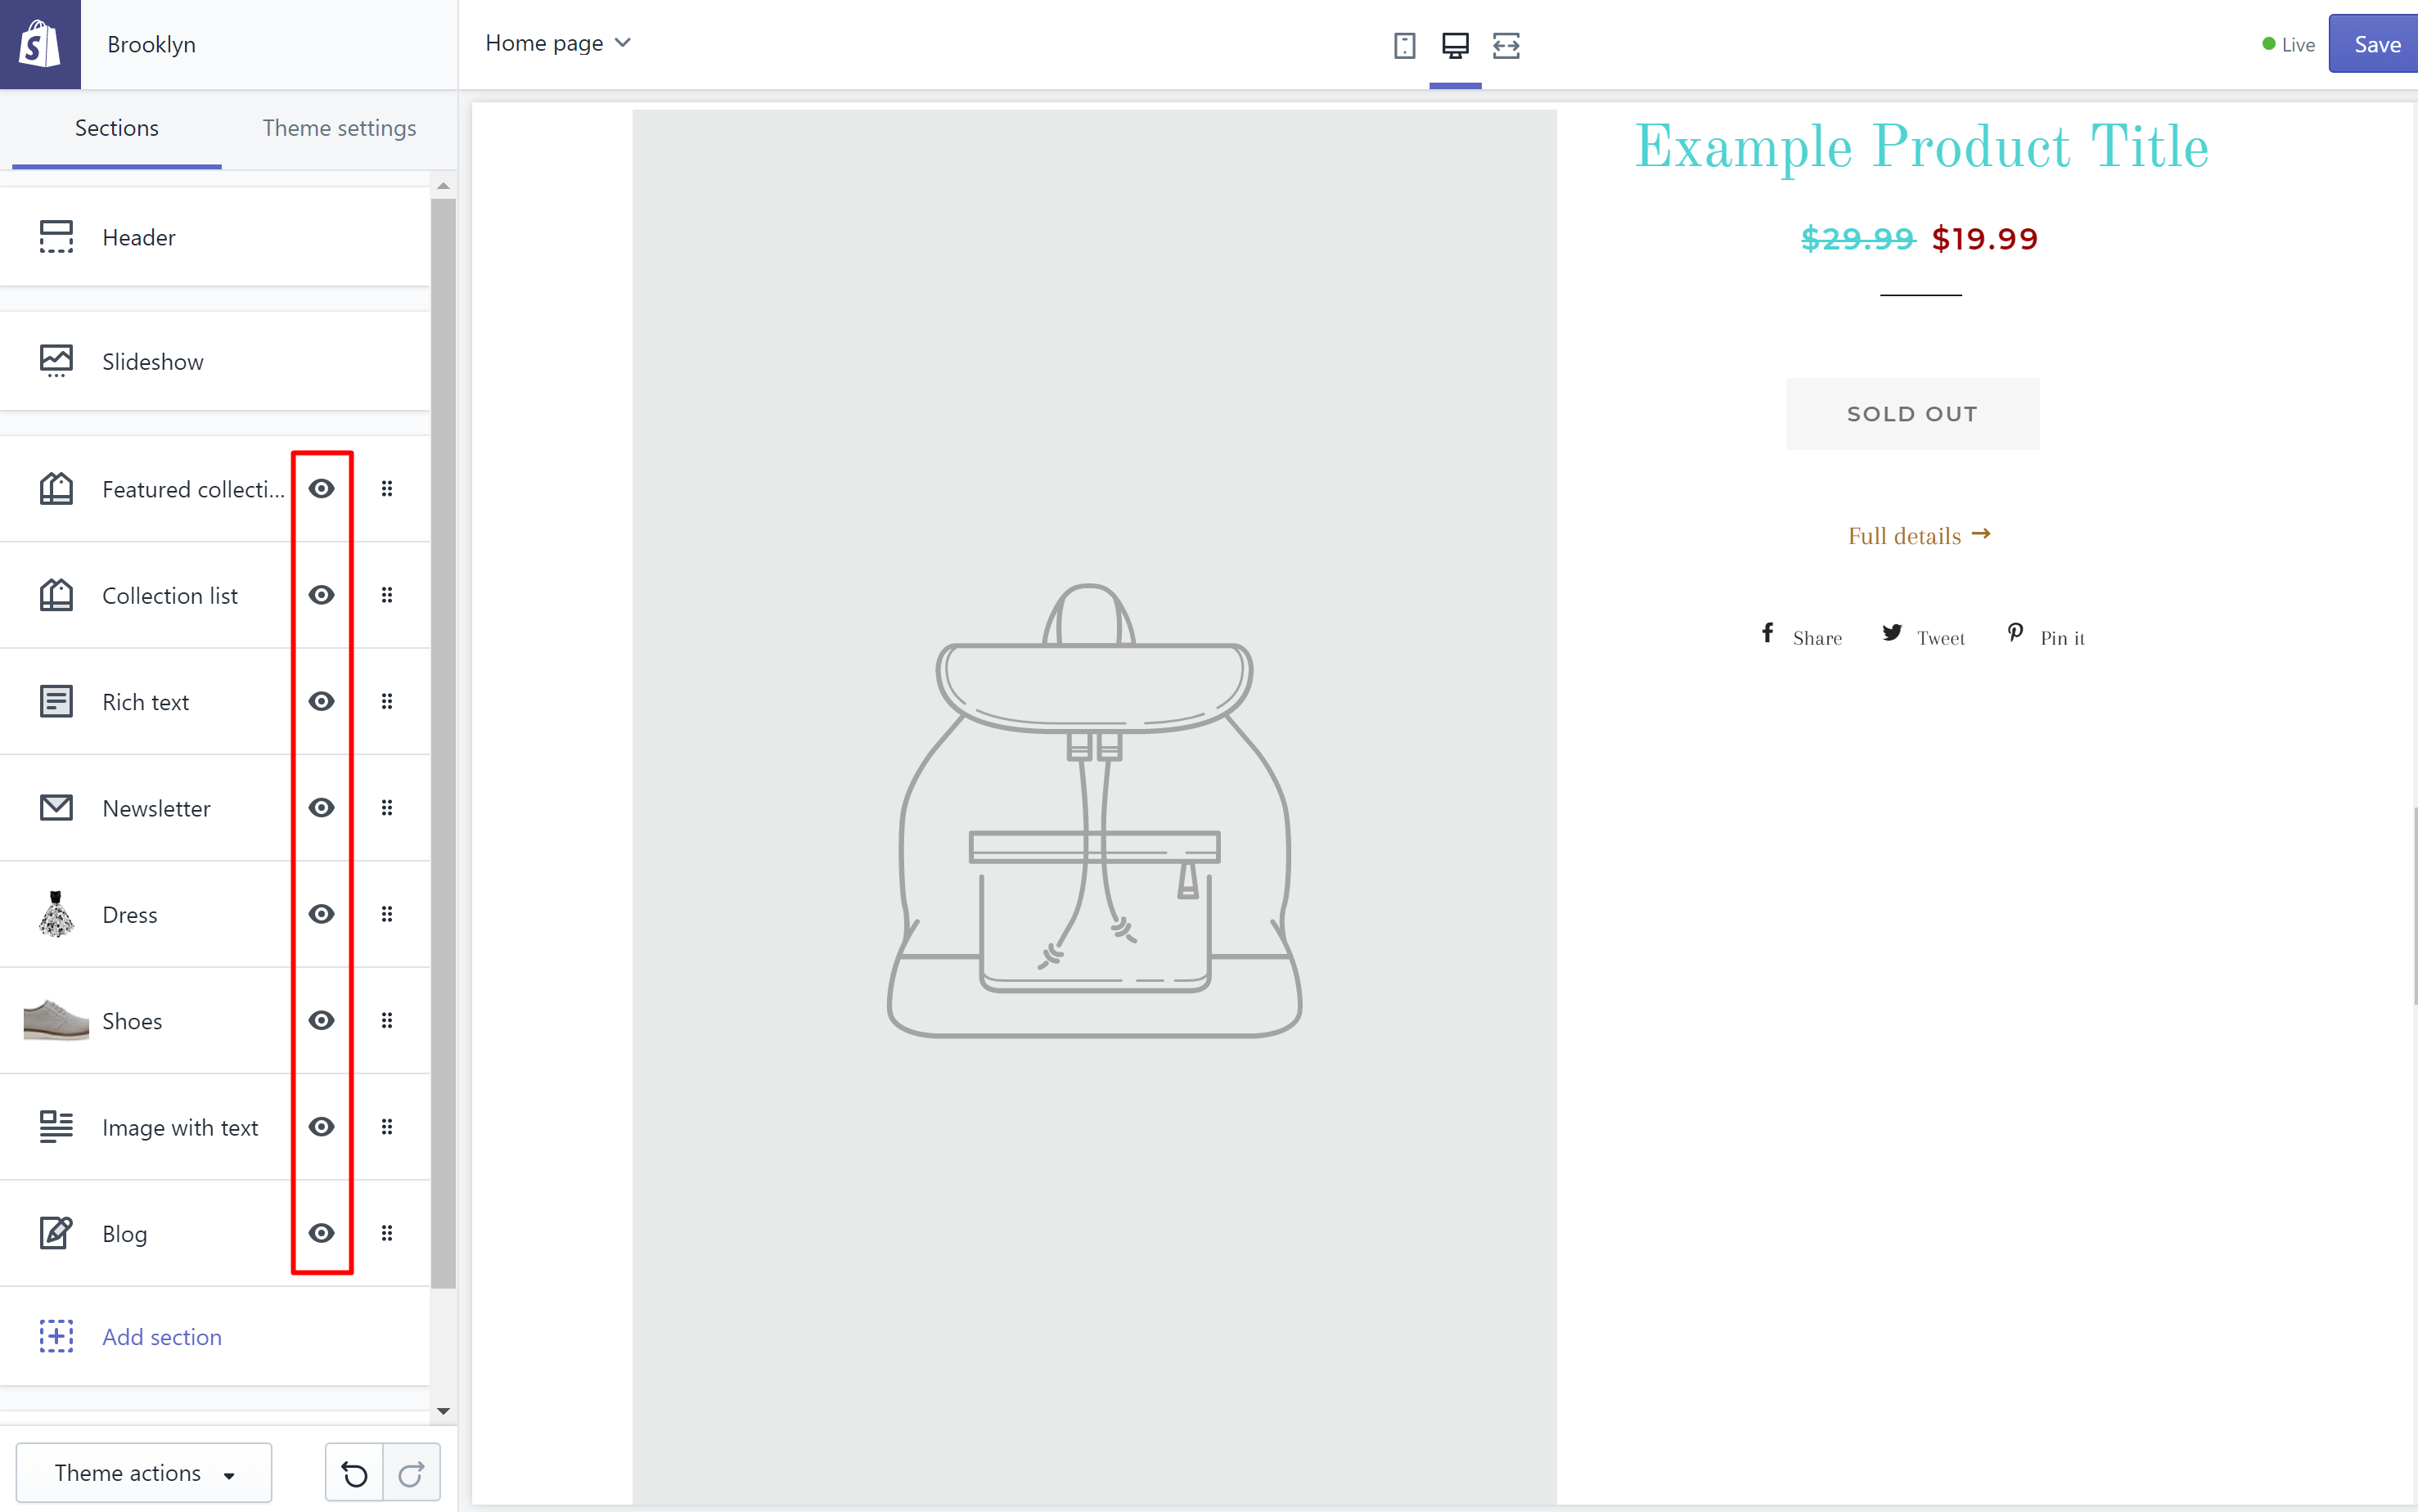
You know a section is hidden when there is a slash through it as below:

Click the eye icon again to unhide that section!
Remove a section
It is also easy to delete a section or only the content of that section. Deleting content in this way will definitely have nothing to do with removing anything from your account, just to be clear. The product or collection block that you delete will still exist in your admin panel. Also, you can still have an image to other sections even when you have already deleted it in a section.
To remove a section
- Step 1: Go to
Online Store > Themes. - Step 2: Select the theme you need to modify and click
Customize. - Step 3: Choose the section including the content you want to delete.
- Step 4: Choose
Delete.
To remove content from a section
- Step 1: Go to
Online Store > Themes. - Step 2: Select the theme you need to modify and click
Customize. - Step 3: Choose the section including the content you want to delete.
- Step 4: Choose the content you want to delete from the section.
- Step 5: Choose
Delete.
Want to know more about how to remove content from a section, read our article: 6 Steps to Remove Content From a Dynamic Section
Customizing Shopify Theme settings
The Theme Settings tab is placed right next to the Sections tab. Under the Theme Settings tab, you are allowed to take further control over how your website looks like.
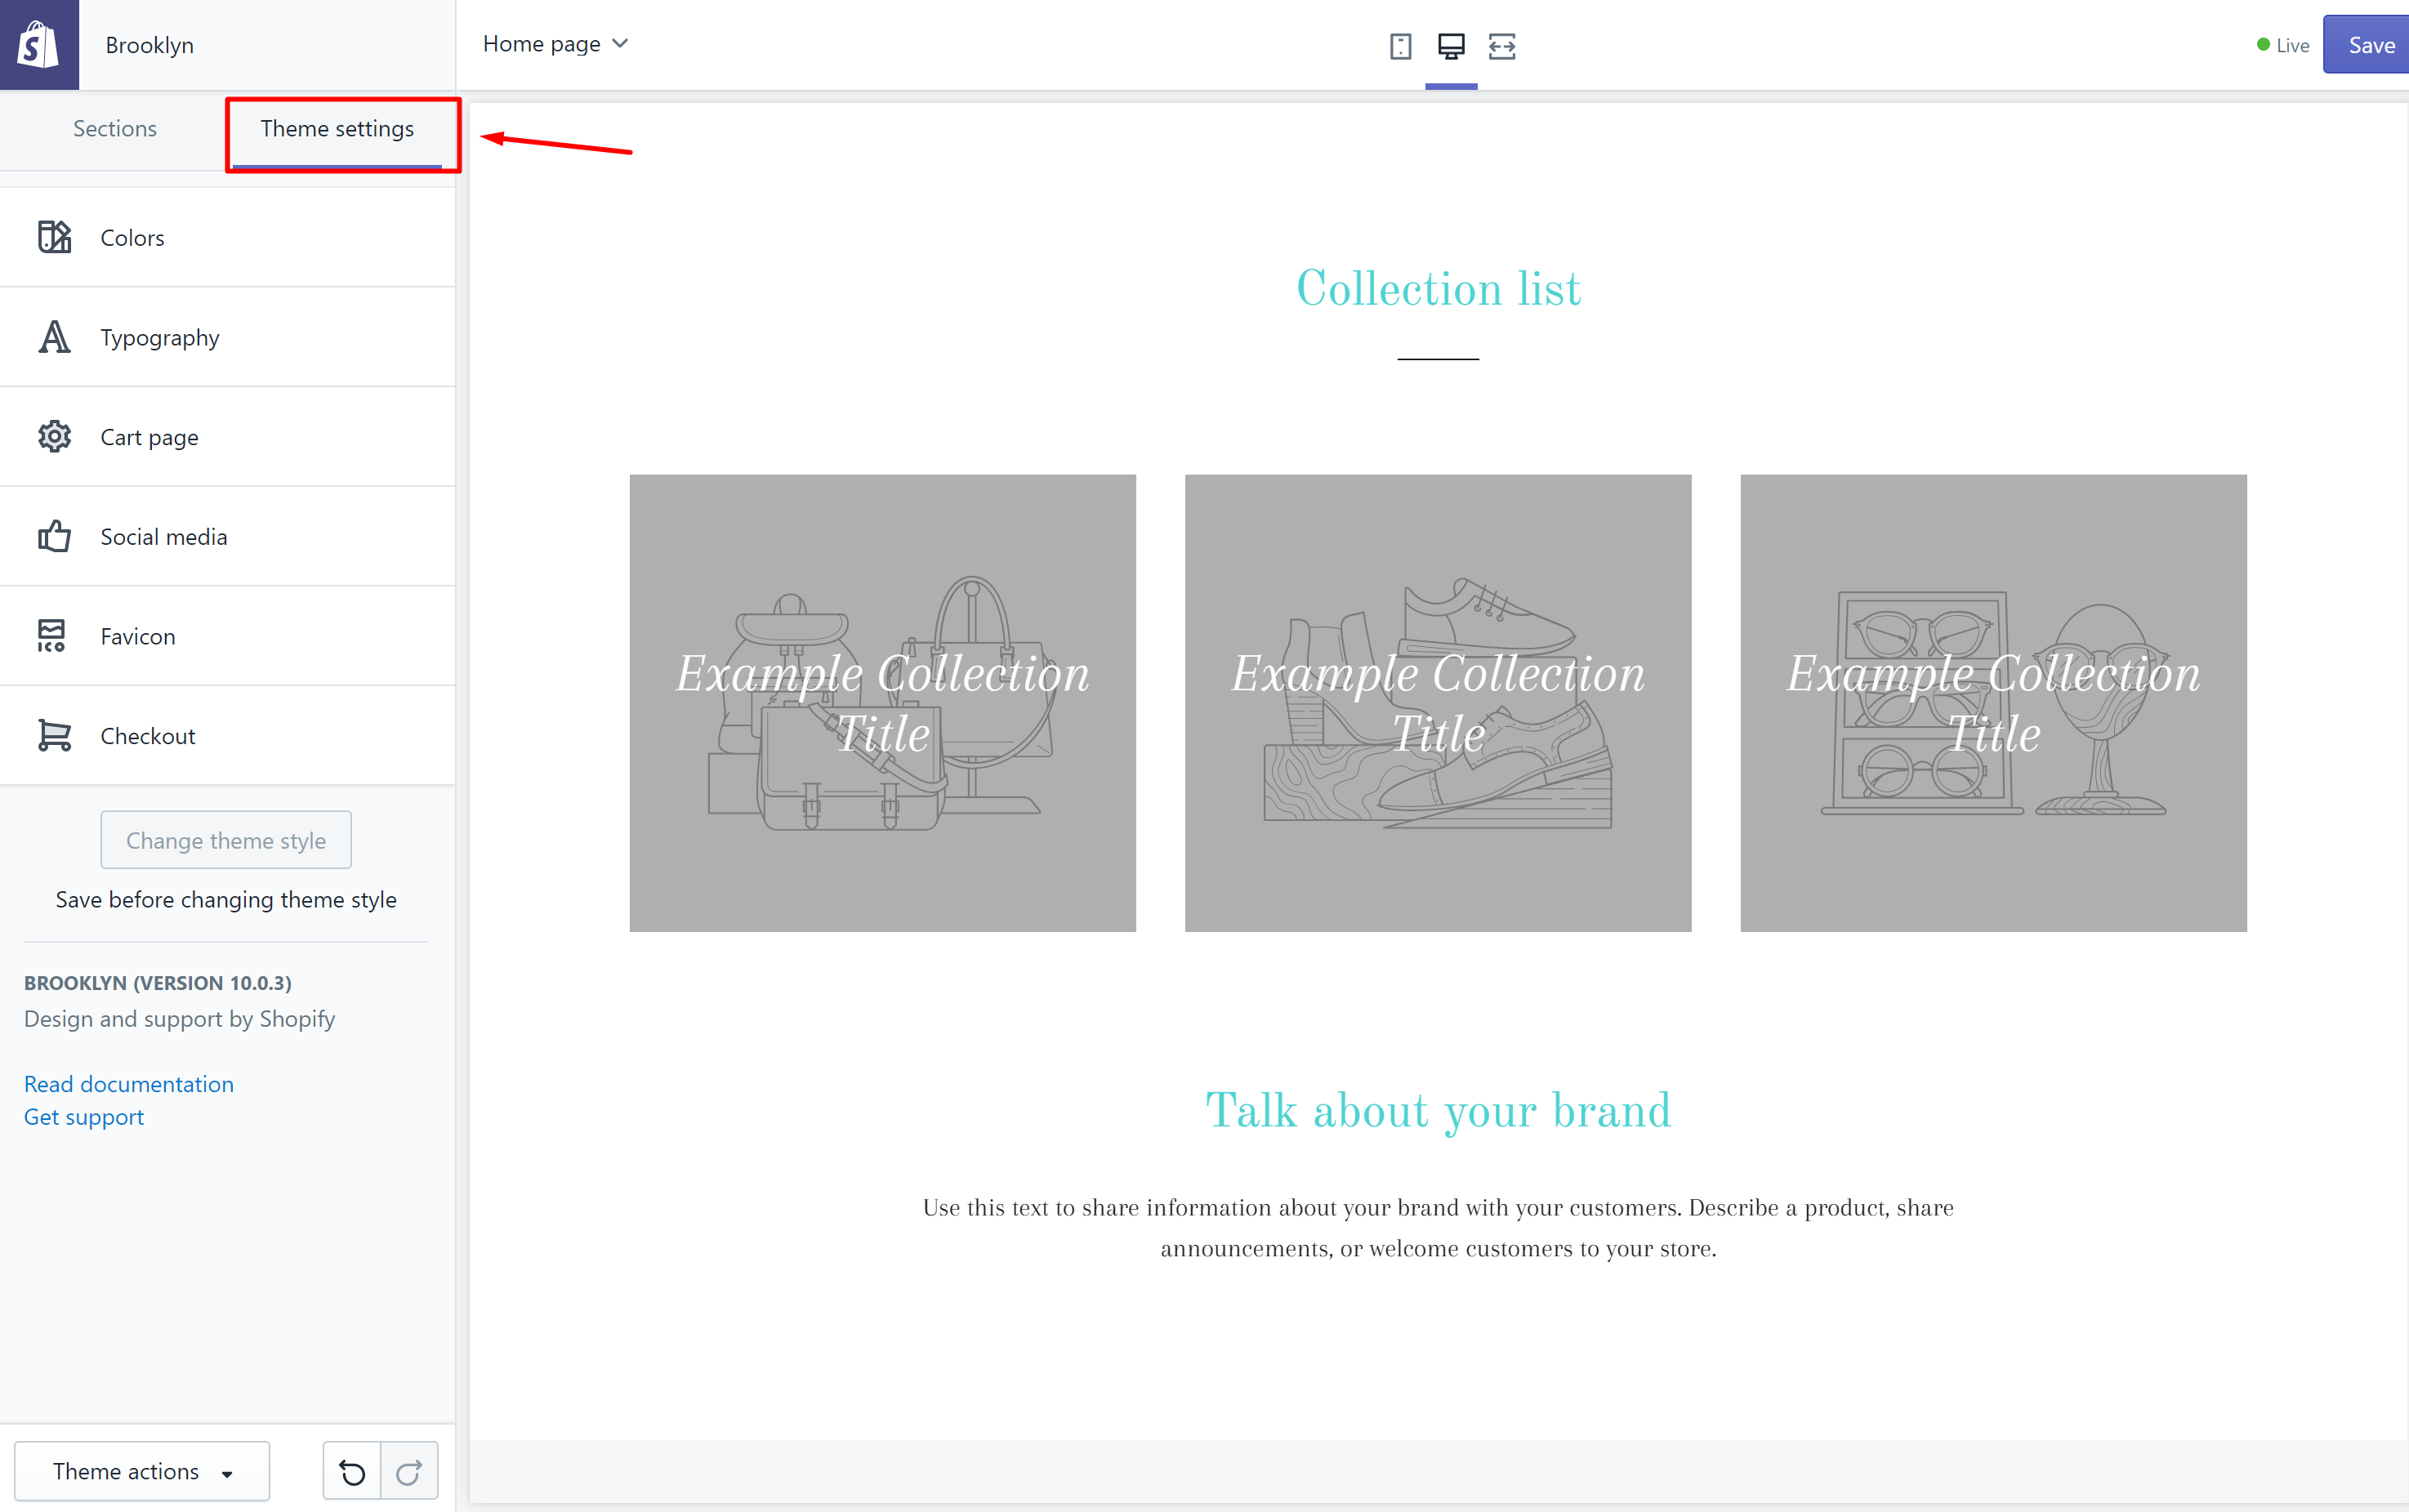
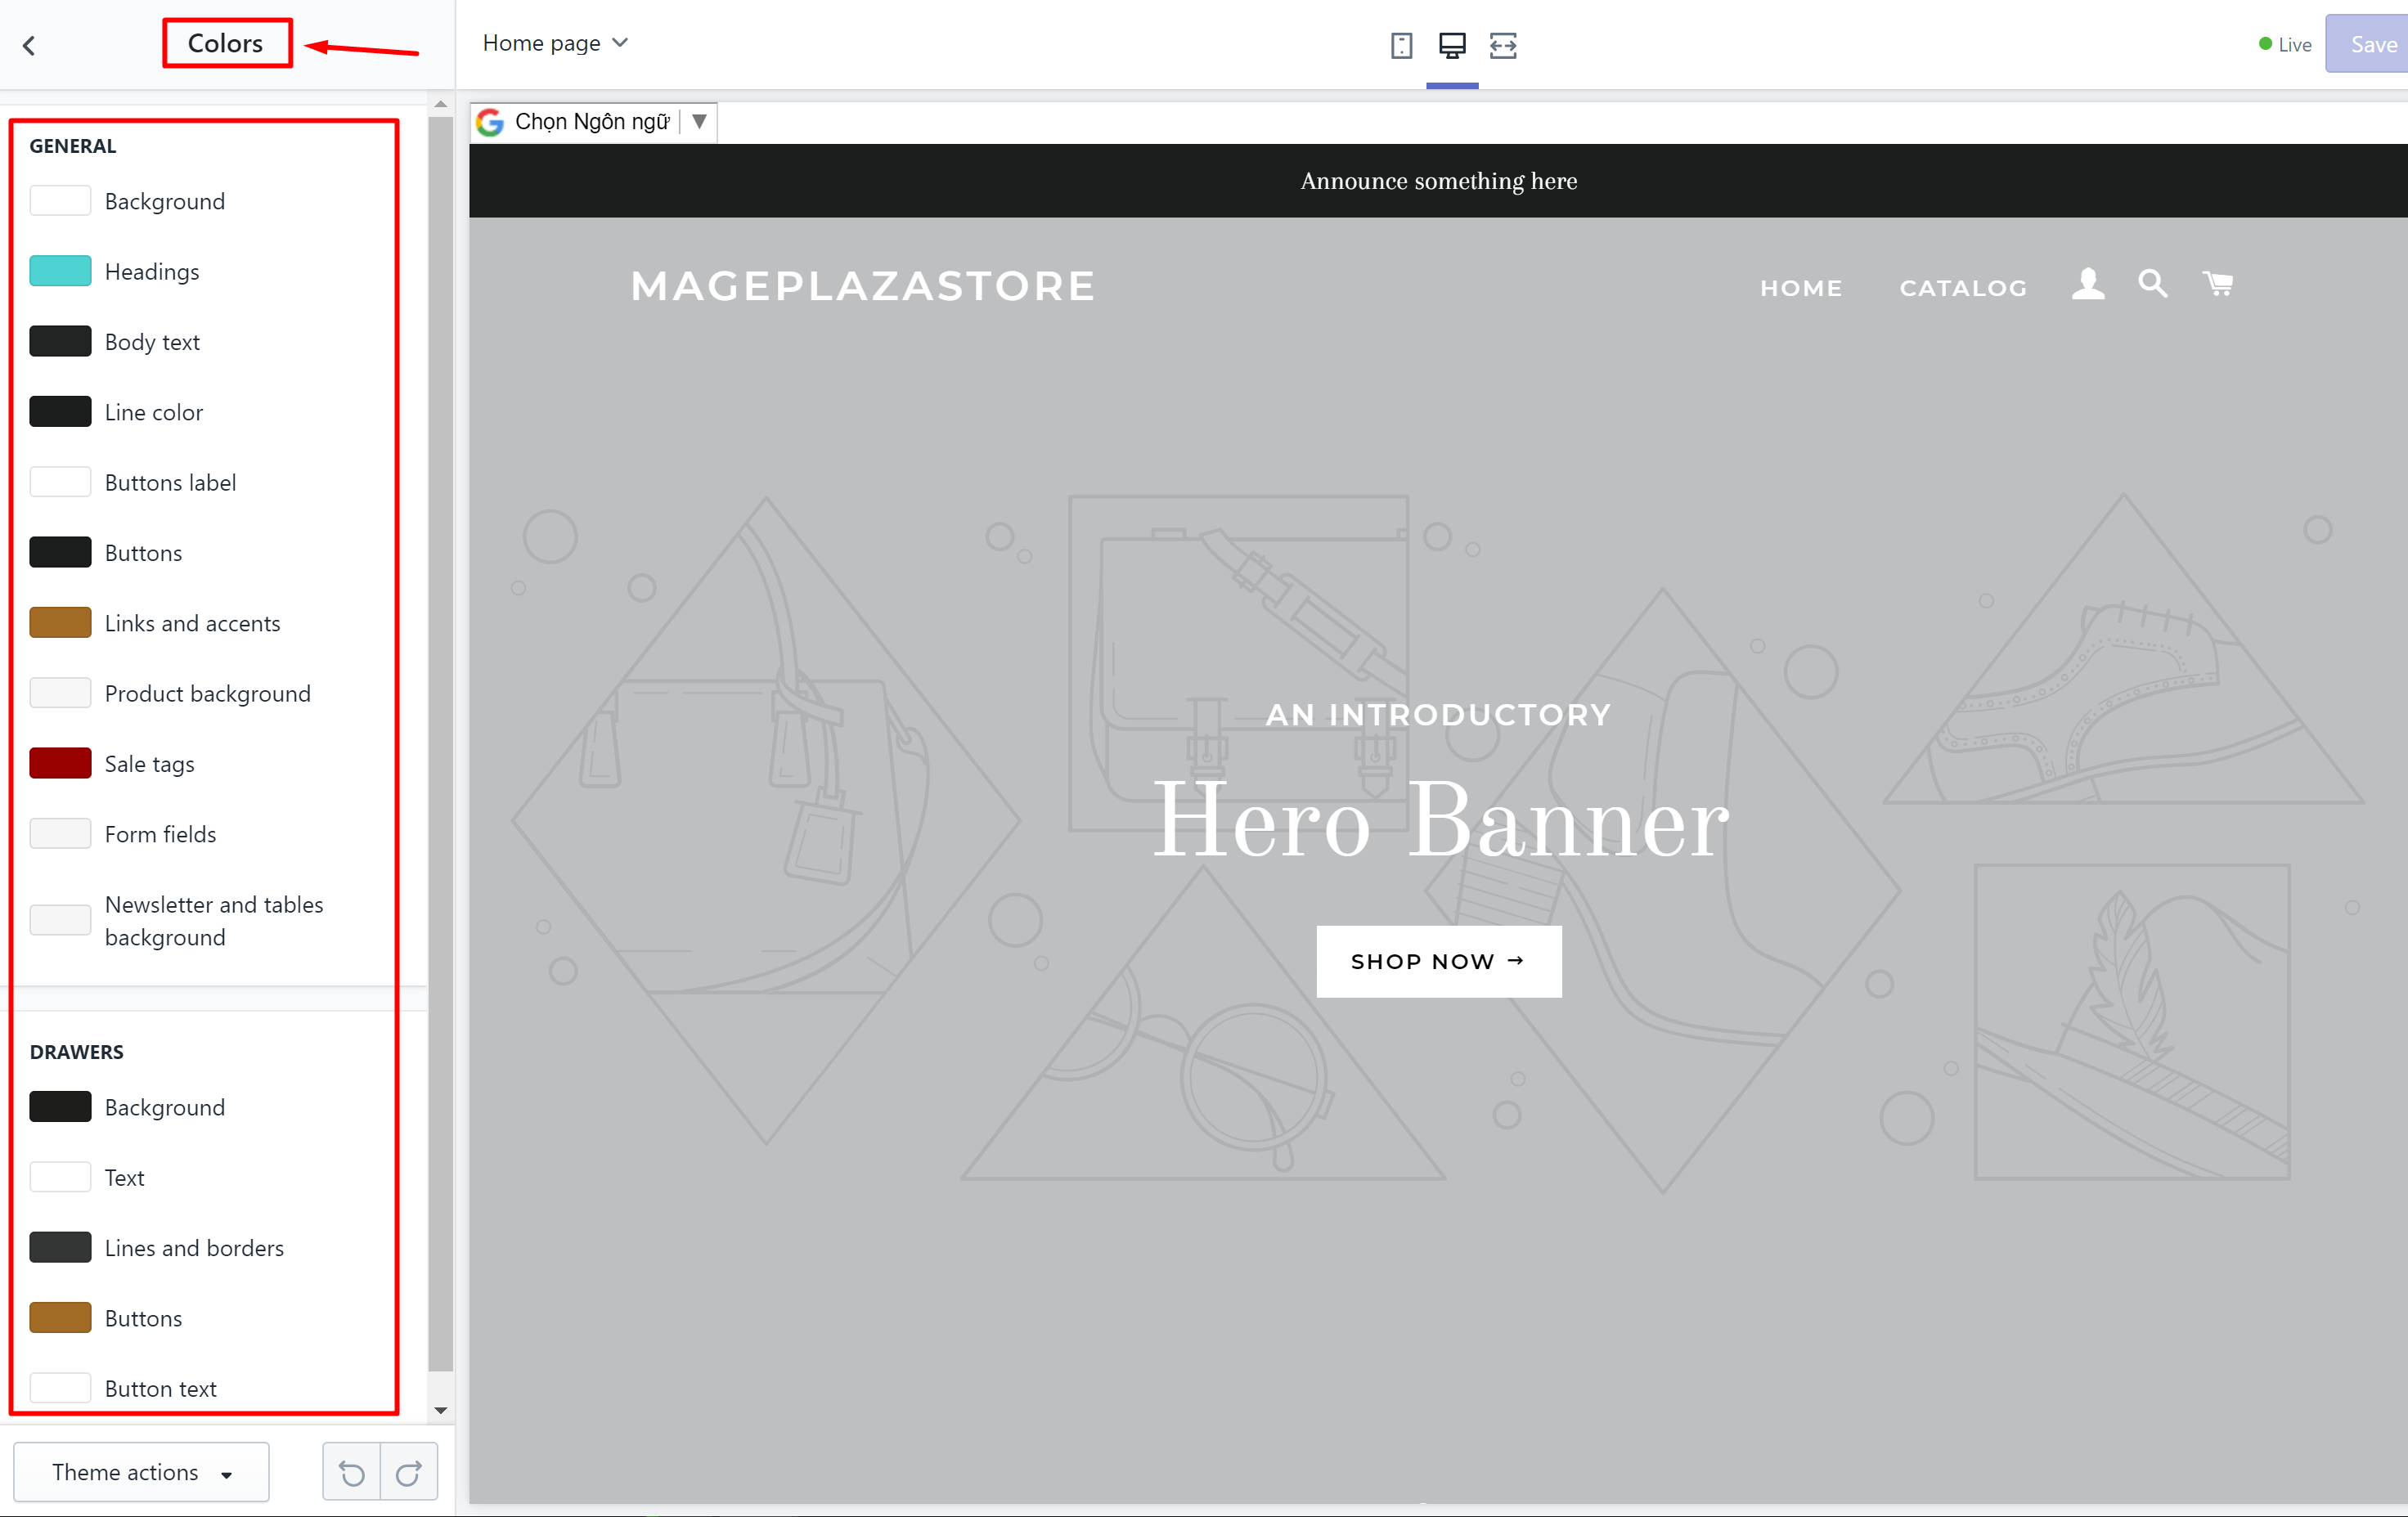
Customize theme Colors
In the Colors section, you are allowed to adjust and edit how your text, form fields, and buttons are displayed on your website. It so is great for you to make your buttons stand out.
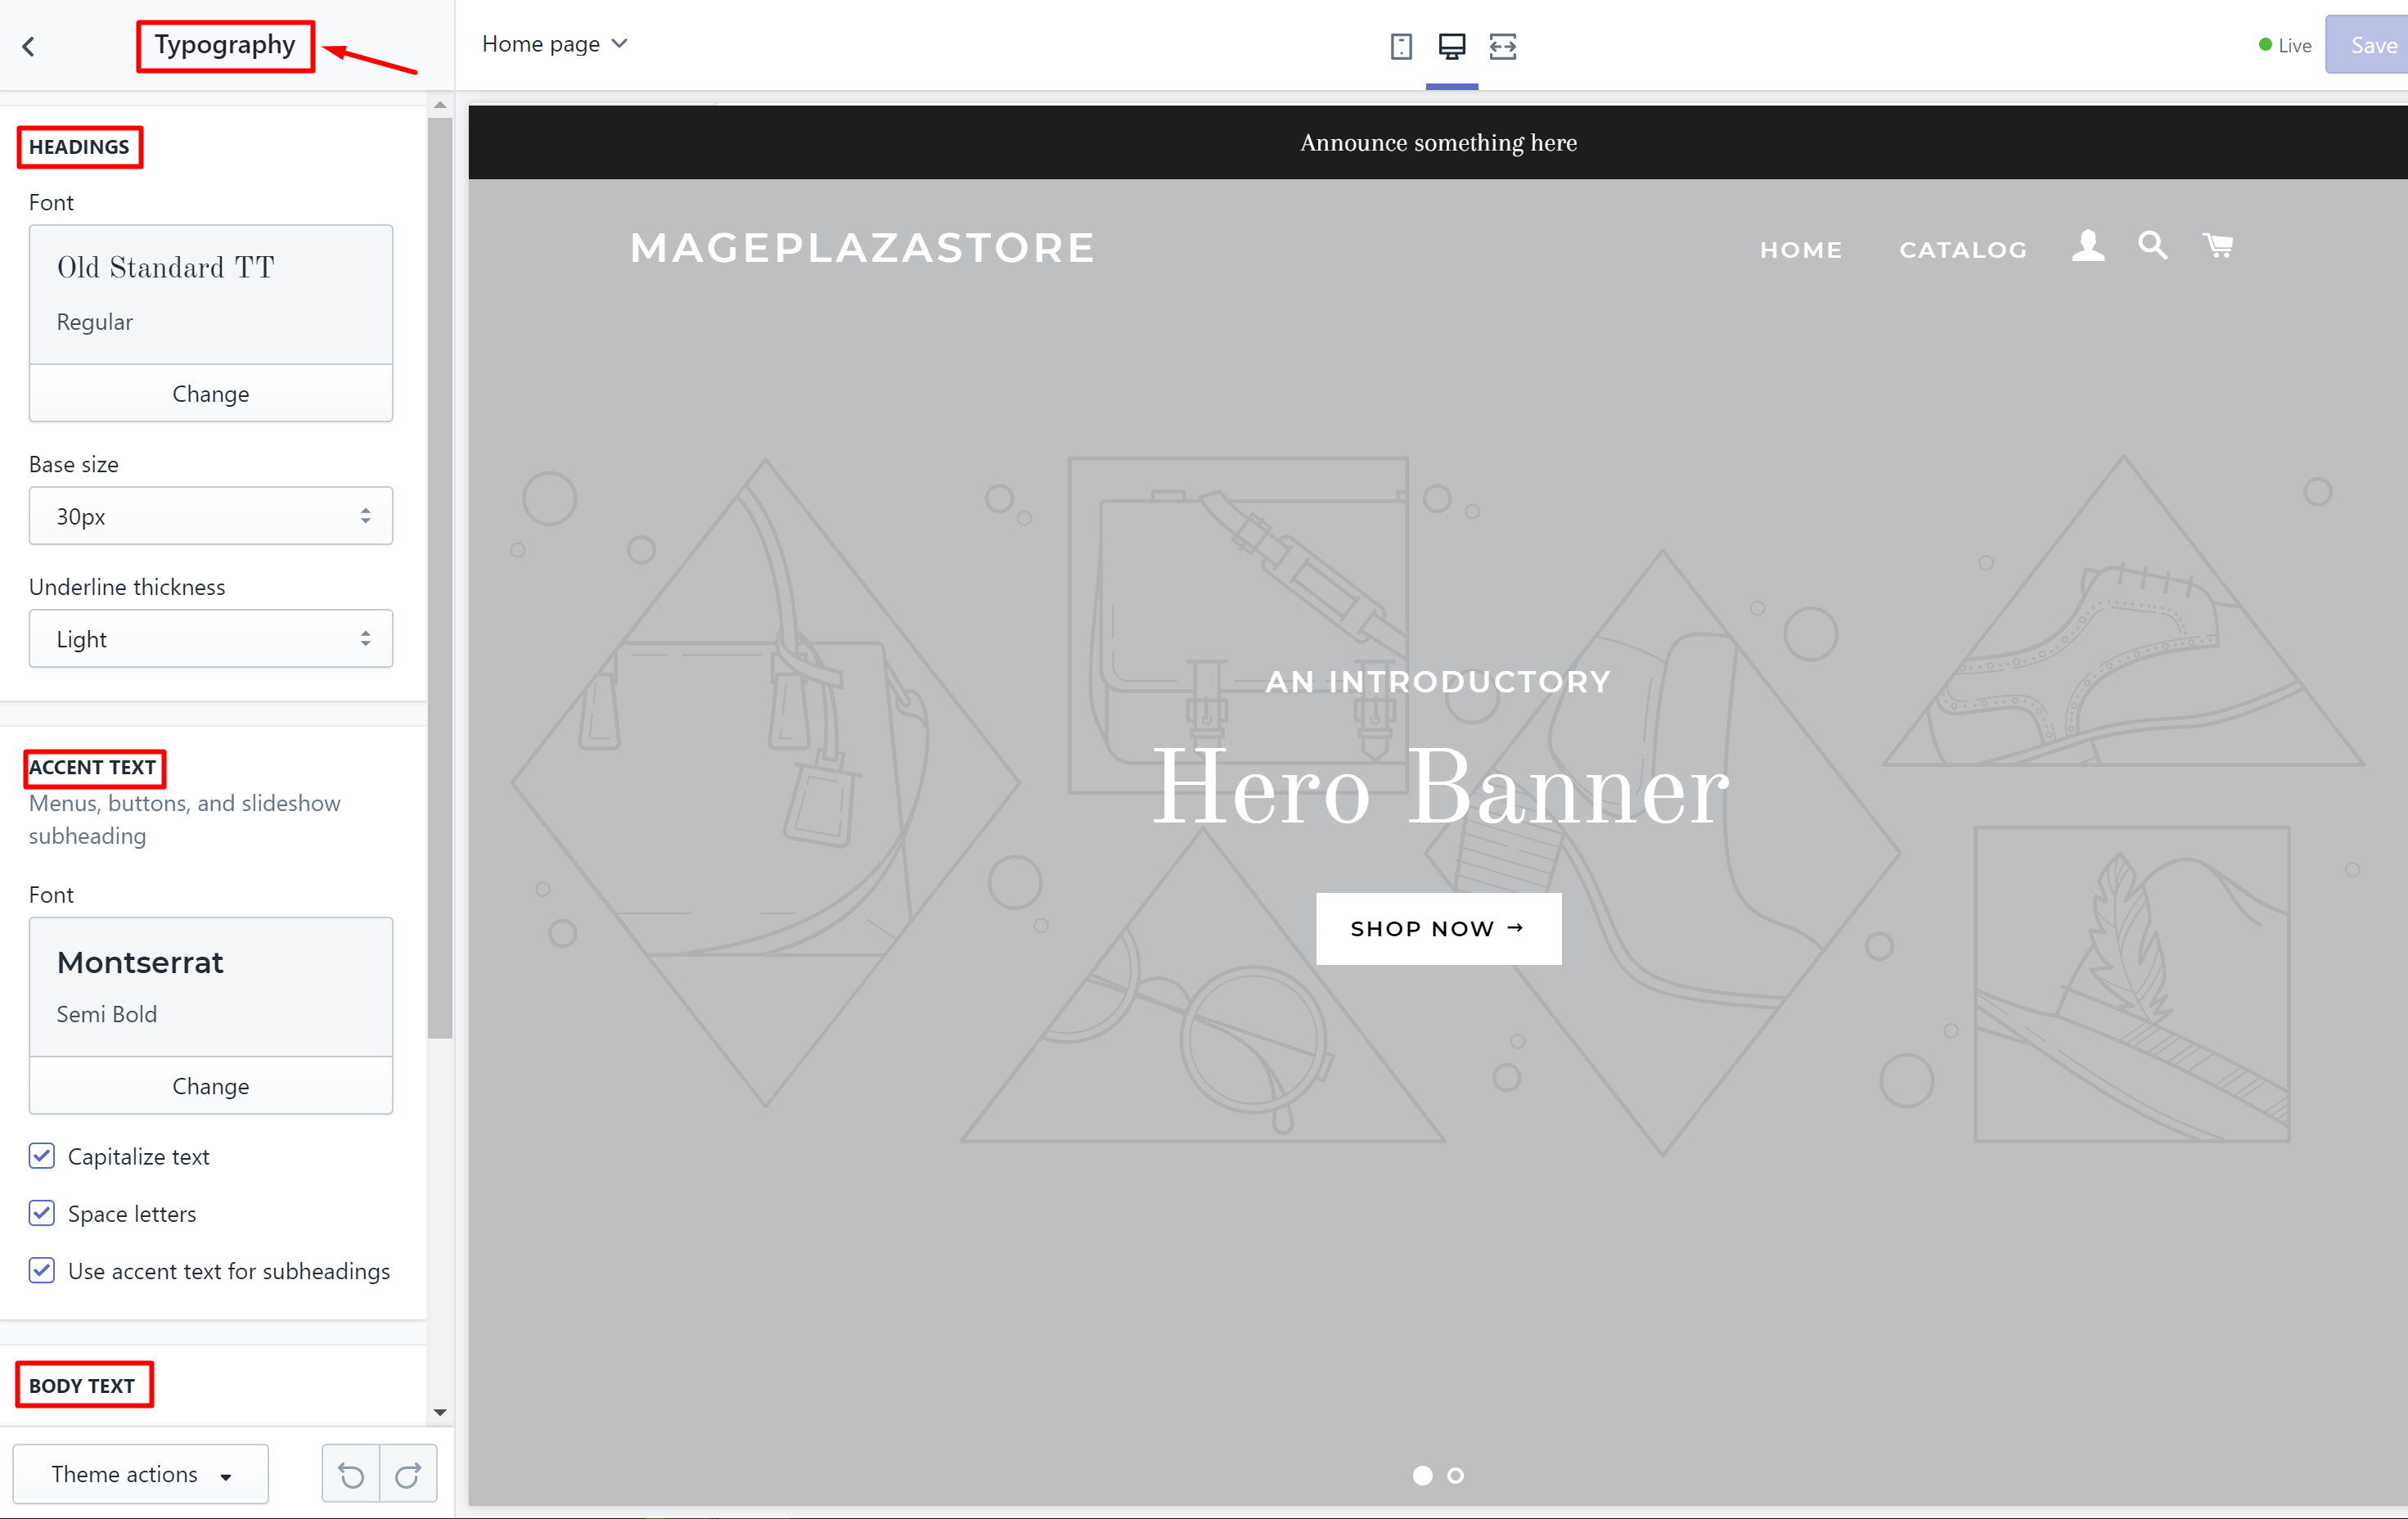
Customize Typography
This is to customize the look of your texts before they are displayed publicly. The section includes everything relating to fonts such as font-weight and font-scale for headings and the body.
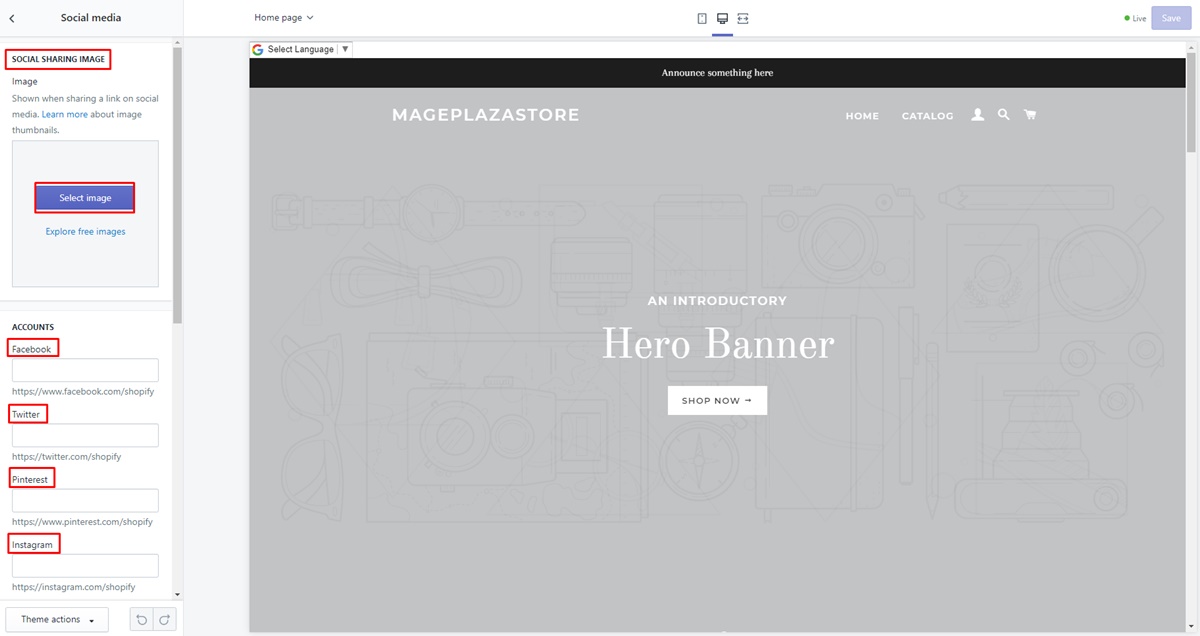
Customize Social Media
Social media is now an important part of our lives. Having social media network buttons will give your customers and visitors permission to share details about your products or your brand.
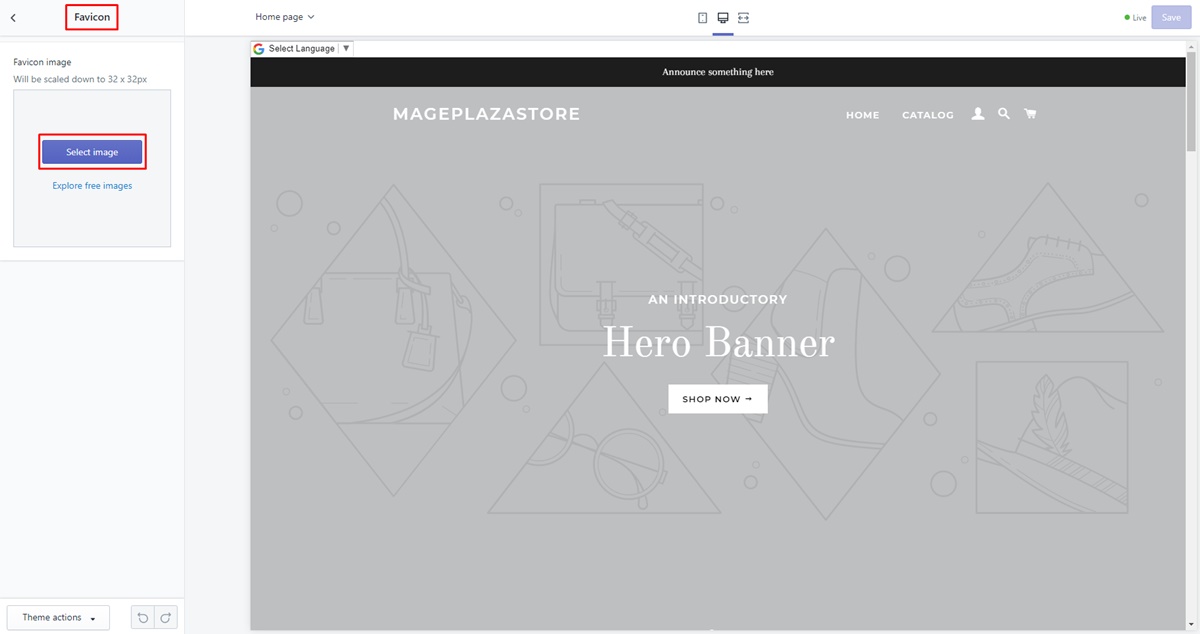
Customize Favicon
Favicon is the small icon (image) that appears together with your web link. It might be displayed right in the tab in your browser or/and next to the URL. Anyways, this section allows you to upload your own photo (it could be your brand logo) and set it as your favicon. Then it will automatically scale it to a suitable size (32 x 32px normally).
Customize Checkout
The Checkout sections give you several options to modify.
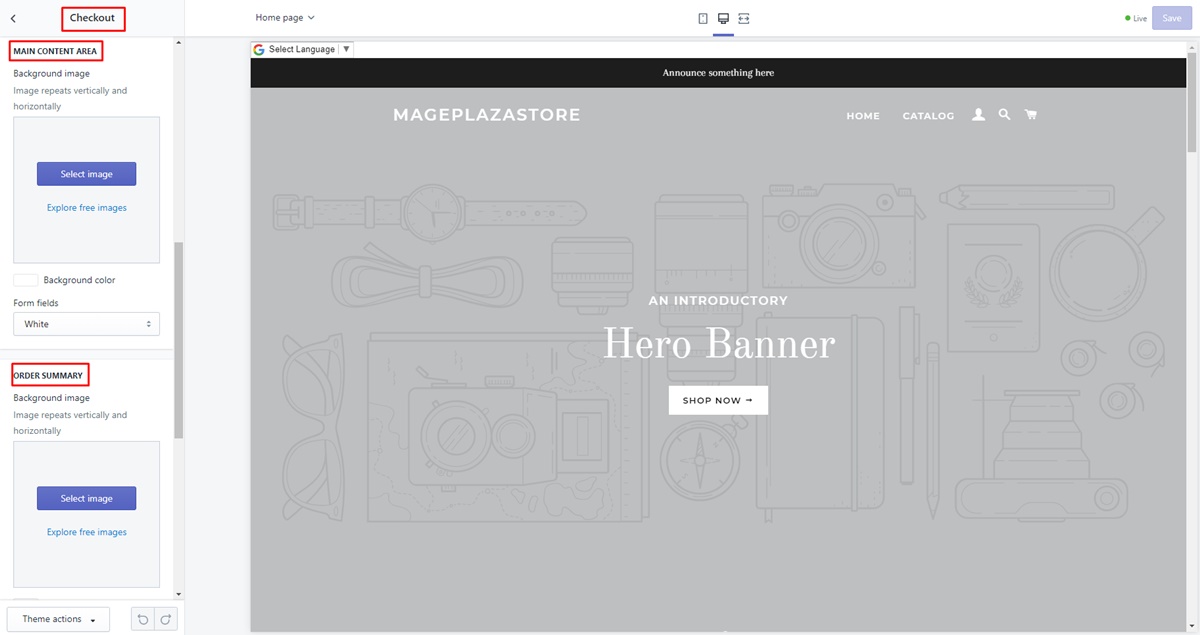
There are some options offered including:
- Customizing colors for accents and buttons, also with the errors
- Customizing typography
- Uploading and setting background images for the checkout
- The checkout’s logo placement
- Order summary images and more
Final words
In fact, there are a lot of Shopify store owners sticking with free themes without changing its design to match their webs well. Yet it is not a professional and wise move if you do not want to lose traffic and look like many other competitor stores. To stand out from the crowd, your website needs to be re-customized and re-designed, that’s why you need to customize your shopify theme. It is definitely what you need to gain more visitors by showing your professional style!


