How to build a Shopify theme from scratch?
When you engage in the online business, and the Shopify platform; you may want to know How to build a Shopify theme from scratch. Well, you will find an answer here in our article. So please do not go anywhere.
We will clarify to you what a theme on Shopify is exactly before going through the steps to build a Shopify theme from the beginning. Let’s get straight into the details!
Related posts:
- How to Choose Shopify Themes That Sell: The Ultimate Guide
- How to Customize Shopify Themes
- 35+ Best Shopify Themes/Templates (Free & Paid)
What is a theme on Shopify?
A theme is a template that decides the appearance of your online store. Various themes have various styles and layouts, and your customers will feel different.
You can customize your theme settings in your Shopify admin by making use of the theme editor. If your theme does not have a setting for a modification, then you can adjust your theme code.
Changing your theme or switching to a new theme will not influence the other parts of your account. In other words, you can try different theme styles and settings without having to make a fuss about the remainder of the content from your admin. Shopify has built a marketplace where both premium and free pre-built themes offer store owners a list of visually fantastic themes that help build a store up and work.
With pre-built themes, your store (particularly a newbie store) can be on track and operate speedily. The marketplace enables you to work a store out in practice in hours, or even less compared to weeks, or months if you are creating an entirely custom eCommerce store.
Another advantage of using pre-built themes is in terms of low fees. More specifically, you do not have to pay a developer or invest your time and effort in line-by-line customization. You only have to perform a one-click installation with only some modifications to settings and flexible branding options, and you can customize a theme quickly to bring a new look to your store.
However, pre-built themes have some drawbacks like limited scalability designed for non-technical users and limited customization. They are also designed for aesthetics but not significantly for conversions. For these reasons, you can build a custom theme for your Shopify store instead.
Read more: Shopify Theme Detector by Avada Commerce
How to build a Shopify theme from scratch
Planning and Analyzing

Not only you have to guarantee that you have all the technical knowledge before the initiation of the project, but you also have to make sure that you meet the non-technical requirements. Reviewing different Shopify theme design options before heading to build your Shopify theme is crucial.
Some of the options may be available while you are aligning your ideas or empowering innovation to reign over, but note that the new theme should be something distinctive and the discrepancy might be quite significant. If it is not going to stand out in the crowd, there is absolutely no point in wasting time on it.
To begin with, evaluate the available alternatives to determine what is lacking, which may include the particular requirements of a niche market that you are targetting. For instance, it is important to review additional presentations of specific product features or outstanding layout styles.
Also, discovering your inspiration source and ensure what you are building is distinct from what already appears to exist in a Shopify templates market is crucial too.
If you want to build a Shopify theme from the beginning for a client, ensure that you understand their requirements well. Since custom development is very costly, you should begin the process with a definite concept about the outcome.
Free 1:1 Shopify consultation & 30-day all-app trial FREE
- Shopify Plus Strategy and Consultation
- Personalized E-commerce Solutions
- Conversion Rate Boosting Techniques
- Inventory Management Hacks
Learning the Liquid code
You may have spotted that some files have the .liquid extension. Liquid files are simply HTML files with embedded code in them. This embedded code is generated using curly braces like {{ }} and {% %} to make it easier for you to notice.
Liquid enables us to manage our output and add logic in the templates without any back-end code knowledge. More specifically, with Liquide, you can make use of data from your store which are product titles and prices.
First thing first, let’s take a look at the output. Below is a very simple example. If you want your <h2> element to show your product title, then you can utilize the product data accessible, and do the following in your template:
<h2>{{ product.title }}</h2>
If Shopify executes a product page, your product title will replace the Liquid code. See how liquid uses the “dot” syntax. Your product also has a price attached to it, which you can show the same by using:
{{ product.price }}
The “dot” enables you to gain access to various product’s properties and present that data.
If you want your product title to be uppercase, then it will be a piece of cake too:
<h2>{{ product.title | up case }}</h2>
With Liquid, you can create elements rapidly. For instance, an image tag:
{{ 'logo.png' | img_tag }}
When done, it will generate the HTML as below:
<img src="logo.png" alt="" />
It won’t do much good, as a consequence, as it has culminated in a relative approach to the file, which is simply not going to work. By inserting an additional filter, Shopify will attach the entire access to the file. For clarification purposes, you can insert in your alt text:
{{ 'logo.png' | asset_url | img_tag: 'Site Logo' }}
It will generate the HTML as below:
<img src="/files/shops/your_shop_number/assets/logo.png" alt="Site Logo" />
Liquid also allows you to manage the page flow. For example, if there is a sold-out item, you can deliver a message to your customers. Liquid logic is very readable so that you can follow it easily.
Liquid will reach a particular store’s data and export it to an appropriate folder in the form. It will play the role of a connection between the seller’s data and the code in the user’s browser. Hence, you can gain access to various variables without confronting any problems while you do it.
With Liquid, you do not have to worry about the data. It will be optional and beneficial if you create templates to sell to various clients. Not only that, you can also make use of the Liquid Cheat Sheet that assists new users in bookmarking, outlining different elements, and adding their descriptions.
Learning the Timber framework
Timber is an open-source framework that can make the process of creating new themes for Shopify so much simpler. This useful tool can be a fantastic starting point for any web designer. Some other tools that can help simplify the process are templates and pieces of code. You can adjust them according to your tastes. Not only that, you can use snippets and some other helpful elements.
You do not have to worry about backend integration since Timber has already handled it. It will be your time-saver in this case since you do not have to perform the task of repeating steps from scratch. Therefore, you can spend more time and effort in creating interesting things that attract the users on-screen and tempt them to interact with you.
You can pay attention to Theme Kit- a valuable cross-platform tool that can contribute to your Shopify theme development. If you want to use some of the defaults before proceeding with extra outstanding features, you can update the configuration file right on your laptop.
Learning Shopify Asset CDN
Every asset you drive up to the server (images, fonts, CSS, JavaScript) is automatically deployed, concatenated, minified (except for JavaScript), gzipped, and finger-printed on Shopify’s CDN. The templating language offers you with asset helpers to reference the assets.
Hence, for asset packaging and delivery, you possess all the necessary things. Nevertheless, it may result in some problems while developing since you are looking at minified CSS. The JavaScript is not minified or uglified.
Theme development workflow
For a single feature branch, a typical workflow will be as below:
Step 1: Pull from master and checkout a new branch
Step 2: Log into Shopify admin

Step 3: Duplicate the published theme
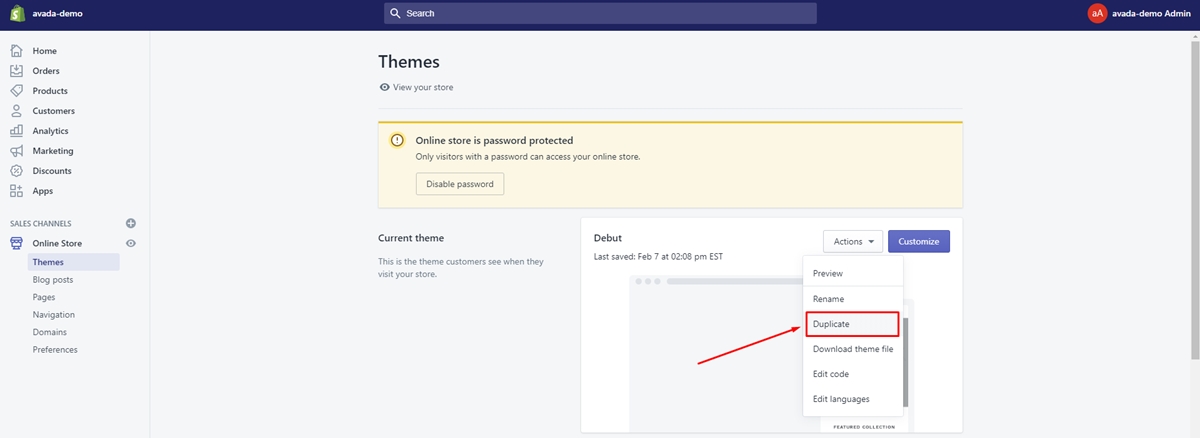
Step 4: Rename the duplicated theme
Rename the duplicated theme to your branch name
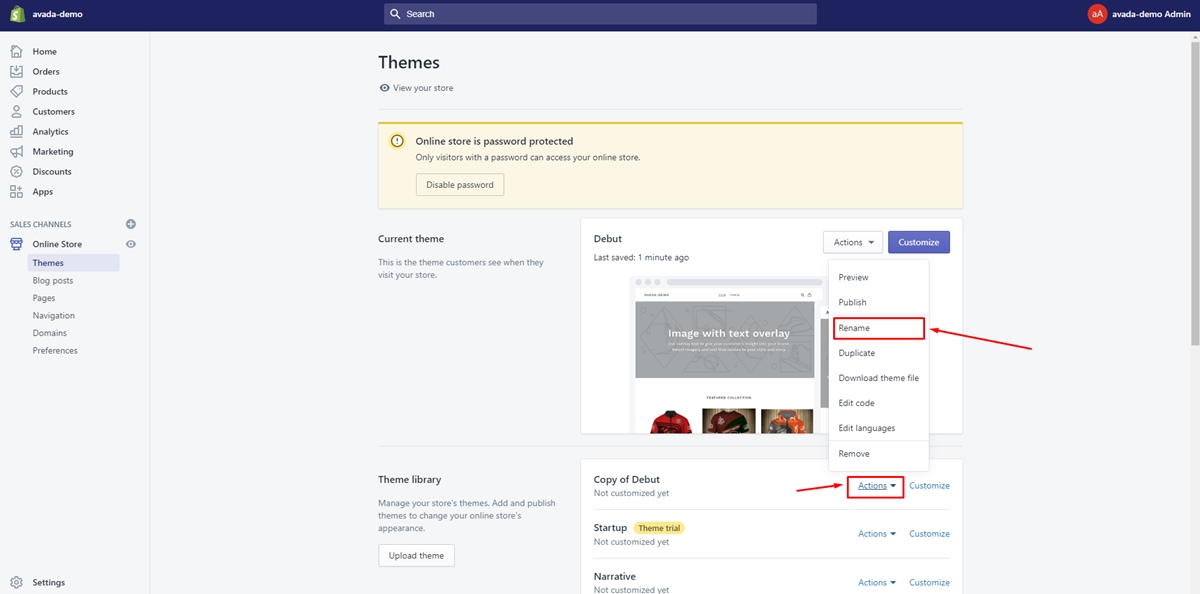
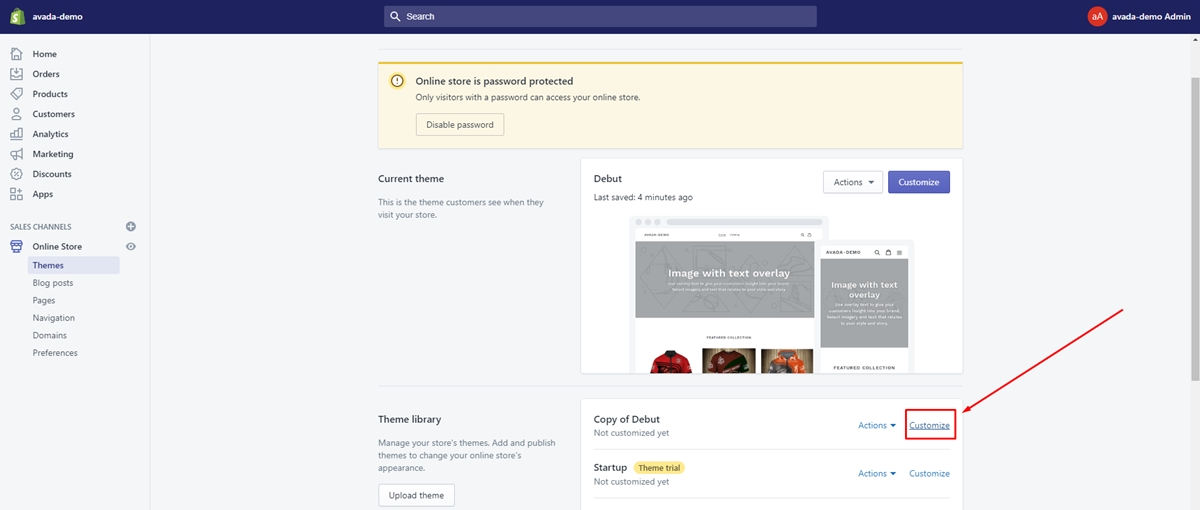
Step 5: Tap on Customize Theme
Tap on Customize Theme of your new branch theme
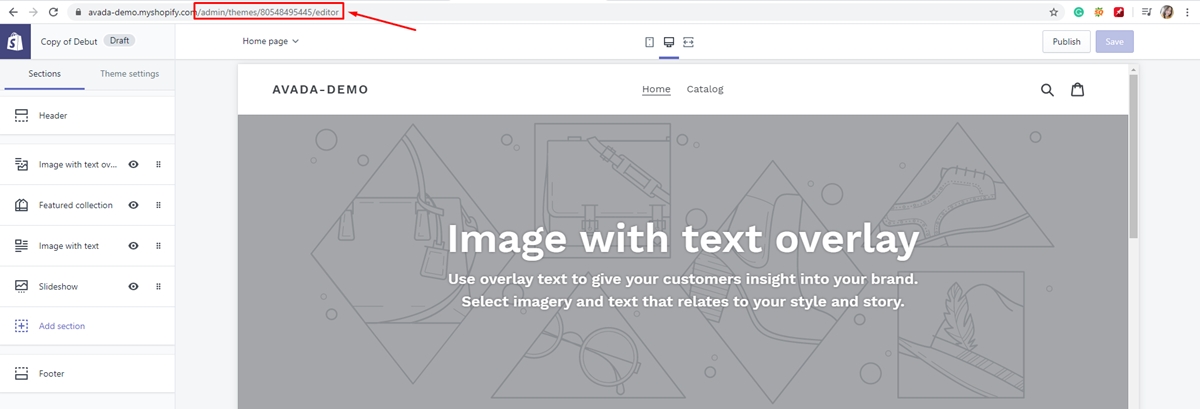
Step 6: Note the theme ID in the URL
For instance: /admin/themes/9542224/settings
Step 7: Edit config.yml
Edit the theme_id in config.yml to point to your branched theme
Step 8: Theme watch and do your work
Step 9: Preview your work
You can browse to that theme in Shopify admin and tapping on Preview
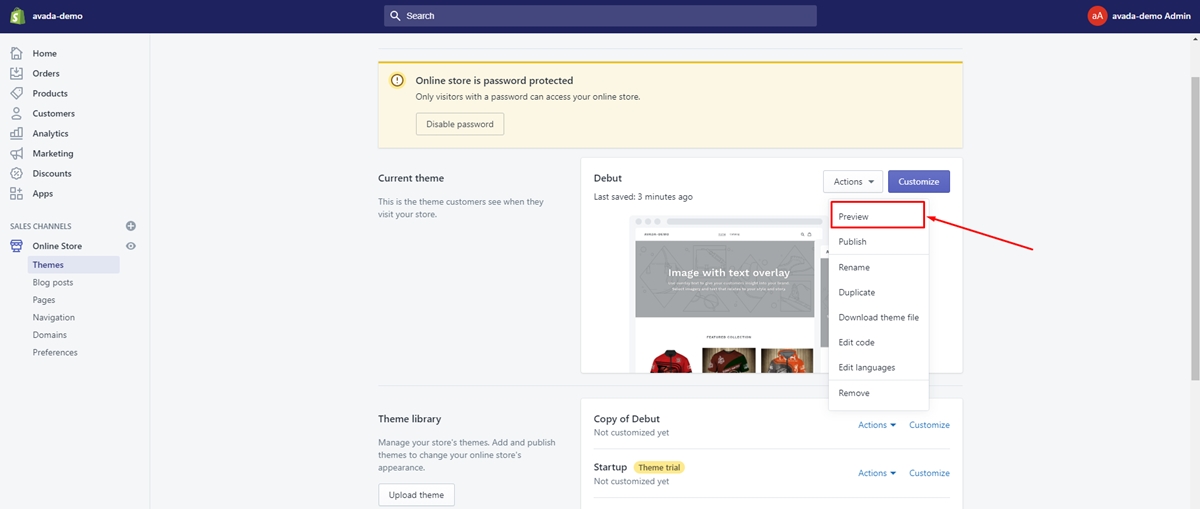
Step 10: Pull Request
Step 11: Rebase onto master, push to master repo
Step 12: Delete your branch (local and server)
Step 13: Delete your branched theme in Shopify Admin
Deployment phase
The next move is to deploy. In this step, force-deploy the theme in the master branch onto the production site:
Step 1: Ensure to kill your local theme watcher
Step 2: Delete your theme ID (to point it to the published theme)
Step 3: Theme upload to push master onto the primary theme
If you have eliminated files, then you can also run theme replace.
Then, you are ready to push master onto the published theme, as long as you blacklisted the settings_data.json.
Conclusion
To sum up, we have revealed to you the answer to the question How to build a Shopify theme from scratch?. We hope that you could do it effortlessly and have yourself a stunning theme.
If you want to modify a Shopify theme to personalize your web design, check out our post: How to Customize Shopify Themes.
Furthermore, if you have any questions, do not hesitate to contact us. We are always ready to help you out in case you need anything. Also, if you find our article helpful, please share it with your social network. We would be glad if you could do that.


