How to Build WooCommerce Pages with Visual Composer
It might be difficult to create a custom product page for WooCommerce. There are so many factors to consider that you hardly know where to begin.
In this article, we will show you how to build WooCommerce pages with Visual Composer.
If this is something you’re interested in, let’s dive right in!
Visual Composer Overview

Visual Composer is a React-based website builder that allows you to design your own professional website. Visual Composer is suitable for both experienced users and newcomers. You can use the simple drag-and-drop website builder to quickly and easily build your website.
With a comprehensive WordPress page builder, templates, blocks, components, and plugins, Visual Composer enables you to create a professional site suited to your company’s needs. And there is no need for coding knowledge.
Below are some main features of Visual Composer:
- Drag and drop editor
- Visual composer hub
- Rich content elements
- Professional templates
- Theme builder
- Popup builder
- Responsive design
- Seamless integrations
- Developer API
You can try out the plugin totally for free, but if you want to unlock a complete website builder experience with unlimited access to the Visual Composer Hub, you should consider purchasing the Premium version.
How to generate a Custom WooCommerce Product Page with Visual Composer?
In this part, we will give you detailed instructions on how to create a custom WooCommerce product page with Visual Composer via one specific example.
Step 1: Install and activate the plugin
First, you need to download the plugin .
After that, you will have to get it installed and activated in your WooCommerce store.
Step 2: Create a product
From the WooCommerce admin dashboard, go to Products and then click on Add New. After that, you need to enter details about your product.
Click Save to save the newly created product.

It’s important to include the title, price, and a brief description. You may also add a category or anything else that your product requires to show on the product page.
Step 3: Add the product to a page
You have complete design flexibility for your product here. In this step, we’d like to introduce to you a unique and useful feature of Visual Composer called Dynamic Content.
Dynamic Content allows the WooCommerce products to be synced with the page where they are displayed. It means that if you add dynamic pricing to your website, when the price of the WooCommerce product changes, it will also update on the page. This method will help save you a lot of time in the long run.
Now we’ll show you how to add dynamic content using the pricing example, but it can also be used for the image, description, title, and anything else you filled out about the product.
Assume that you’ve finished your layout and styled it, and you’ve already added a placeholder text for the price.
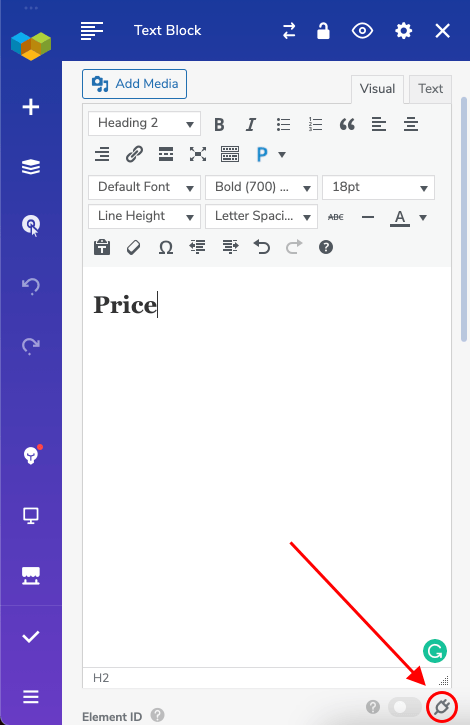
Then, in the TinyMCE editor, open the Edit window for the text block element and look for the Dynamic Content icon at the very bottom.

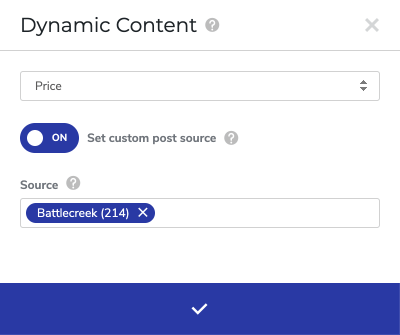
There, you need to activate the toggle that allows you to select the source from which the information will be retrieved. In this example, you need to locate the product. You can do this by writing the product’s name or ID, which could be found under the product in the “Products” section.
Next, from the dropdown, select the type of content you wish to display. “Price” can be found at the bottom of the WooCommerce section.

Simply click on Save, and the information will all be synced.
Step 4: Create a custom “Add to Cart” button
Make sure to have an Add to Cart button created and start to customize it now.
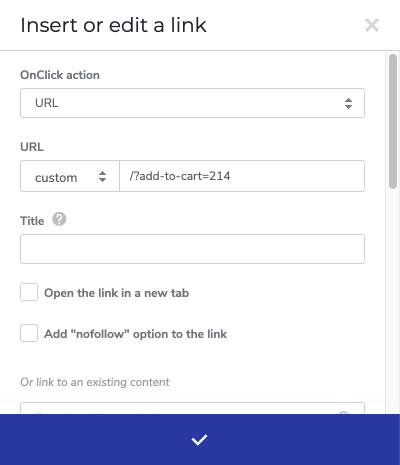
Open the Edit window of the Add to Cart button and click on the link selector. Under the URL section, choose custom from the dropdown menu and enter the URL with your accurate product ID. The URL should be like this: /?add-to-cart=214, the number 214 should be replaced by your product ID.

Once that’s done, the button will automatically add the product to the cart when being clicked on by shoppers.
Final Words
Visual Composer can help to design attractive, functional custom product pages in WooCommerce. You can use the drag-and-drop interface to effortlessly change the layout and style of your product pages.
We hope that this post has been of great help to you as you create WooCommerce pages with Visual Composer.
Thanks a lot for reading and we’ll see you in the next post.


