How to add products to pages in Shopify
If you are wondering about how to add products to pages in Shopify, don’t miss out on this article. The purpose of this tutorial is to aid you in understanding more about your products, pages in Shopify, and how to insert your products to pages through simple instructions.
As you are an online store owner, you might see that there are not so many differences in the process of adding products to the other platform, but, as they are different platforms, the steps are not always the same.
Product pages are very important parts of your eCommerce store
There is a fact that product pages are of great importance for your eCommerce stores since it is the major pages in which you display every product you are possessing as well as encourage customers to buy them. As creating product pages, you are thinking of your customers’ perspective and offering them what they need to finalize buying decisions.
Additionally, all of the information, details, images or specifications of a product should be available for buyers to provide them with good experience in your shop, which can convert to sales.
Also, do remember that product pages are where you get your product sold; hence, you need to make sure that it is the best place to show off your products and boost sales.
One of the most amazing things when using Shopify is that inserting products is not so complicated because you only need to add every detail to a single page without being required to press on confusing tabs. Additionally, Shopify just asks for some basic information so that newcomers, starters or those who are low technical store owners can use it with efficiency and confidence.
How to add products to product pages
Let’s get started by obeying those simple and helpful steps below. No worries since you can ask for help if you are not successful in performing them.
Step 1: Login your Shopify account
To activate all of the Shopify functions, you need your own account by logging into your Shopify account with your emails and passwords.
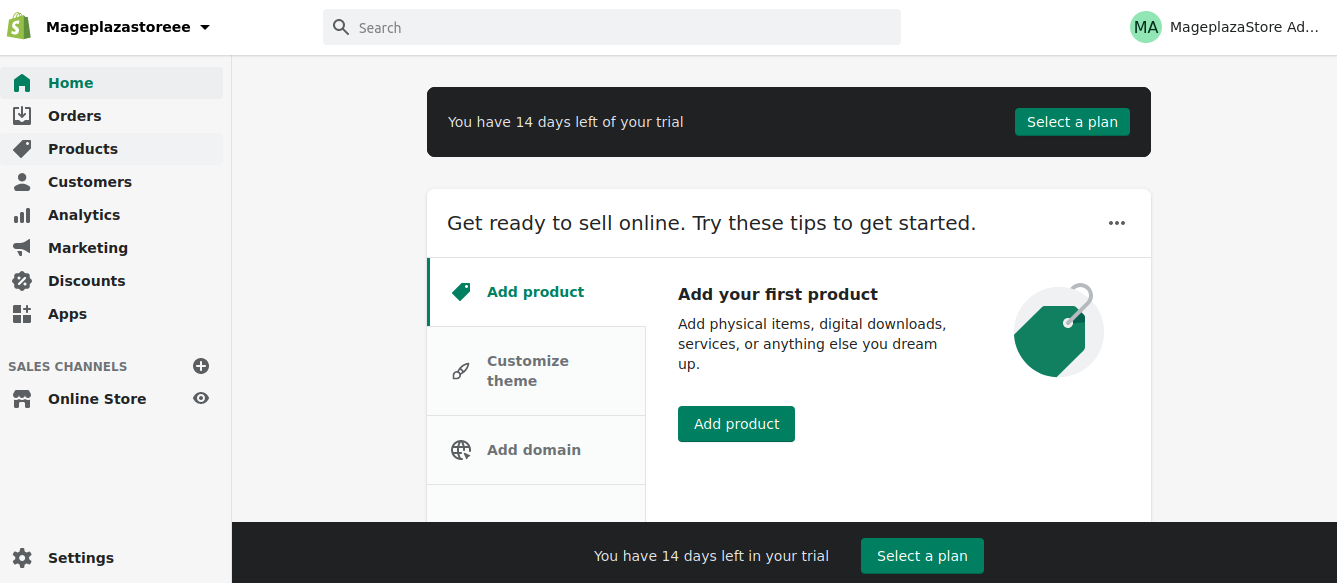
Step 2: Head to Products, then Add Products
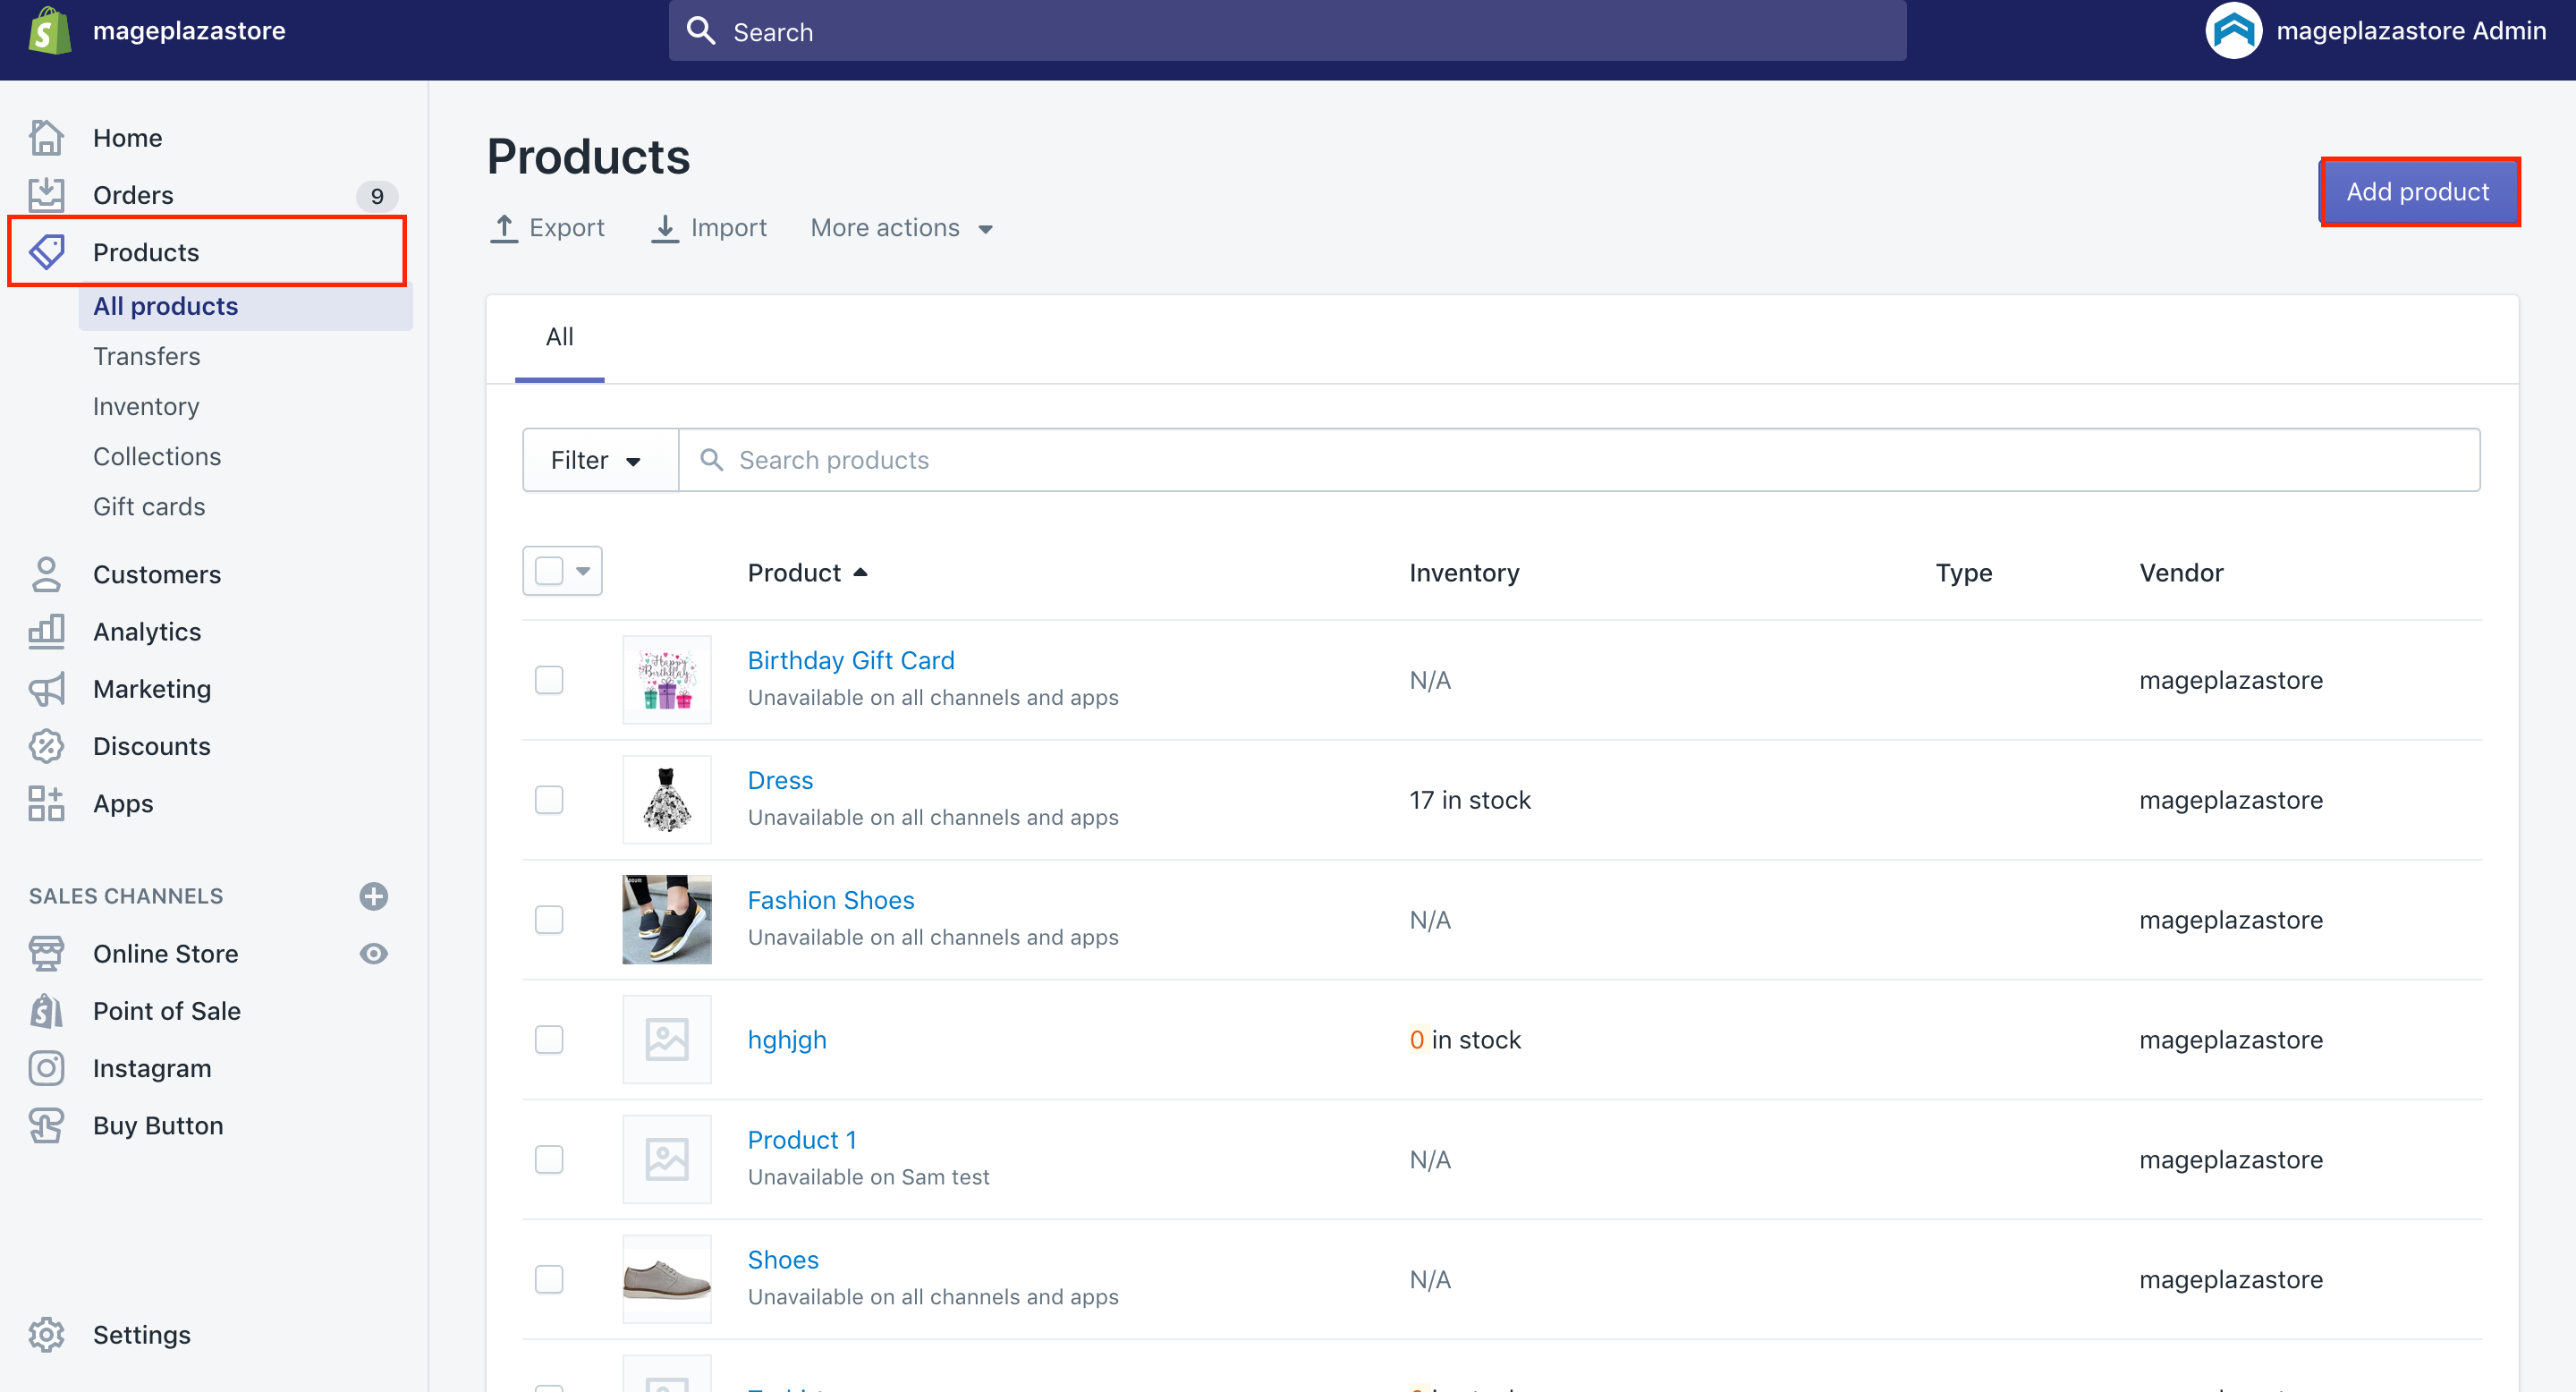
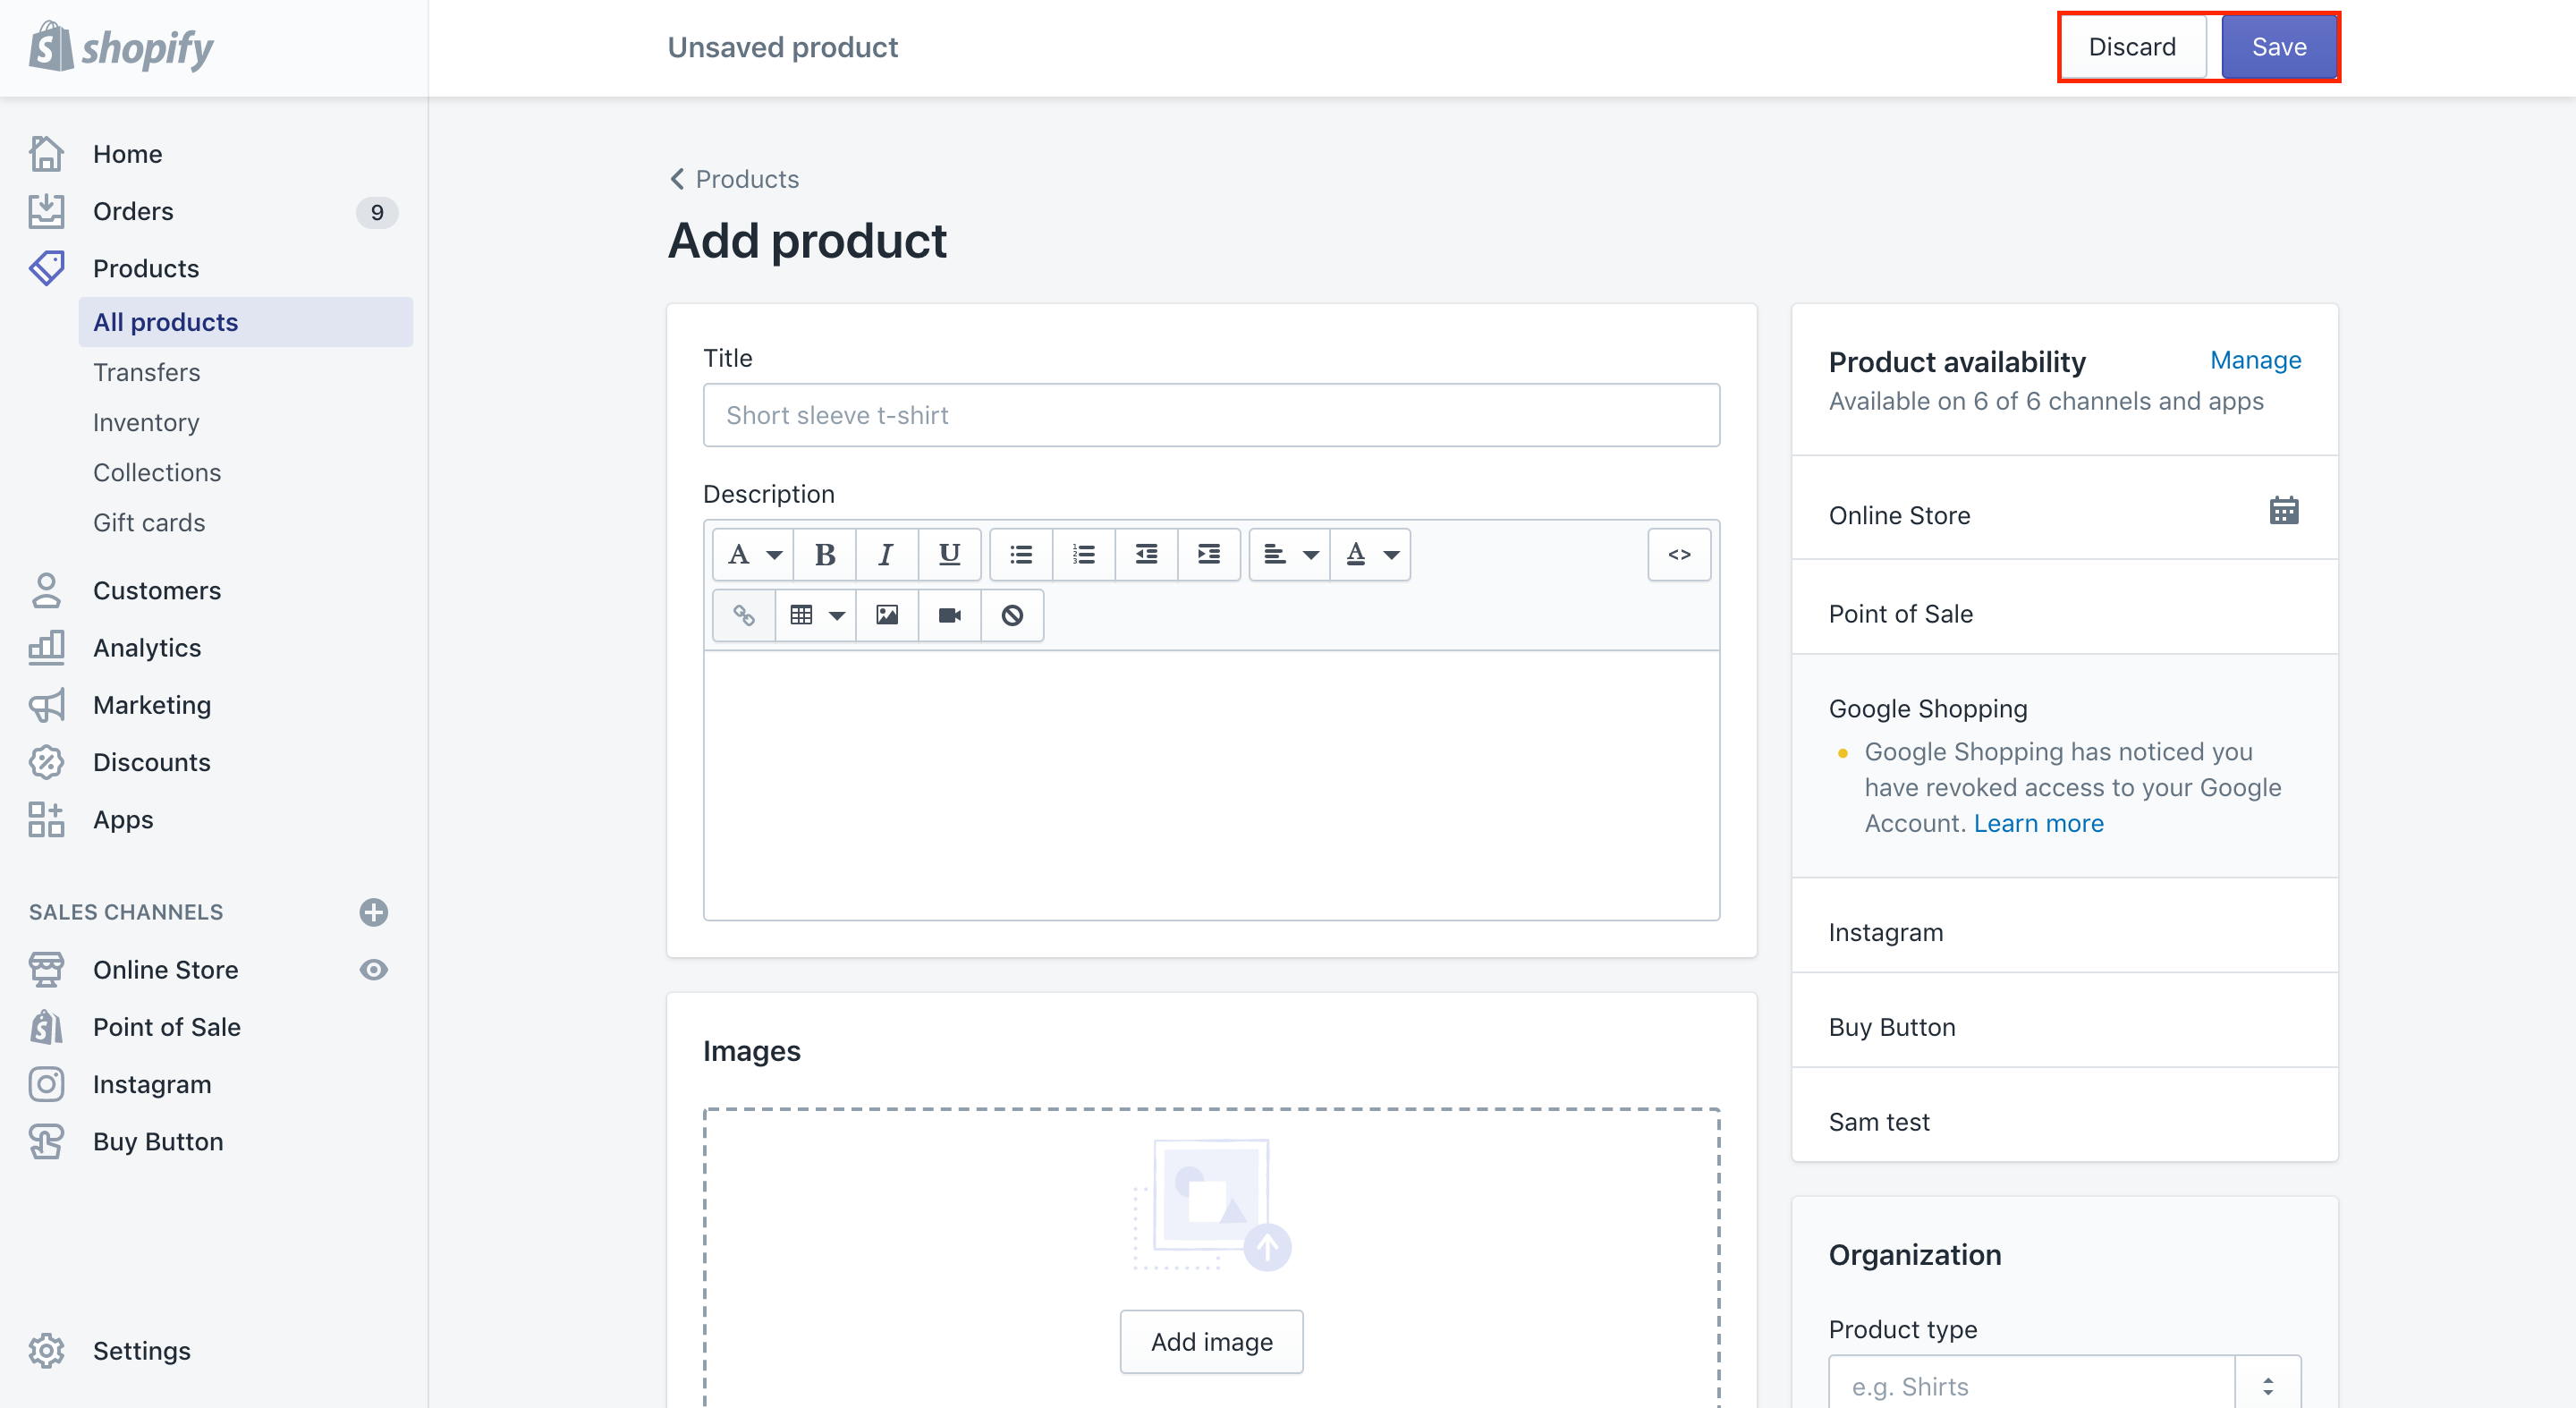
After logging in, the next thing is heading to Products > Add Products. You will see there are Navigation options located on the left side of the paper.
Whenever you see Products, kindly click on that.
Then, you can go to the Add Products button located on the right corner of the page.
Step 3: Provide product details
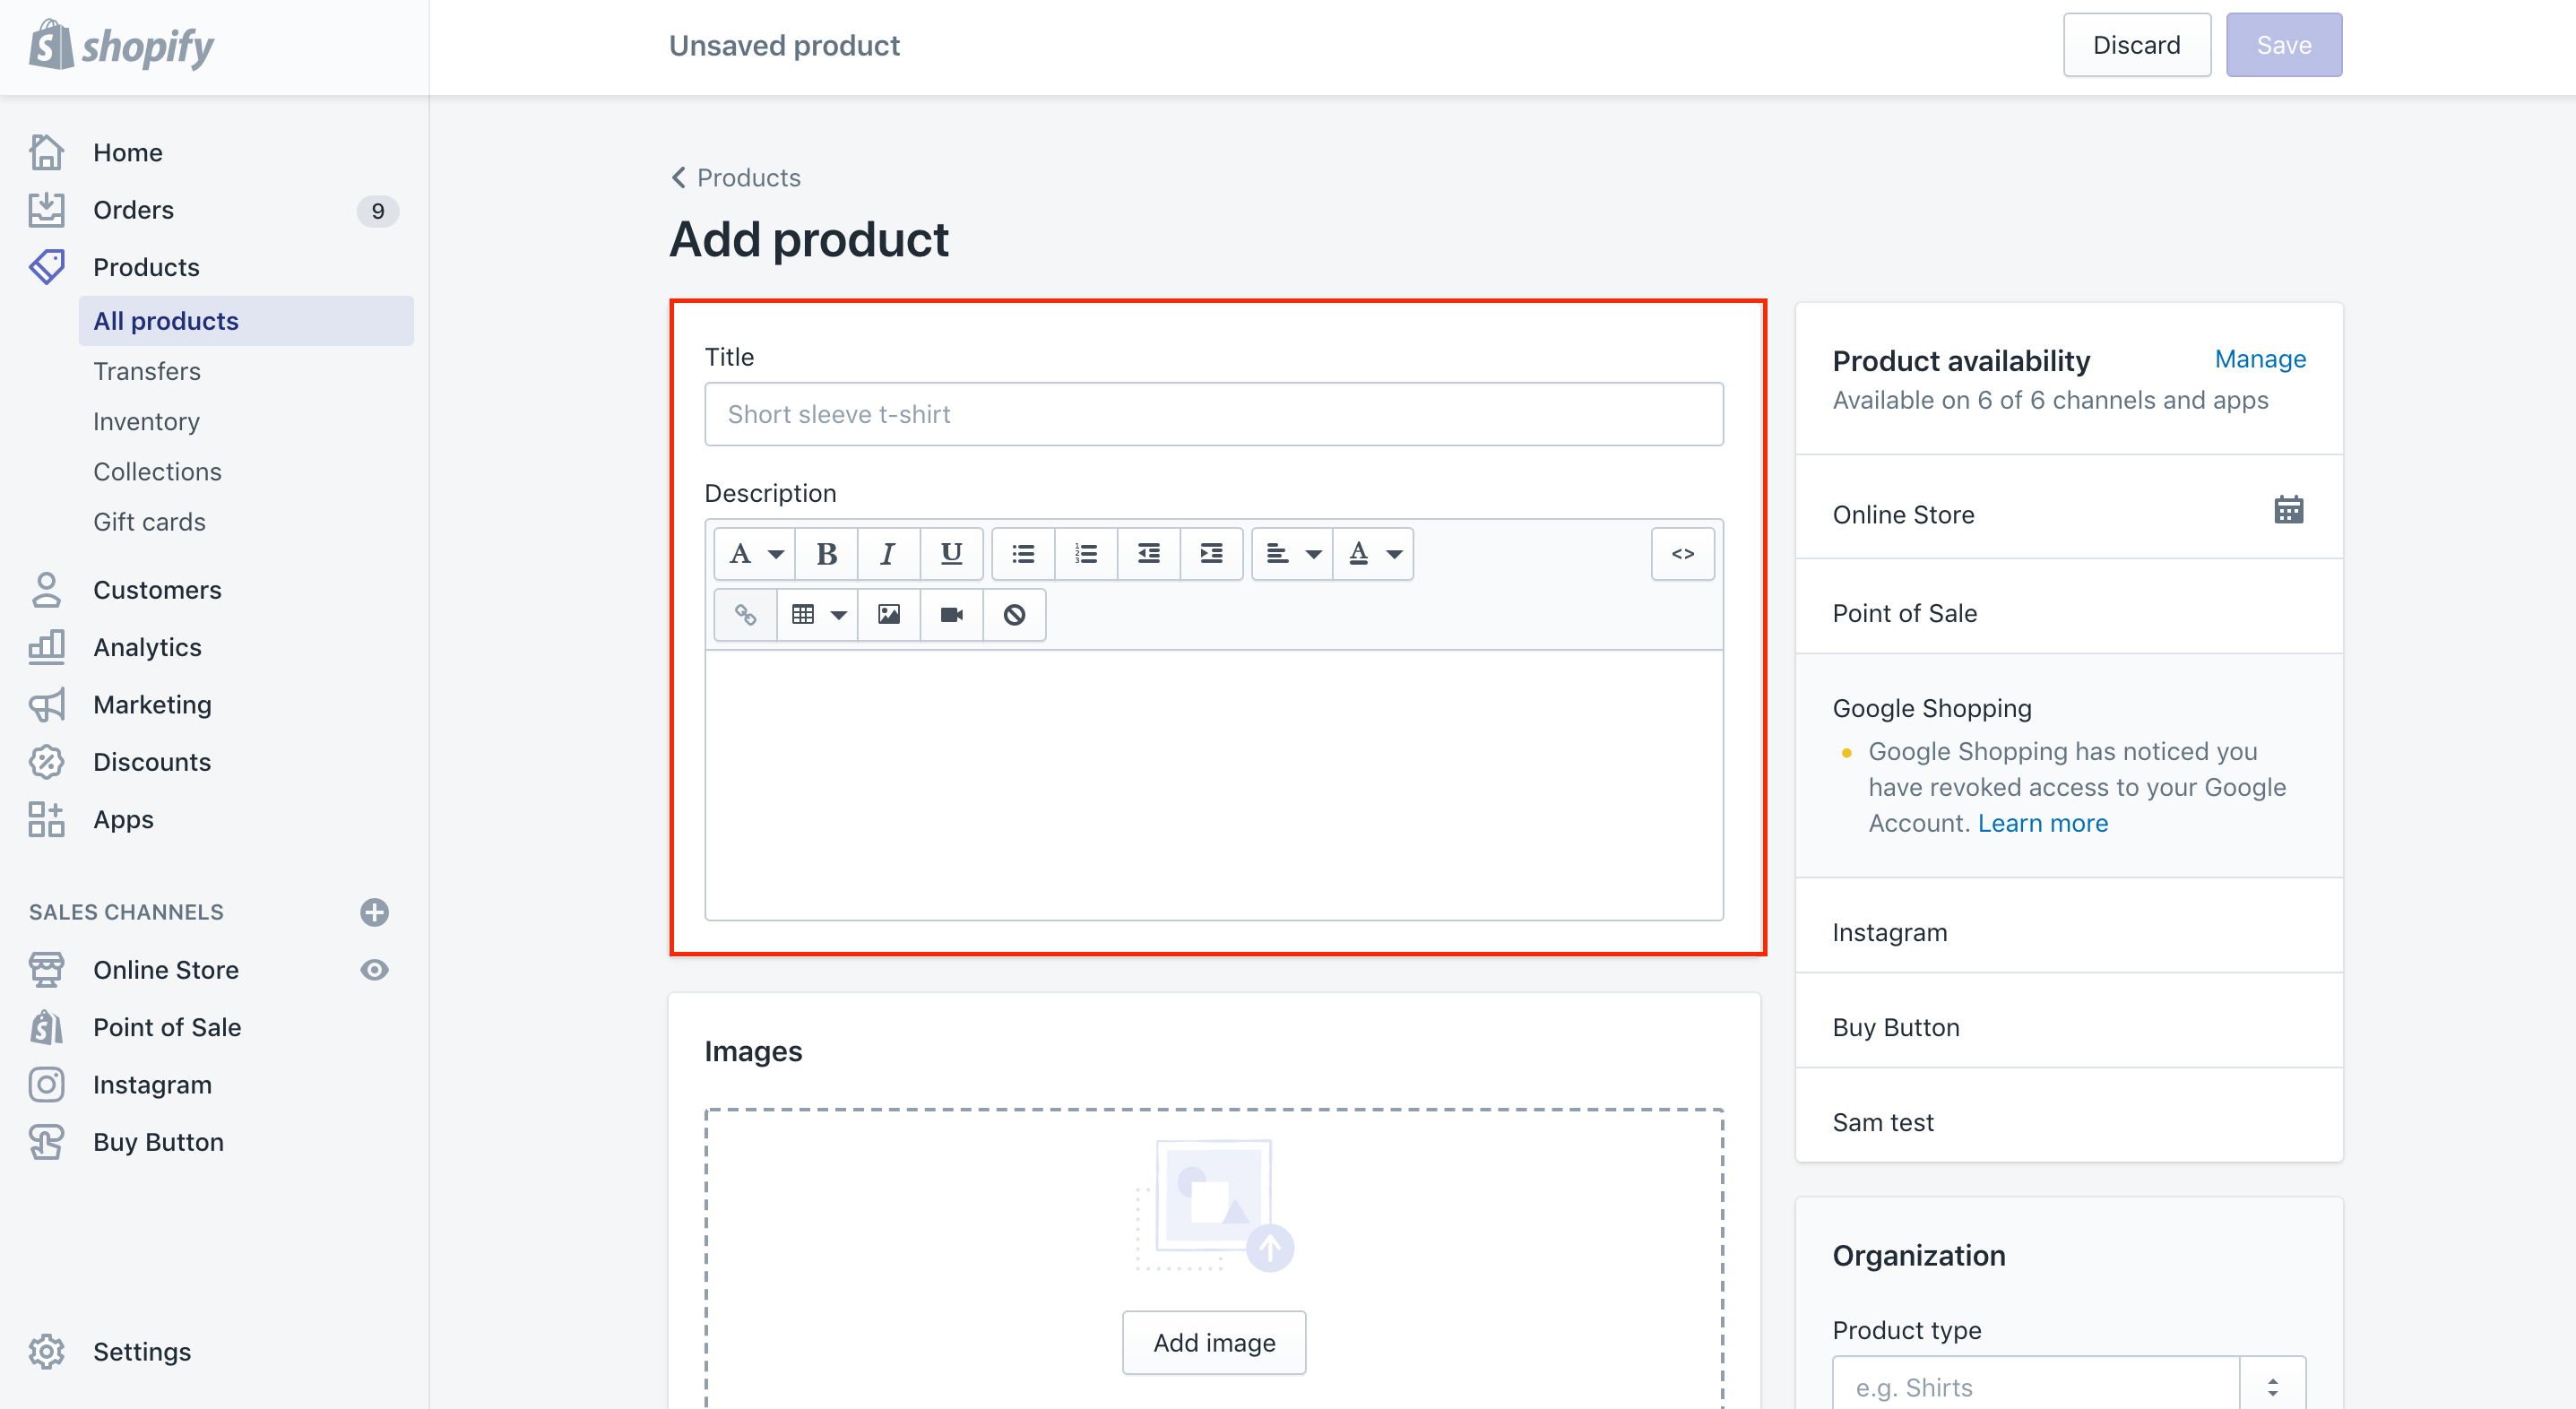
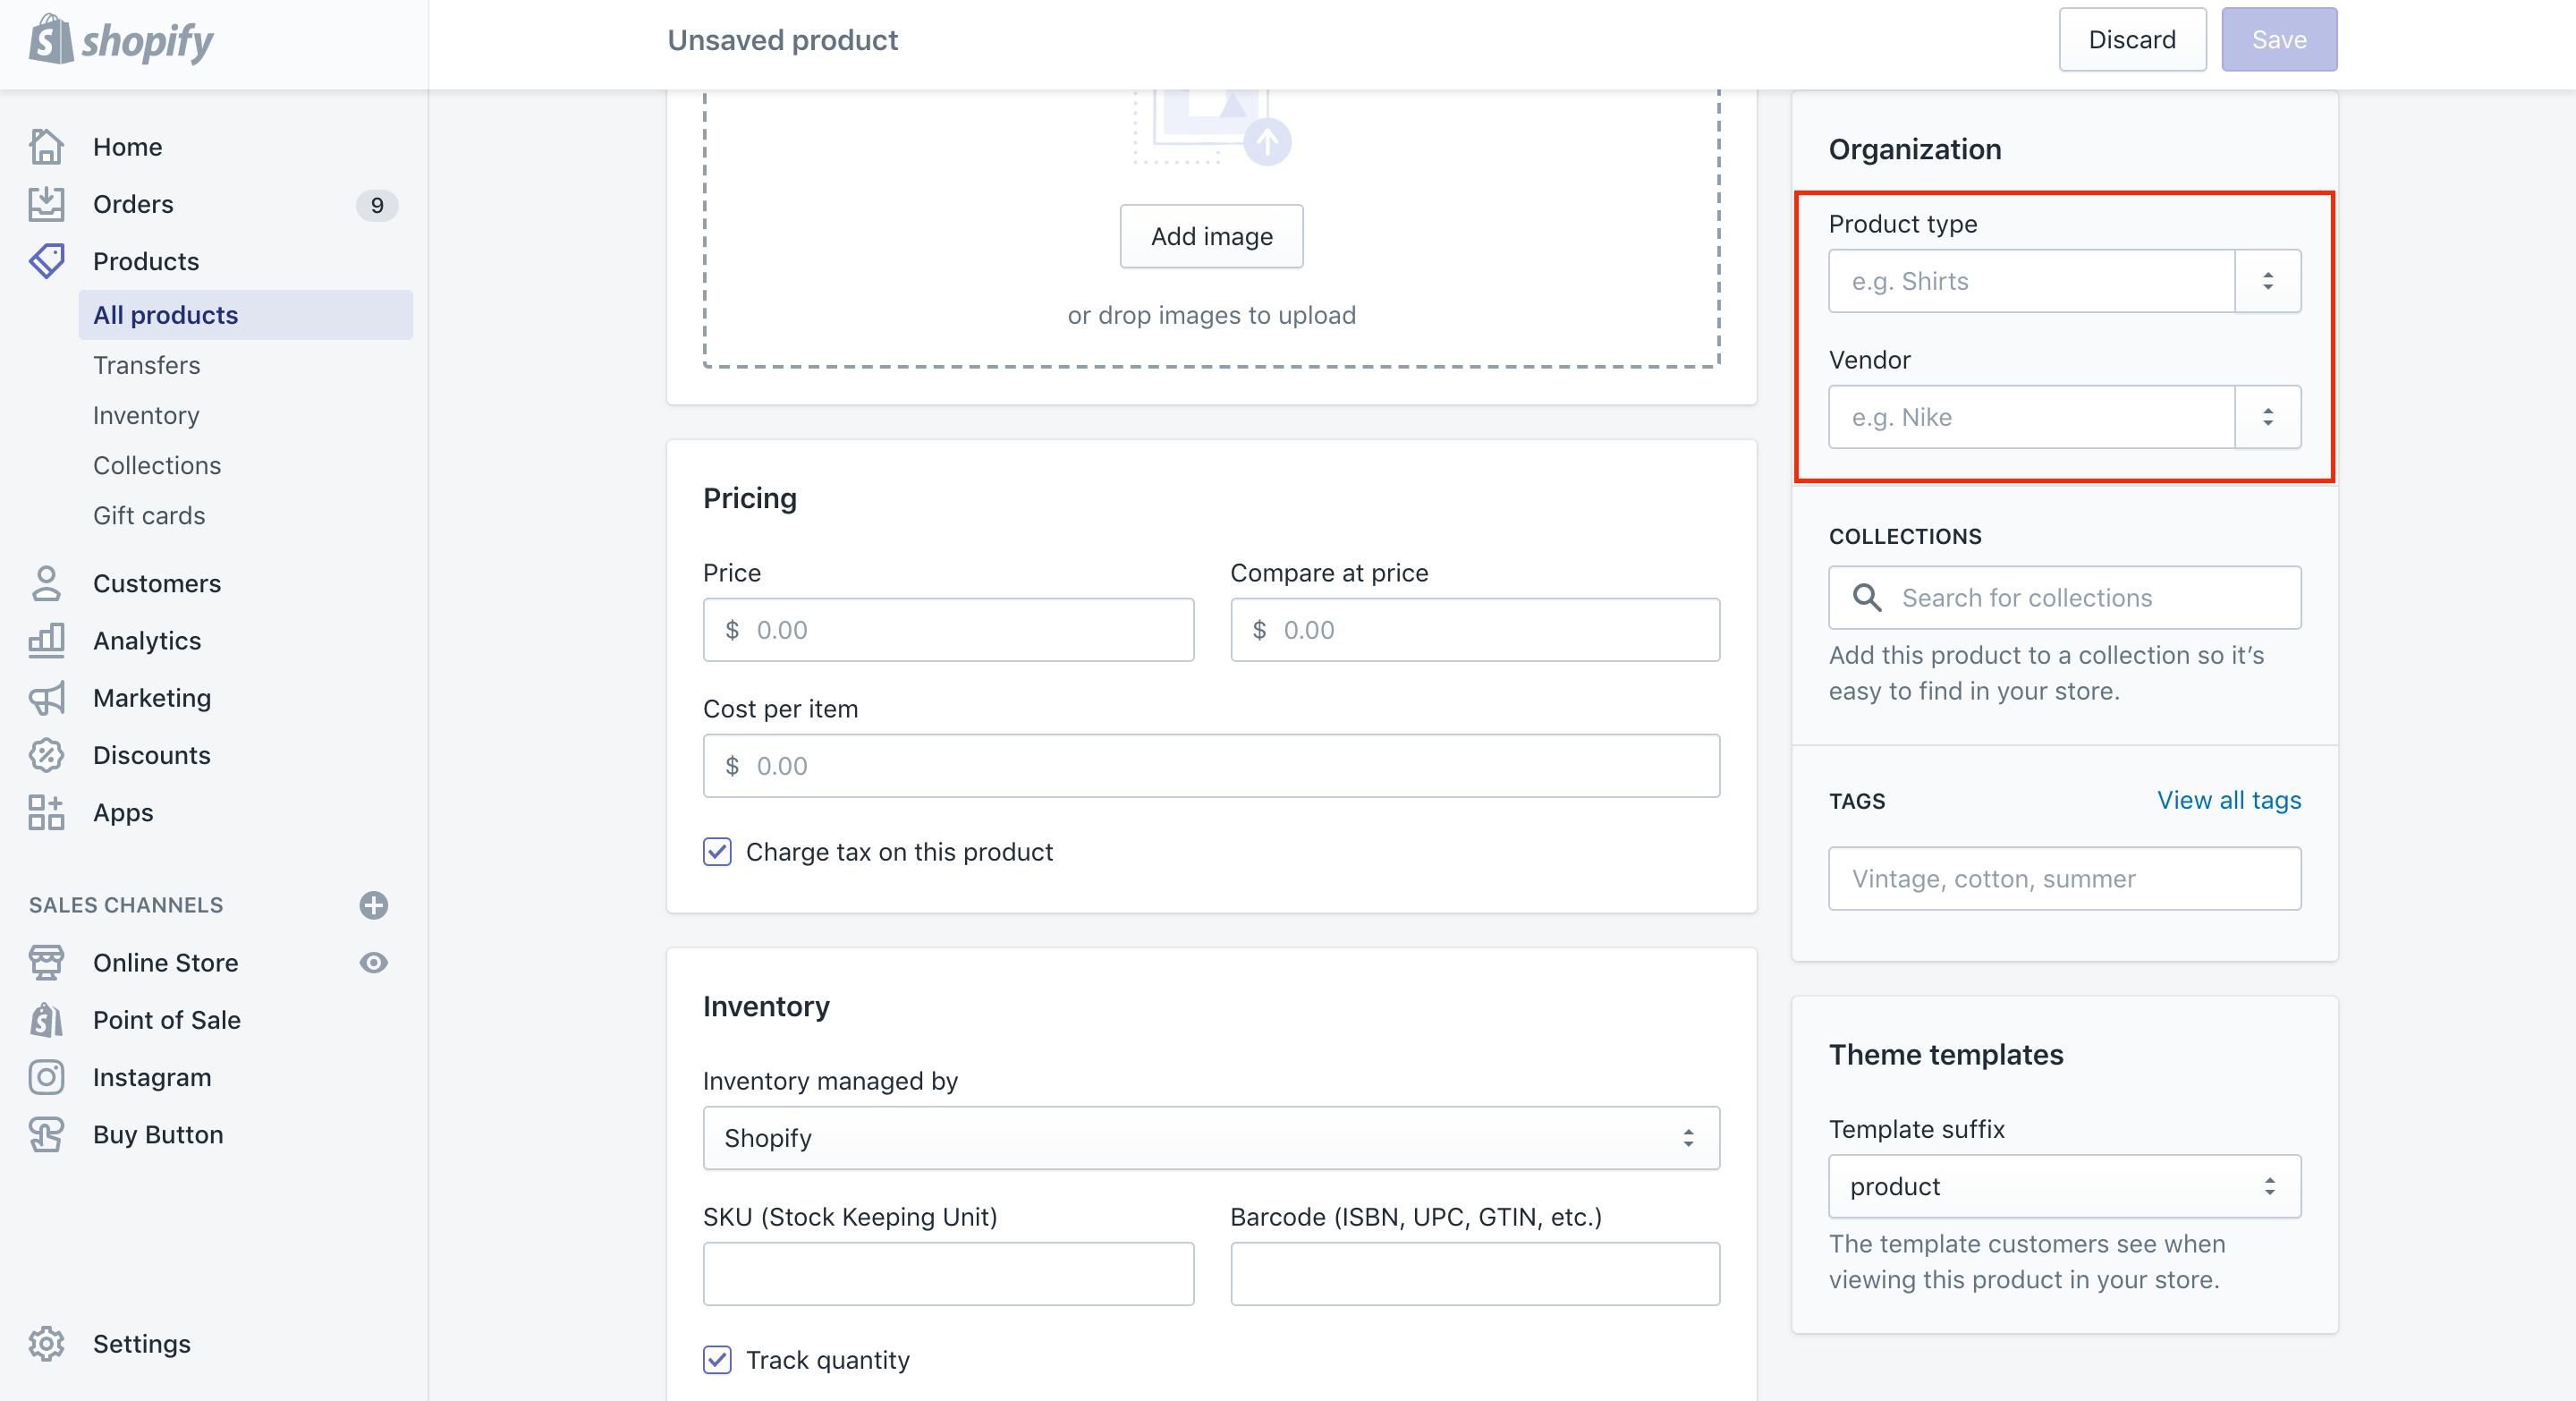
In this step, you have to show your product’s details to customers who are interested in your item. Product information includes product title, description, type, and vendor.
Product title
When it comes to the product title box, this is the place where you can give your product a name. Item titles had better contain a consistent format to help them look good as shown in the showcase view. Also, product titles should consist of keywords, along with a distinct description of this product.
Description
Regarding product descriptions, Shopify offers you a large space for your product description. On the product description, you can feel free to present your products’ features, specifications, benefits, and other worth-sharing information to assist customers in their purchasing.
Like every short and attractive paragraph, the product description needs to be unique and well-written. As a content writer, you also know that copying and pasting content from another site is unacceptable since it puts your search engine rankings in stake and leaves your customers a not-good-impression about your sites.
Type
In this type section, you are able to add texts in order to clarify your products. In general, this is known as a mandatory field. All you need to do is to guarantee that you are using appropriate texts to get your products classified.
Vendor
In this field, you can edit the suppliers, manufacturers or credit the brand of your items.
Step 4: Add inventory and variants
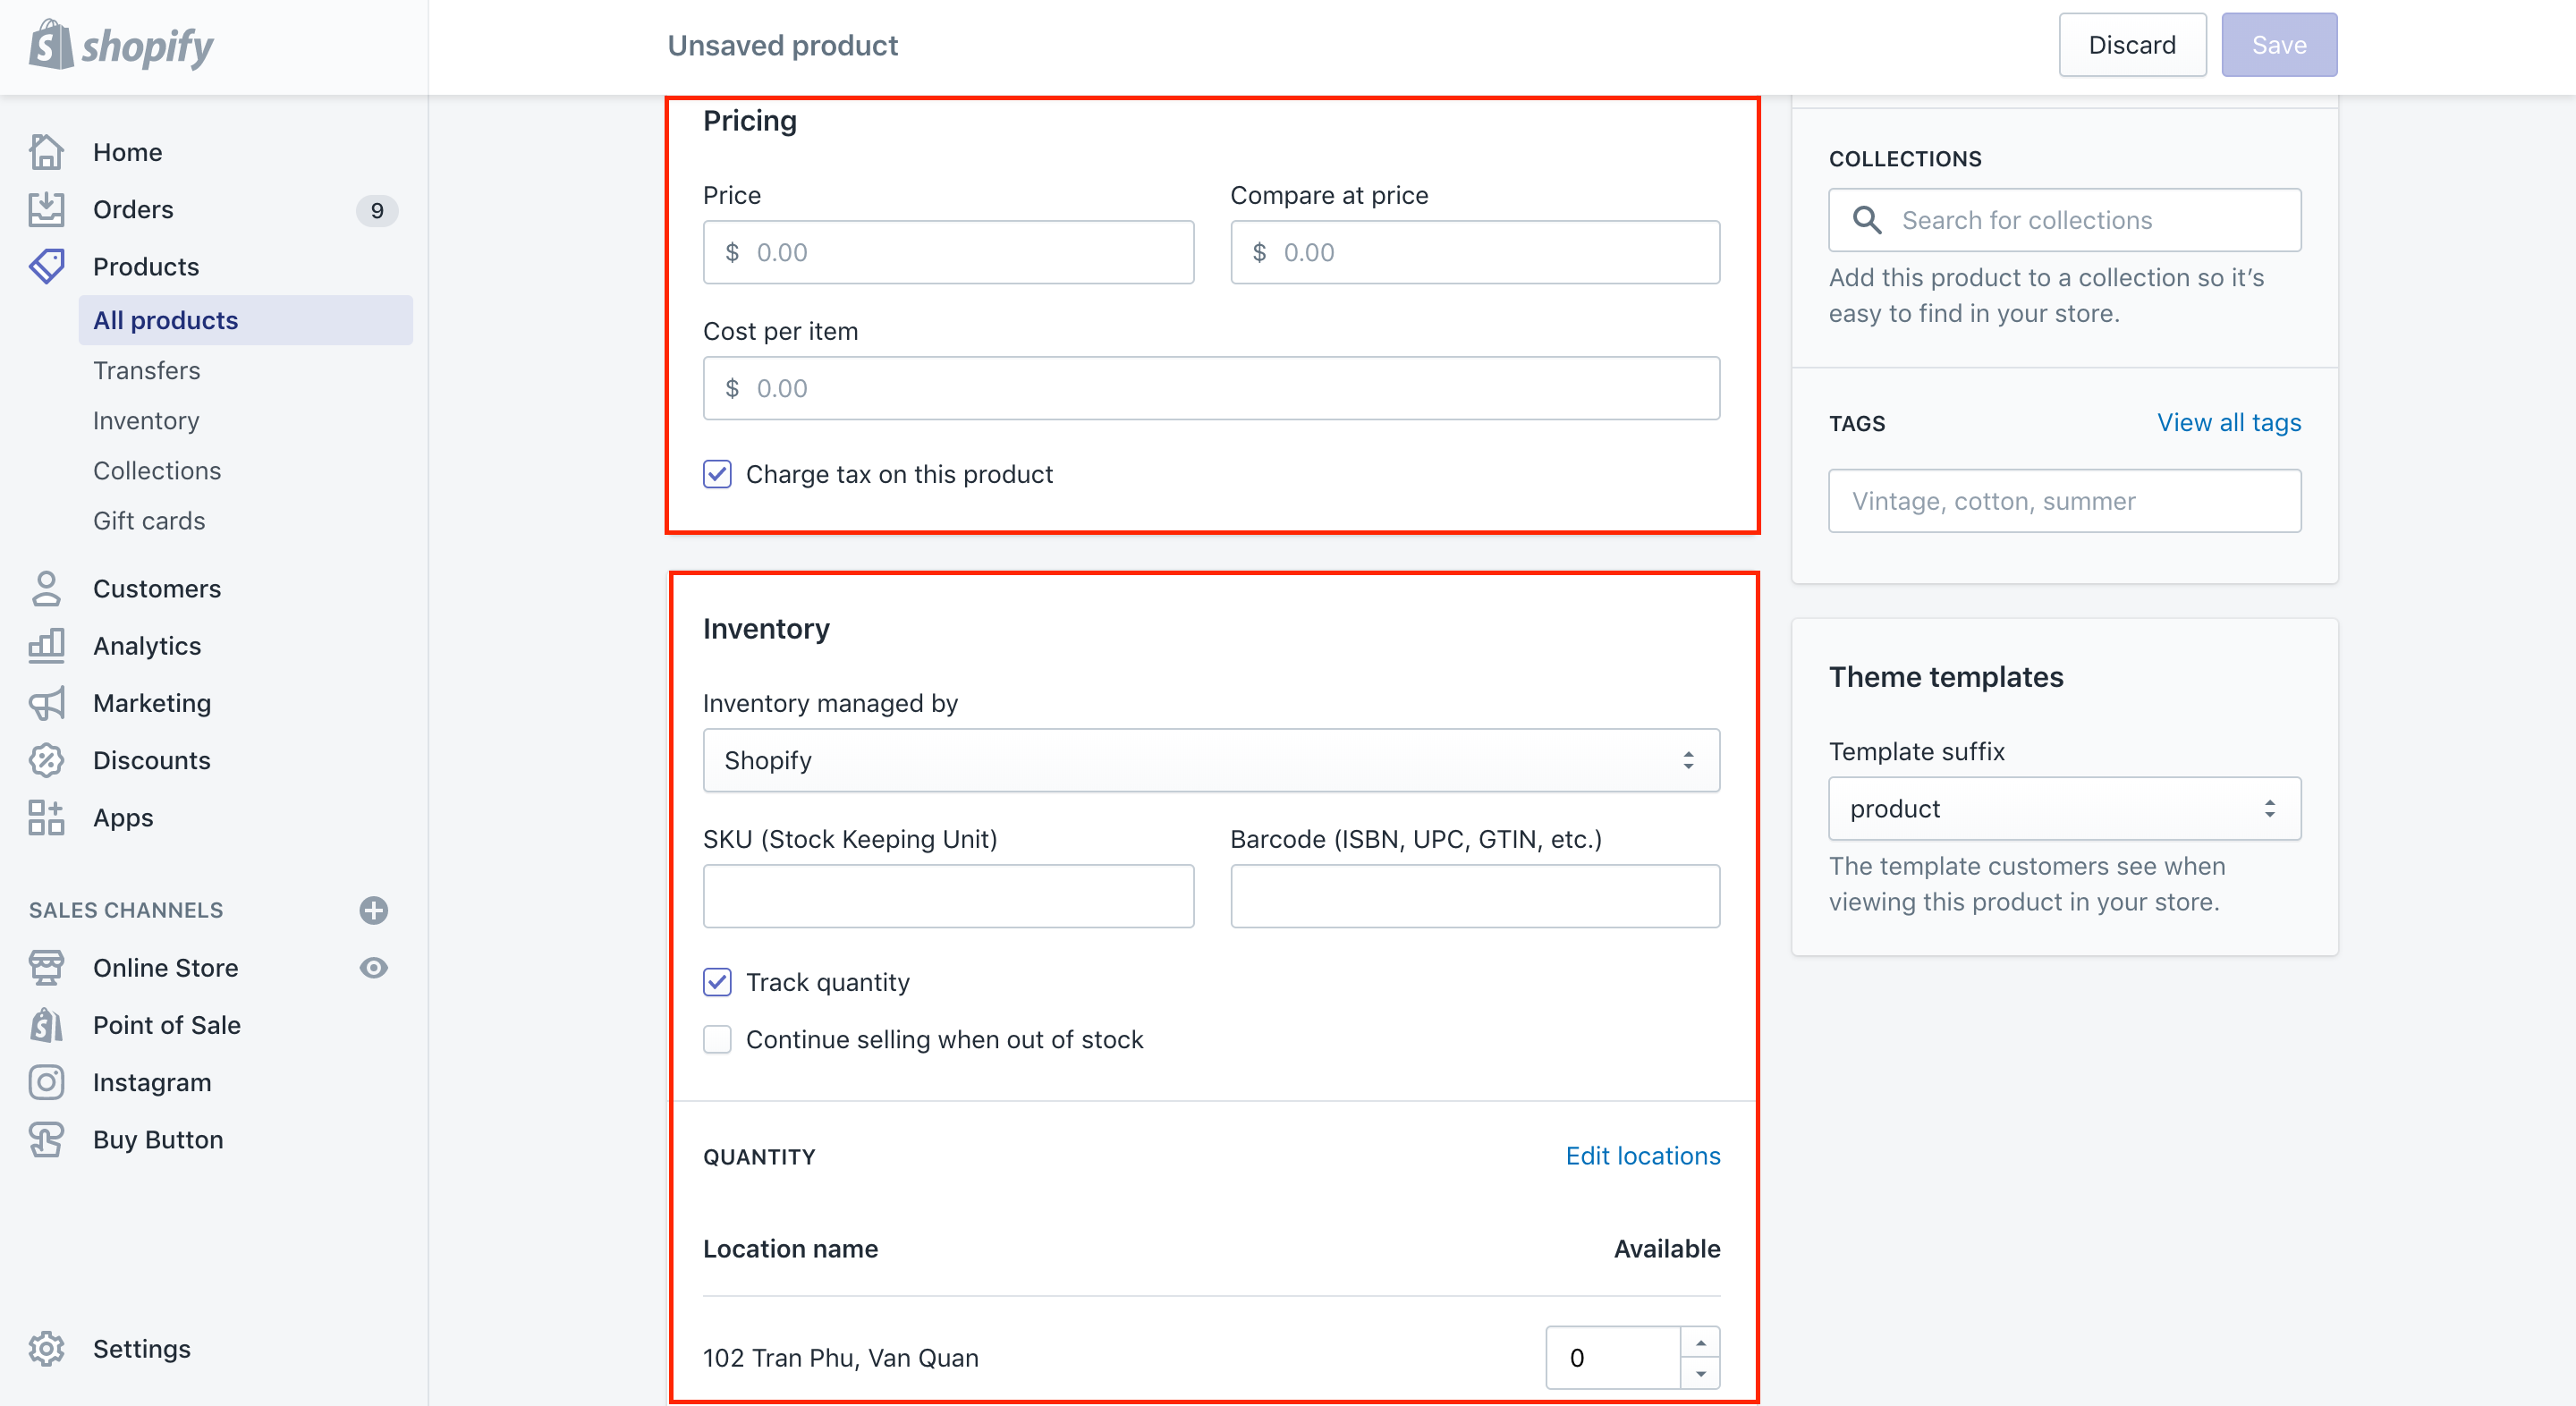
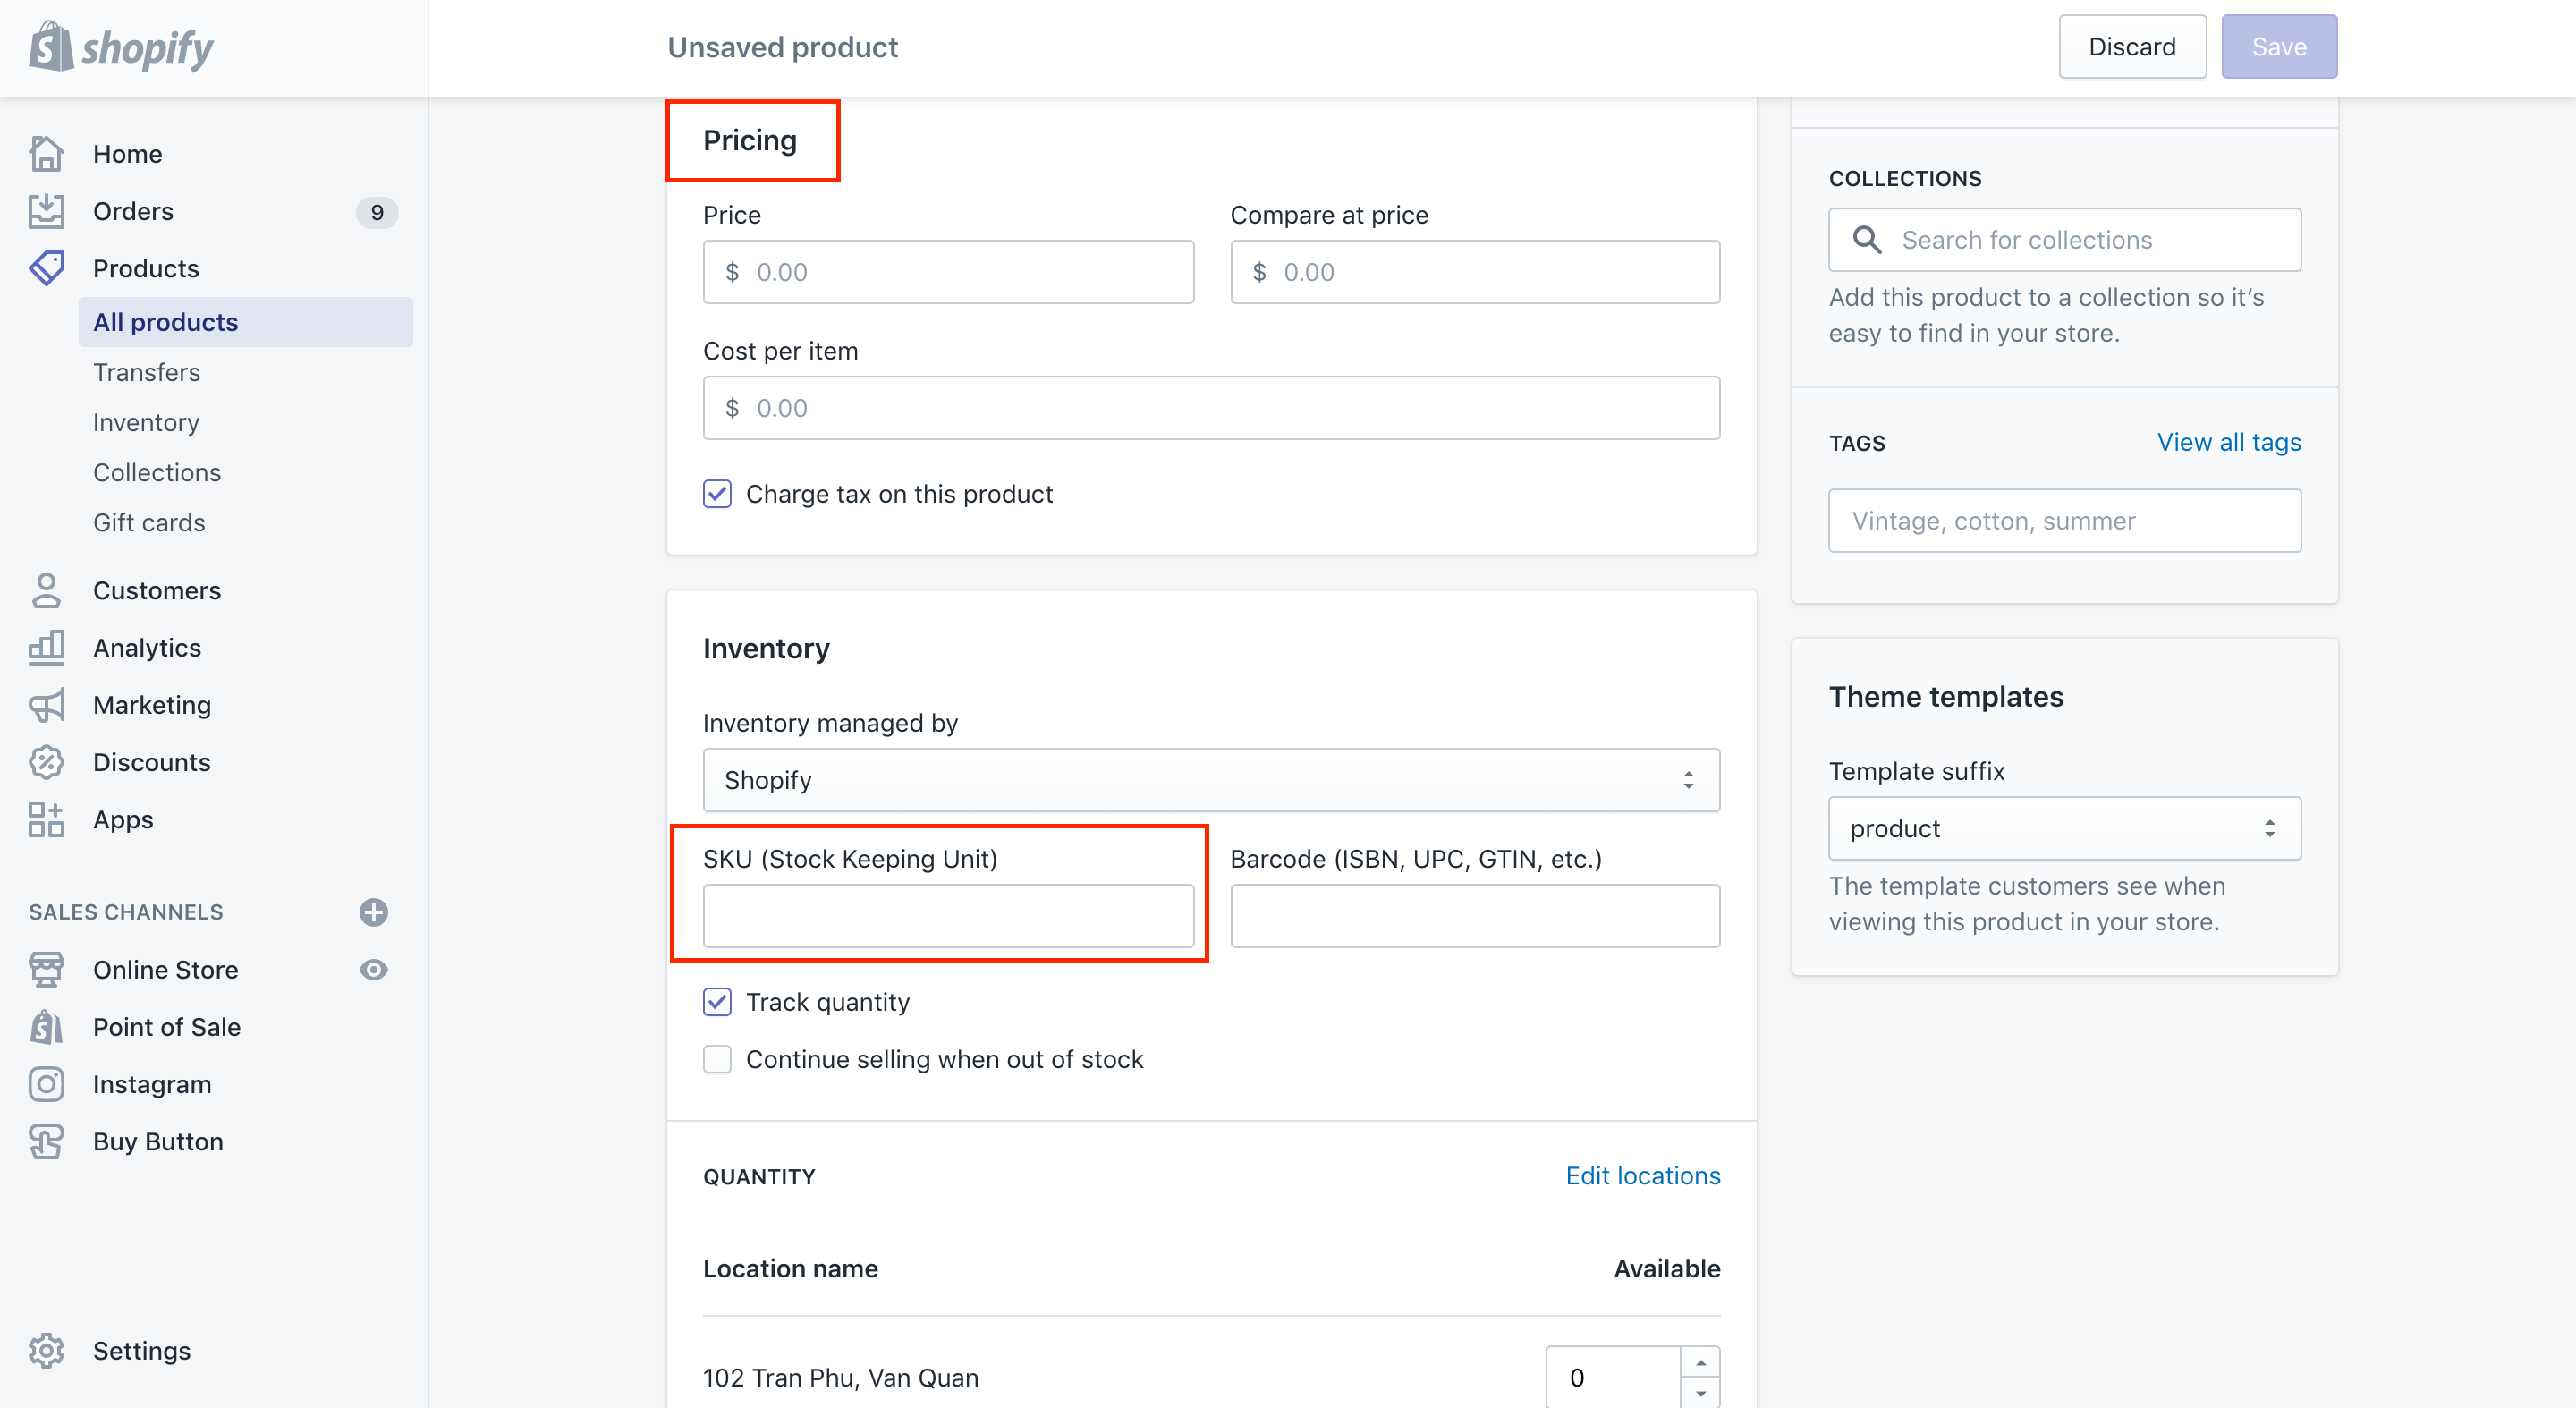
Next, let’s refer to the Inventory and Variants section, where you can add more details on each product, including price, SKU, shipping option, and weight.
Price
Price section is a place where you can provide your customers with your product prices. Take note that you do not have to add the currency symbol as it will be installed on the Shopify’s General Settings page.
SKU
Lots of Shopify users are concerned about SKU and wish to know what SKU exactly is. In fact, SKU is defined as a unique identifier for every product in your stores. SKU stands for Stock Keeping Unit. You can find SKU on the manufacturers’ sites or spot them directly from the suppliers. In case you feel hard to find SKU for a specific product, let’s leave it there.
Shipping options
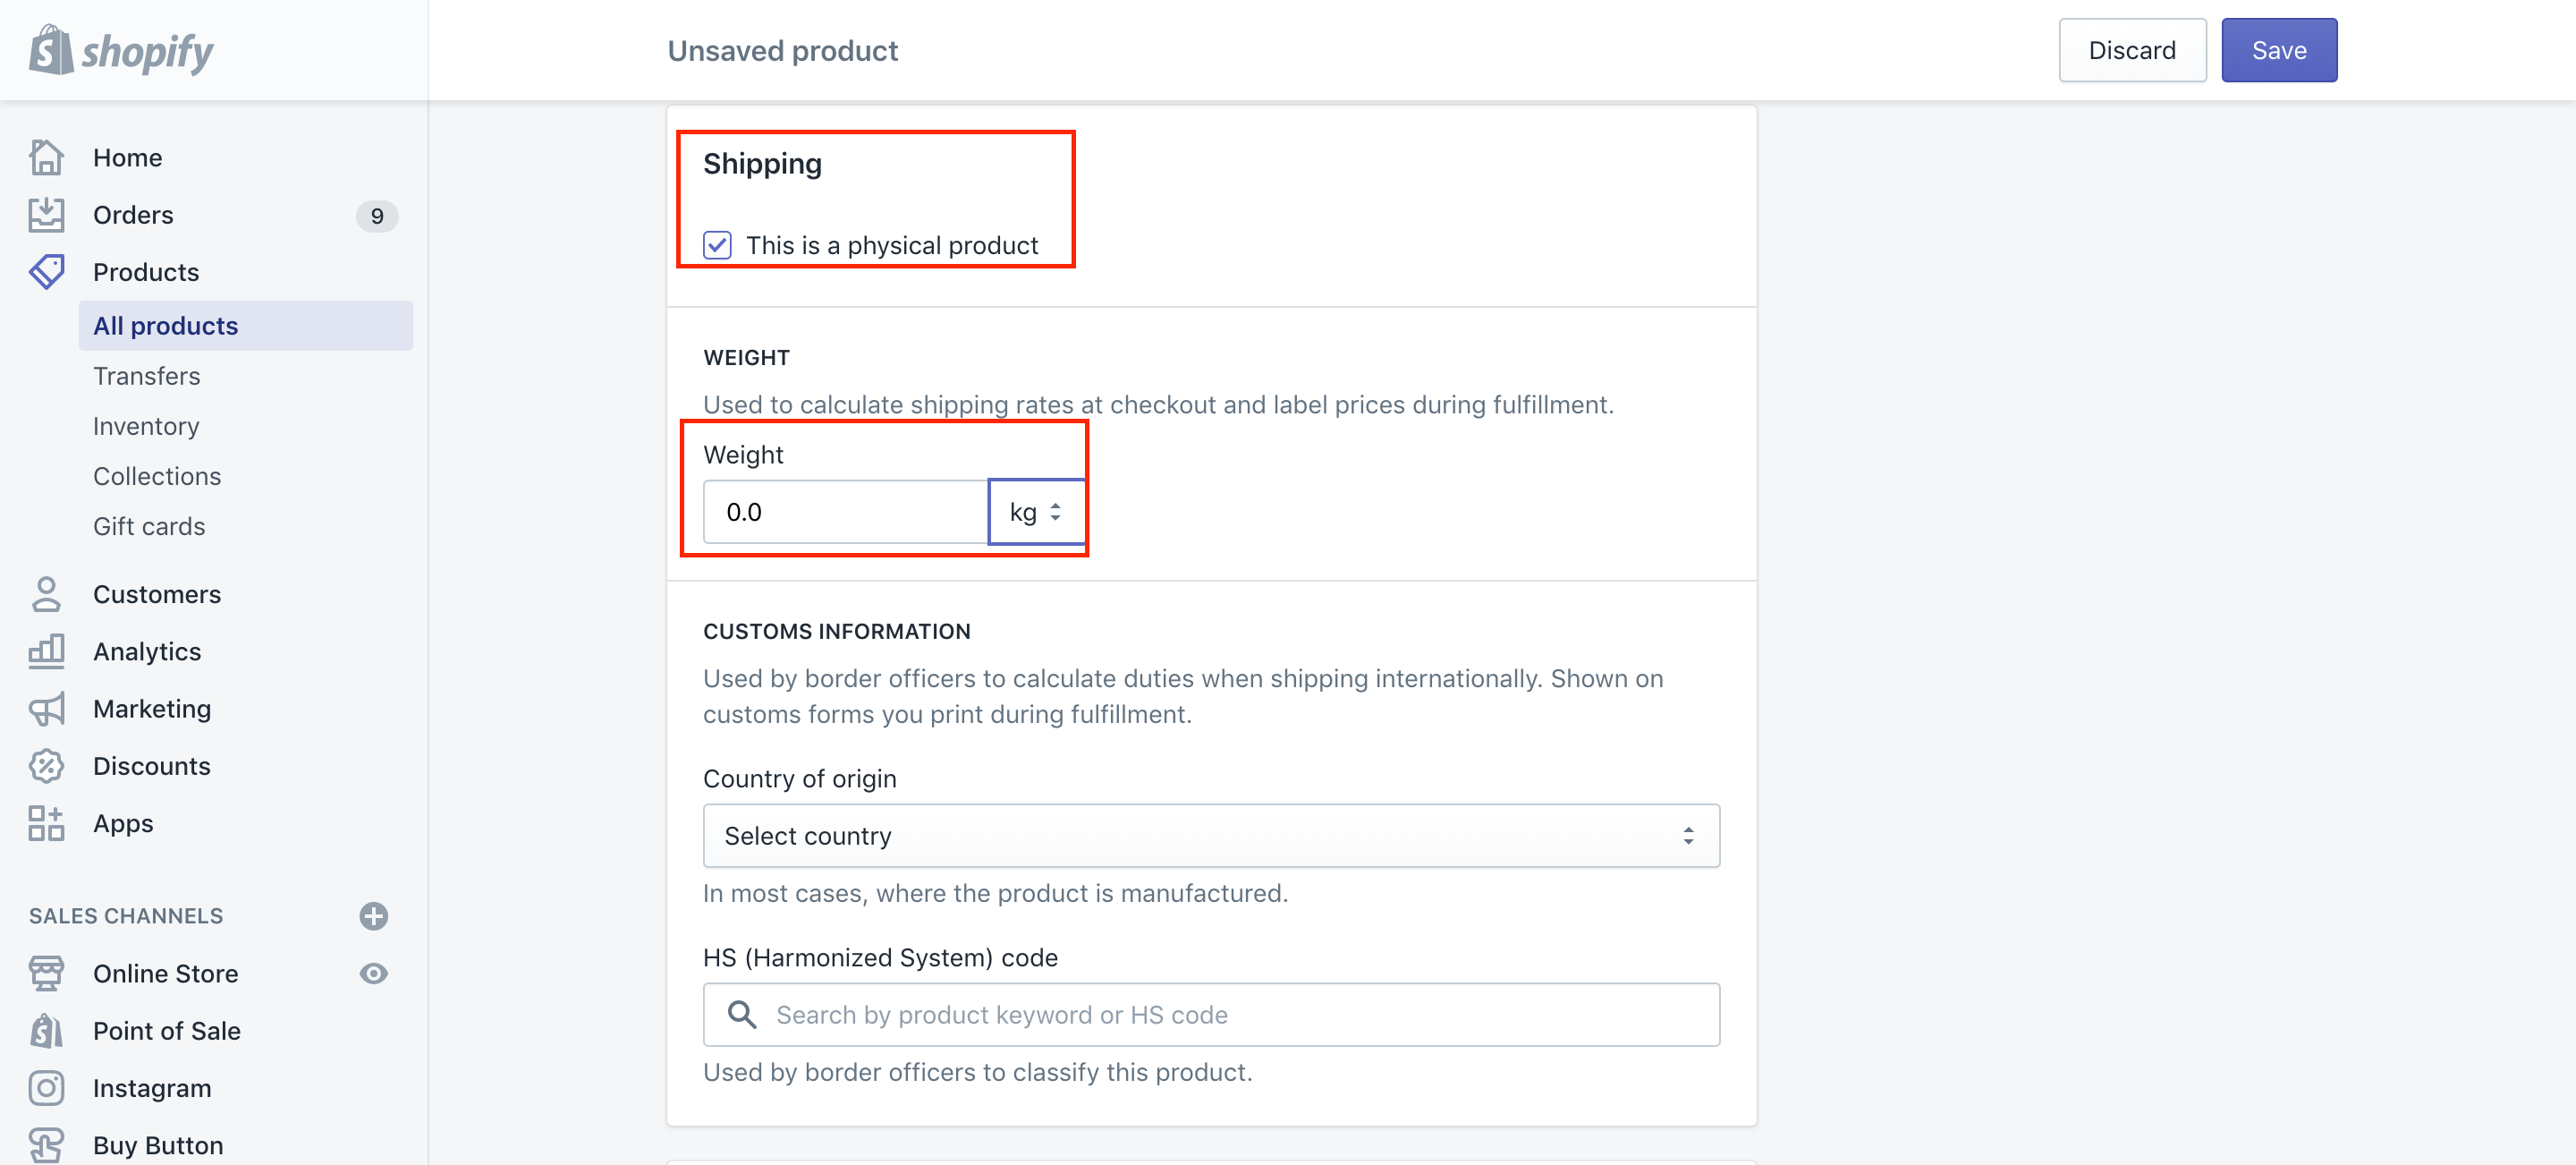
When it comes to shipping options, Shopify users can check or uncheck the Charge Taxes and Require Shipping checkboxes. With physical products, Require Shipping ought to be checked, meanwhile, if you are selling services and downloadable items, you are allowed to leave it unchecked.
Weight
Product weight is one of the most vital parts for configuring your shipping and freight costs for a product. In case you cannot give the exact products’ weight, you can estimate it. And the weight should be set in a kilogram unit.
With product weight, you are capable of adding some other product’s information, consisting of:
-
Compare a price where users are able to insert a higher price than the competitors.
-
The product barcode is given by the manufacturer of a product.
-
Fulfillment in case you are activating a fulfillment service to get a product delivered.
-
Inventory policy where Shopify enables you to track your own inventory.
-
Multiple options to let you add colors and sizes.
Step 5: Add product images
After finishing all the detail, you should not forget to add a product image. More interestingly, product images act as an indispensable role that will help customers find your products with ease and Shopify store owners should add much relevant product pictures.
When giving your images a name, you need to make sure that you are using a consistent format and use - to divide words. In addition, let’s guarantee that your product pictures are tailored to a similar size.
Besides, you have to finish and save the pages prior to checking the product images you have added. There is no option to get your images named; hence, you might need to name your images in your computer first before getting it uploaded in Shopify.
Step 6: Add To Collection and Add Tags
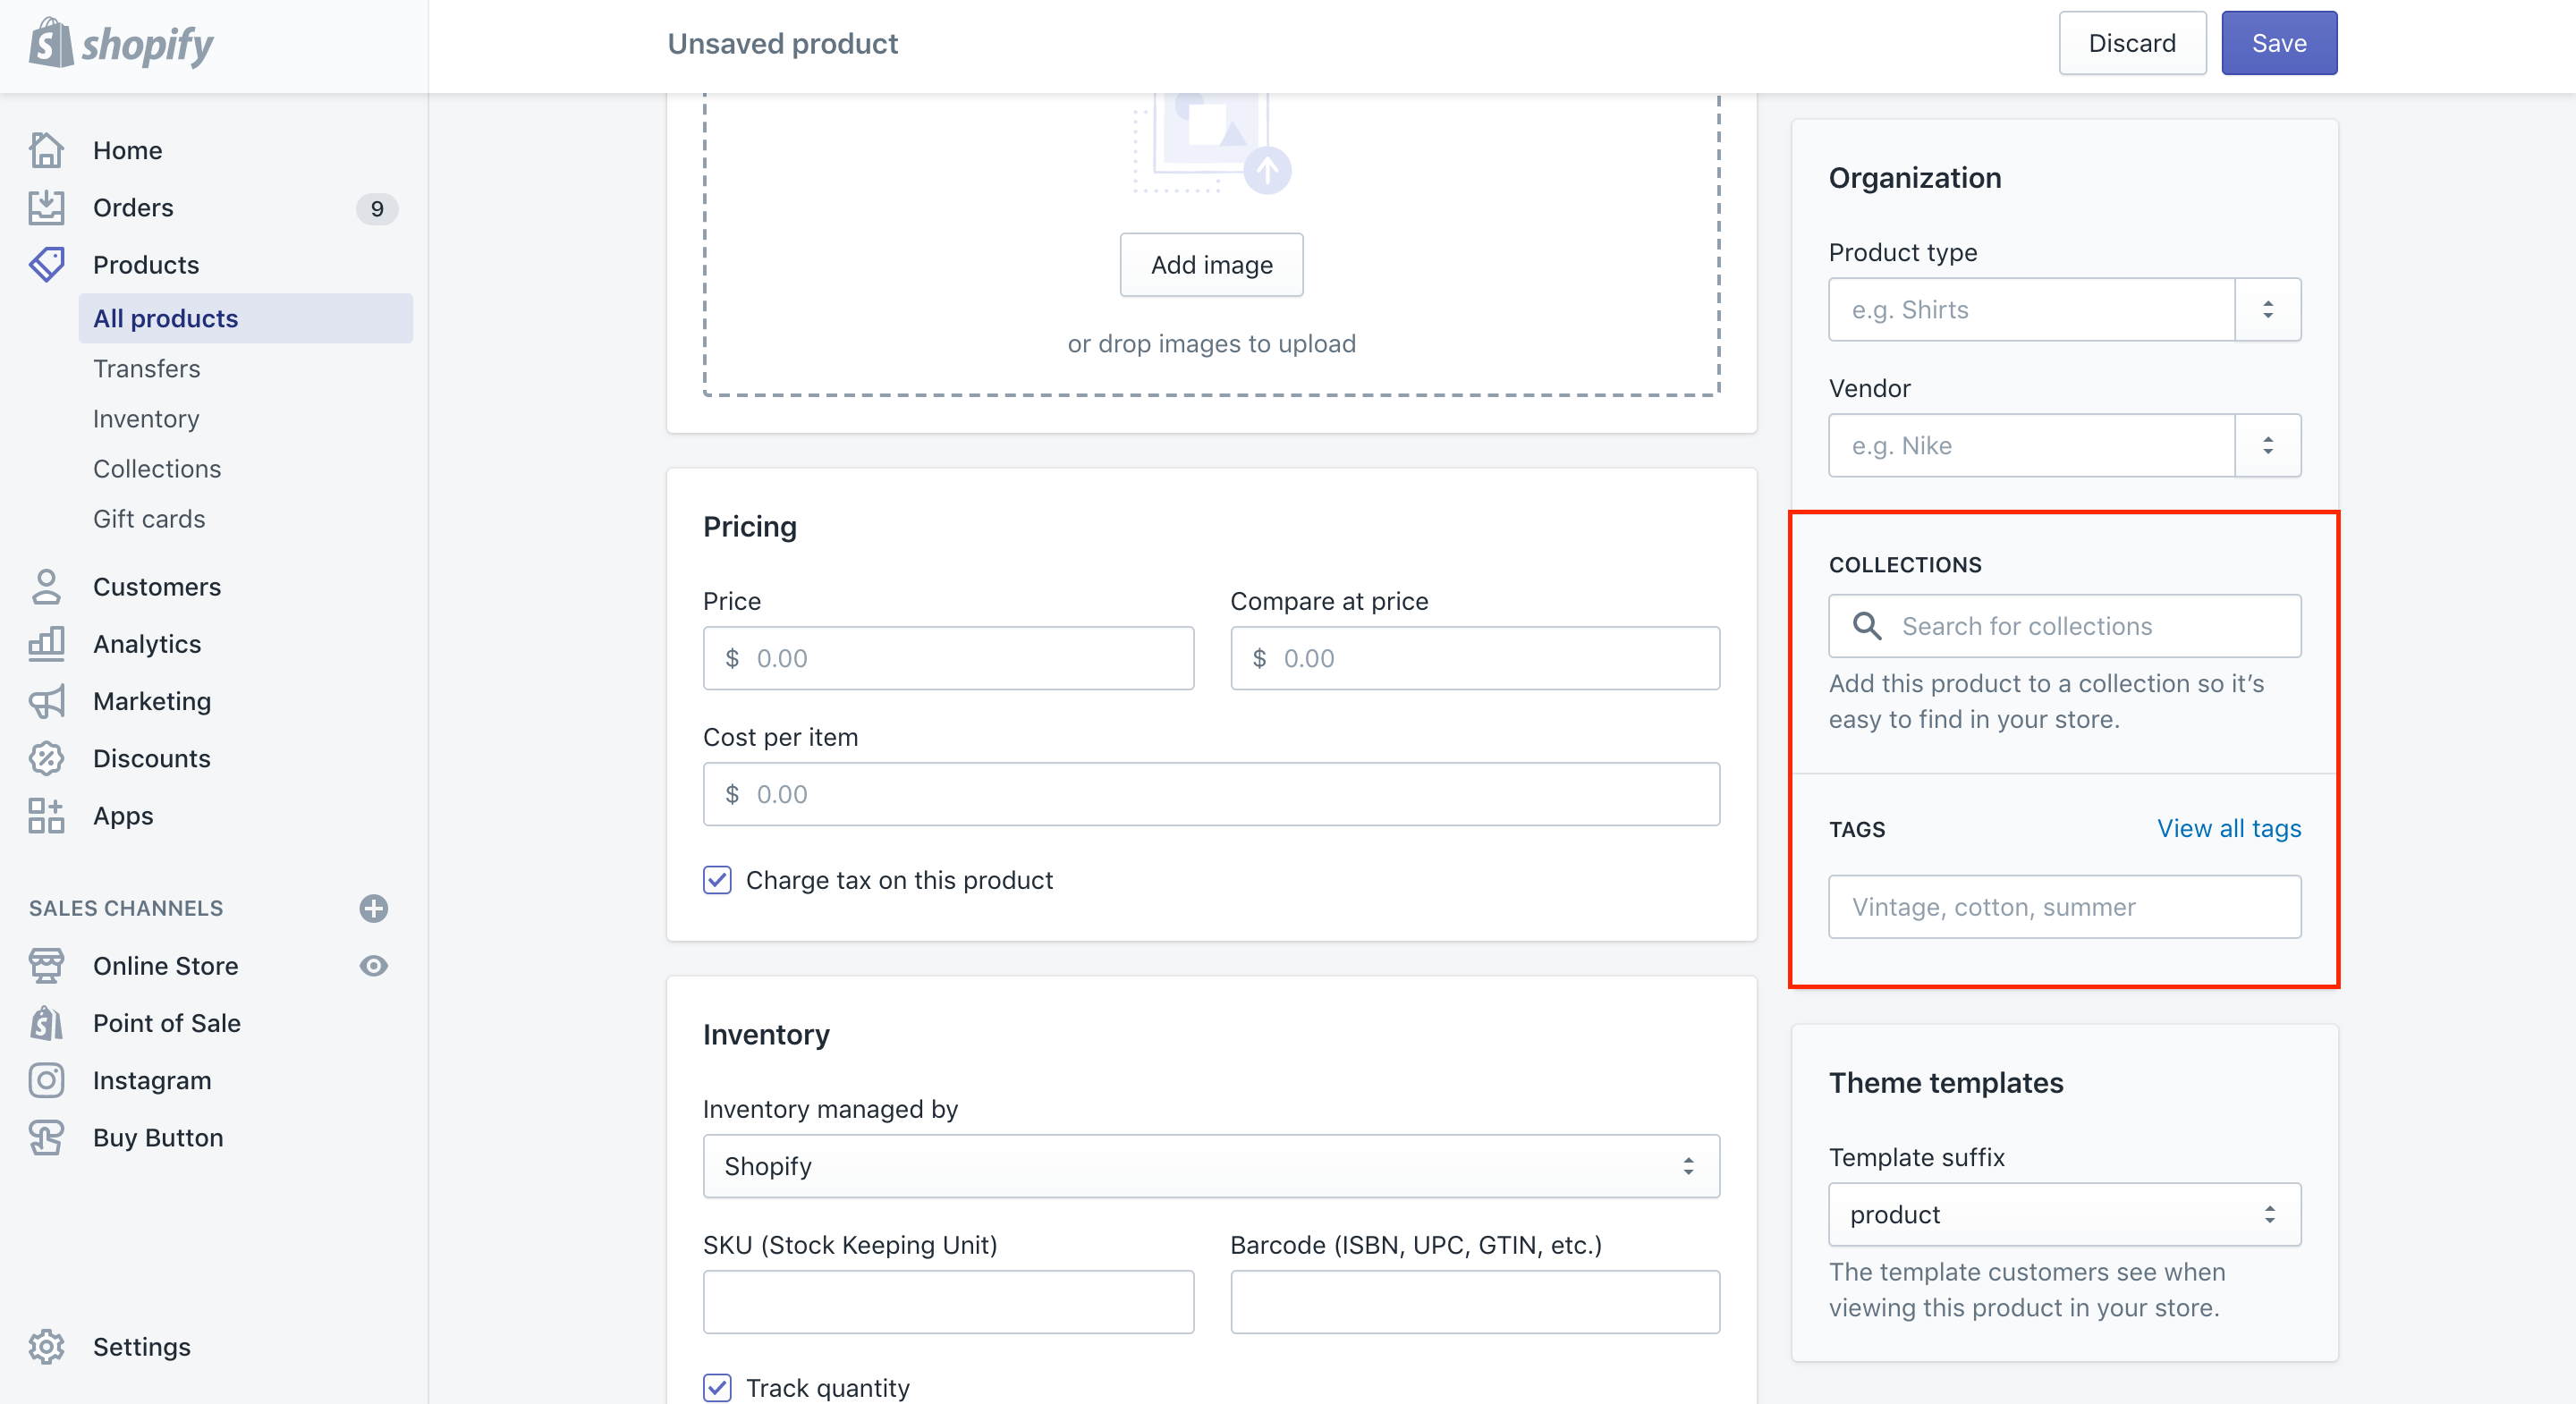
It is critical to categorize your products and give them tags. Shopify users are able to insert a specific item to a specific collection where they wish to display their products.
Adding tags to help the category your products are also needed. Based on the products’ color, size or material, you can give them tags as many as you want. But don’t forget to separate them with a comma.
Step 7: Add Meta Data
One of the best things on Shopify is that it automatically creates your Page Title, along with the Meta Description for you based on what you already provided on the Product Details section.
Basically, you might need to update and edit your Page Title and Meta Description to boost your products’ value. They are data displayed on the search result pages. Therefore, it is essential to add valuable info so that buyers can easily catch your products with just a click.
The Page Title and Meta Description had better include keywords that are related to products to consider the value for your readers and customers.
Note that Page Title and Meta Description often have a limit on characters.
Step 8: Click on Save Product
After completing everything, it is time for you to check all again and make a preview before choosing the Save button located on the bottom of the right corner on the page.
Step 9: View Products on the website
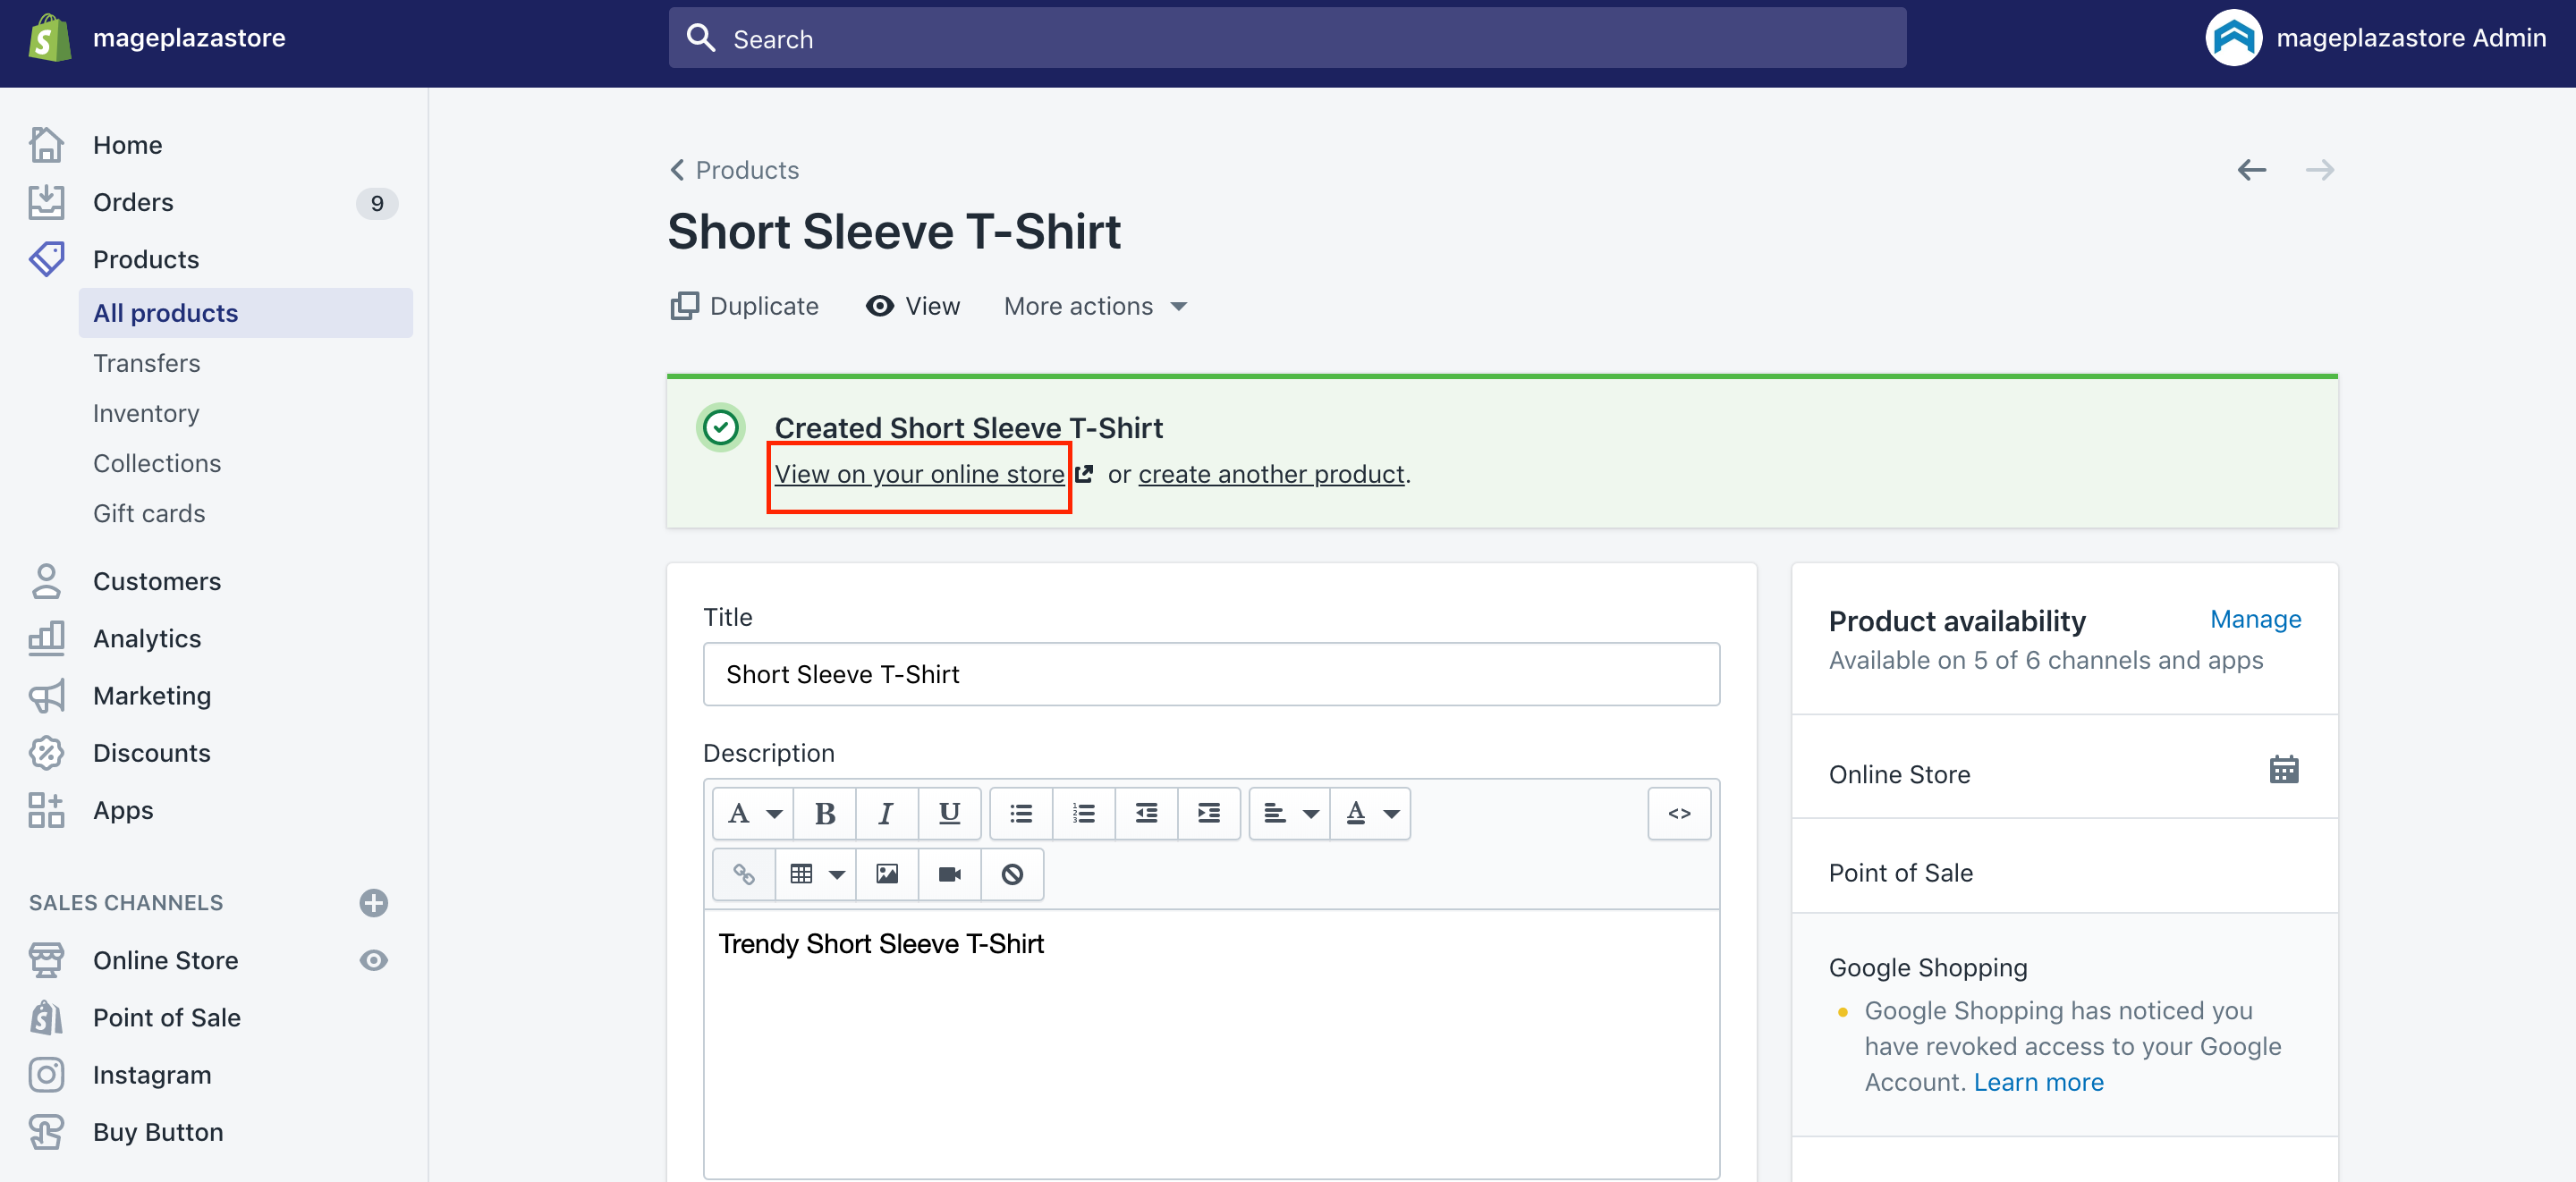
When clicking on the Save button, you can use your mouse to scroll up and down the page. After that, let’s select View on your websites to have a closer look at your products.
Final Checklist
Adding products to Shopify is not hard, but you have to make sure that you follow the steps correctly. One more time, let’s revise all the steps again and give the final checklist for what you have done.
- Login to your Shopify account
- Head to Products > Add Products
- Add Product details
- Add Inventory and Variants
- Add Product images
- Add products to Collections and add tags
- Add Meta Data
- Save Product and view them on the website
Conclusion
Hopefully, this above post on how to add products to pages in Shopify is useful for you to conquer Shopify’s amazing features. Do not hesitate to contact us if you have any problems. In case you find this tutorial worth-ready, let’s assist us by sharing this on your own social media channels.


