How to Add WooCommerce Custom Product Fields
WooCommerce has several methods for storing product data. All standard product fields include the name, price, categories, tags, and measurements. There’s also the possibility of adding product characteristics. But what if you need to save more product fields? What if you need something more adaptable than product variants, like checkboxes or text fields? That’s where WooCommerce custom fields come into play.
Today’s tutorial will show you how to add WooCommerce custom product fields. Whether you want to add extensive characteristics to a WooCommerce product page or present alternative product variations with the press of a button, creating custom fields in WooCommerce takes only a few minutes. Following that, you can adjust every feature of your WooCommerce dashboard and swiftly add site information that would typically need manual data entry.
Why do we need to add WooCommerce custom product fields?
So, what are the main benefits of using custom product fields? Here is the shortlist:
- Custom product fields are used for adding more product information to items such as PCs, where technical data such as RAM and processor power would be displayed.
- Create messages that can be rapidly changed to something else.
- Extra video, for example, is an example of a unique media element that cannot be introduced using ordinary WooCommerce capabilities.
- Provide dates and times for when you have a product countdown, auction, or release date.
- Customers can browse more product alternatives in addition to variations.
- Diagrams that show in detail how to use a product.
- Add-on offerings supply the consumer with several upsells that complement the existing purchase. Brush attachments for electric toothbrushes or various charms for a bracelet are two examples.
- You’d like to include any uncommon or additional data on a product page that isn’t supported by WooCommerce or is simpler to fill out with custom fields.
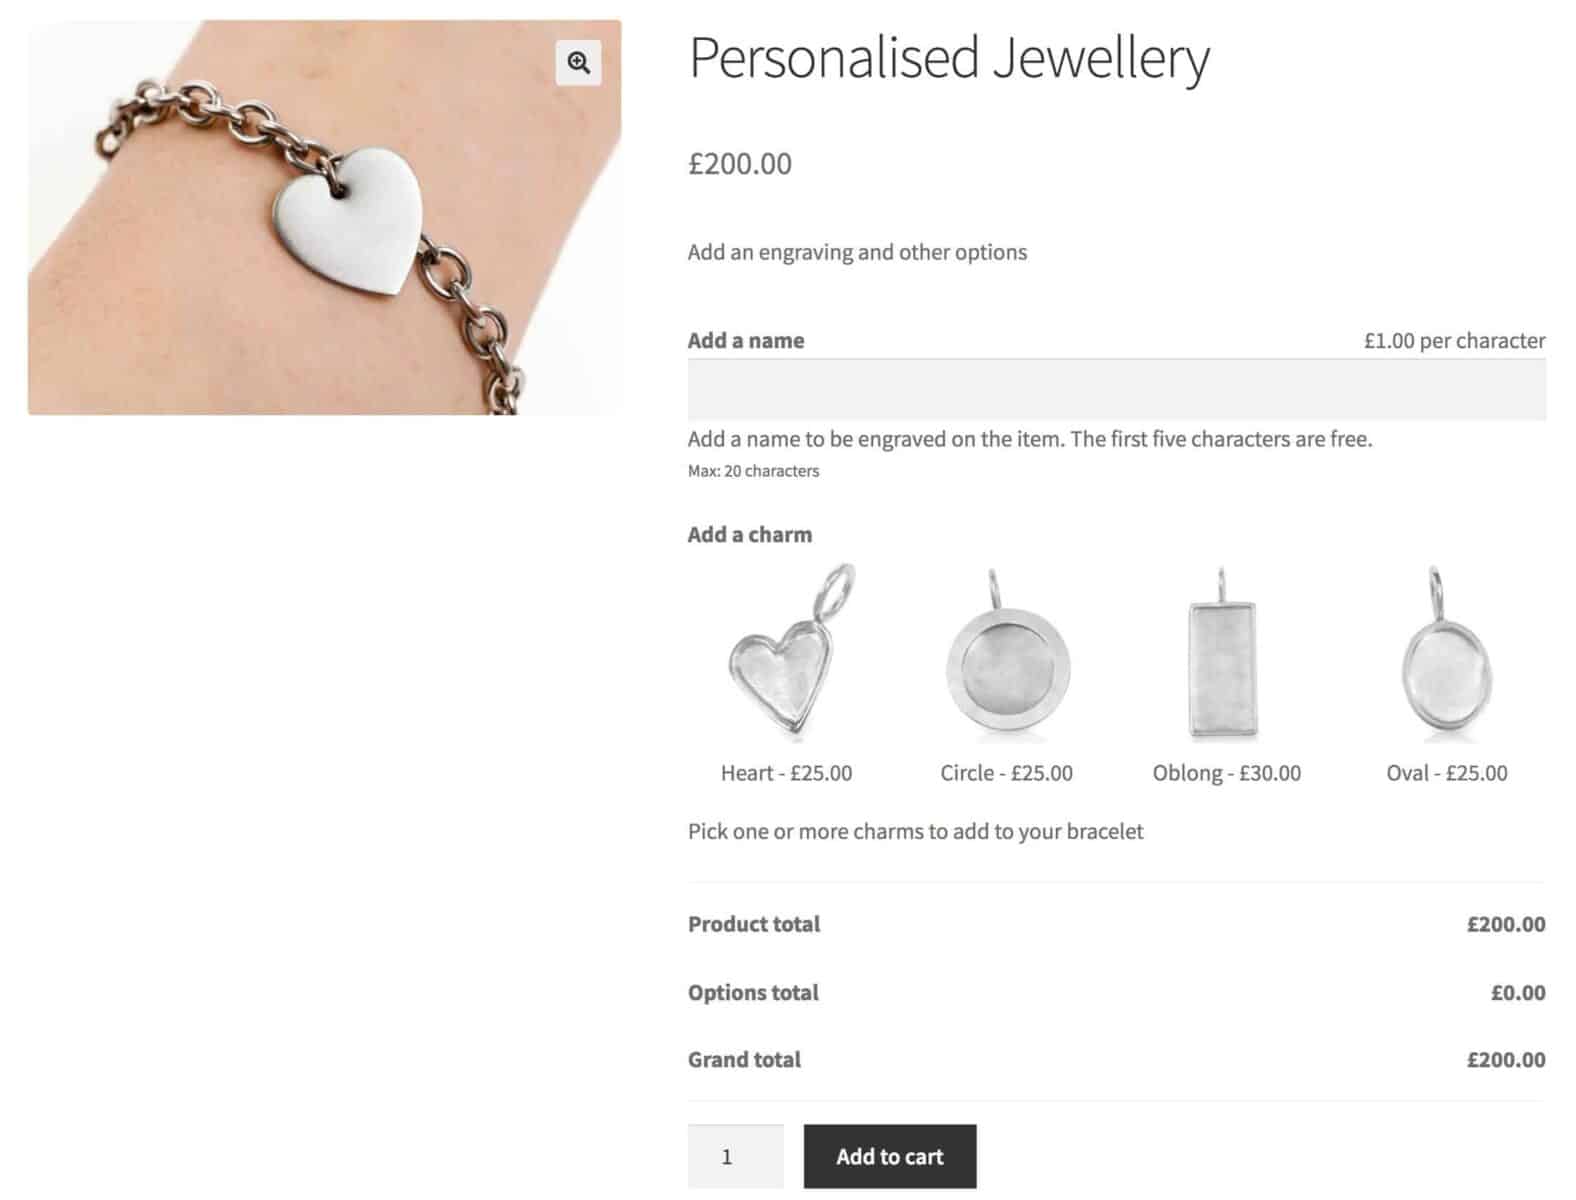
Common types of custom product fields on WooCommerce
When individuals mention WooCommerce custom fields, they usually imply one of two things:
- Including further product information: This is the most common application of custom fields. Custom fields are used in WordPress to add extra fields to posts, pages, or items. These are used to store and show more information, such as additional text fields, dates, photos, and so on.

- Selling more product possibilities instead of utilizing variations: This entails including additional elements like dropdown lists, checkboxes, radio buttons, text fields, and so on for the buyer to fill before adding the goods to their basket. Extra product options aren’t technically custom fields at all; they’re better known as product add-ons! Many individuals, however, refer to these possibilities as custom fields.
How to add custom product fields on WooCommerce product pages
Method 1: Coding
As you can see from the example below, we will show you how to add custom fields to the Edit Product page. Moreover, we will teach you how to change the functions.php file in the theme folder to add these fields.
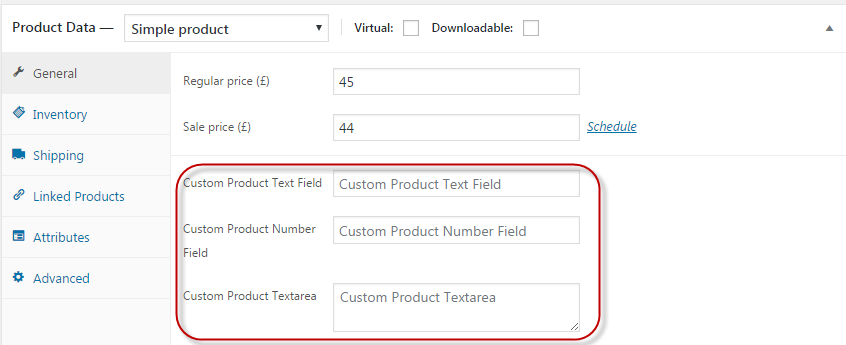
Set up custom product fields
The first step is to connect to the woocommerce_product_options_general_product_data variable. The function associated with this hook is in charge of displaying the new fields. The custom field values will be saved via a second hook, woocommerce_process_ product_meta. Both of these activities are performed in the following code:
// The code for displaying WooCommerce Product Custom Fields
add_action( 'woocommerce_product_options_general_product_data', 'woocommerce_product_custom_fields' );

// Following code Saves  WooCommerce Product Custom Fields
add_action( 'woocommerce_process_product_meta', 'woocommerce_product_custom_fields_save' );
function woocommerce_product_custom_fields () {
global $woocommerce, $post;
echo '<div class=" product_custom_field ">';
// This function has the logic of creating custom field
//  This function includes input text field, Text area and number field
echo '</div>';
}
To add the fields, we’ll often utilize WooCommerce’s built-in functions, such as:
woocommerce_wp_text_input
Package: WooCommerce\Admin\Functions
Located at: includes/admin/wc-meta-box-functions.php
woocommerce_wp_textarea_input
Package: WooCommerce\Admin\Functions
Located at: includes/admin/wc-meta-box-functions.php
// Custom Product Text Field
    woocommerce_wp_text_input(
    	array(
    		'id'          => '_custom_product_text_field',
    		'label'       => __( 'My Text Field', 'woocommerce' ),
    		'placeholder' => 'Custom Product Text Field',
    		'desc_tip'    => 'true'
    	)

    );
Instead of showing the usual field description, desc_tip is used to display those fantastic tiny bubbles to the right of the field. This characteristic applies to all field types.
// Custom Product Number Field
woocommerce_wp_text_input(
    array(
        'id' => '_custom_product_number_field',
        'placeholder' => 'Custom Product Number Field',
        'label' => __('Custom Product Number Field', 'woocommerce'),
        'type' => 'number',
        'custom_attributes' => array(
            'step' => 'any',
            'min' => '0'
        )
    )
);
The default value of the step in the above code is one, with the min set to zero. Essentially, this says that we anticipate a good deal here (at least greater than zero). The text box should be created using the following code:
// Custom Product Textarea Field
woocommerce_wp_textarea_input(
    array(
        'id' => '_custom_product_textarea',
        'placeholder' => 'Custom Product Textarea',
        'label' => __('Custom Product Textarea', 'woocommerce')
    )
);
Here is the complete code for custom input fields, which you must insert into the theme folder’s functions.php file:
// Display Fields
add_action('woocommerce_product_options_general_product_data', 'woocommerce_product_custom_fields');

// Save Fields
add_action('woocommerce_process_product_meta', 'woocommerce_product_custom_fields_save');


function woocommerce_product_custom_fields()
{
    global $woocommerce, $post;
    echo '<div class="product_custom_field">';
    // Custom Product Text Field
    woocommerce_wp_text_input(
        array(
            'id' => '_custom_product_text_field',
            'placeholder' => 'Custom Product Text Field',
            'label' => __('Custom Product Text Field', 'woocommerce'),
            'desc_tip' => 'true'
        )
    );
    //Custom Product Number Field
    woocommerce_wp_text_input(
        array(
            'id' => '_custom_product_number_field',
            'placeholder' => 'Custom Product Number Field',
            'label' => __('Custom Product Number Field', 'woocommerce'),
            'type' => 'number',
            'custom_attributes' => array(
                'step' => 'any',
                'min' => '0'
            )
        )
    );
    //Custom Product  Textarea
    woocommerce_wp_textarea_input(
        array(
            'id' => '_custom_product_textarea',
            'placeholder' => 'Custom Product Textarea',
            'label' => __('Custom Product Textarea', 'woocommerce')
        )
    );
    echo '</div>';

}
Save your fields in the database
Once you’ve established the custom product fields, you’ll need another function to store the data when the user clicks the update or publish button. We’ll call this function woocommerce_product_custom_fields_save. This function is linked to the woocommerce_process_product_meta hook. This method is rather straightforward; it first determines whether the field is empty. If this is not the case, update_post_meta() is used to generate a post meta. To safeguard the data, We used esc_attr() and esc_html(). Here is the code for storing all of the fields’ values:
function woocommerce_product_custom_fields_save($post_id)
{
    // Custom Product Text Field
    $woocommerce_custom_product_text_field = $_POST['_custom_product_text_field'];
    if (!empty($woocommerce_custom_product_text_field))
        update_post_meta($post_id, '_custom_product_text_field', esc_attr($woocommerce_custom_product_text_field));
// Custom Product Number Field
    $woocommerce_custom_product_number_field = $_POST['_custom_product_number_field'];
    if (!empty($woocommerce_custom_product_number_field))
        update_post_meta($post_id, '_custom_product_number_field', esc_attr($woocommerce_custom_product_number_field));
// Custom Product Textarea Field
    $woocommerce_custom_procut_textarea = $_POST['_custom_product_textarea'];
    if (!empty($woocommerce_custom_procut_textarea))
        update_post_meta($post_id, '_custom_product_textarea', esc_html($woocommerce_custom_procut_textarea));

}
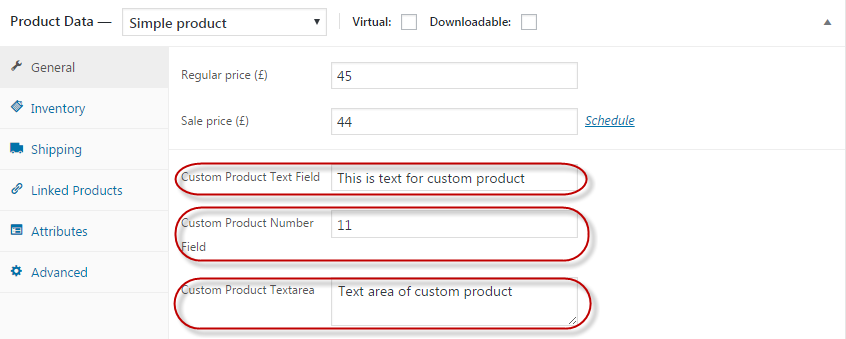
Get back your data from the database
We’ll display the values on the front-end now that the fields have been created and their values have been saved. In this instance, working with WooCommerce custom templates would be the ideal option. We’ll utilize the well-known get_post_meta() method to retrieve that information.
<?php while (have_posts()) : the_post(); ?>
<?php wc_get_template_part('content', 'single-product'); ?>
<?php
// Display the value of custom product text field
    echo get_post_meta($post->ID, '_custom_product_text_field', true);
// Display the value of custom product number field
    echo get_post_meta(get_the_ID(), '_custom_product_number_field', true);
// Display the value of custom product text area
    echo get_post_meta(get_the_ID(), '_custom_product_textarea', true);
    ?>
<?php endwhile; // end of the loop. ?>
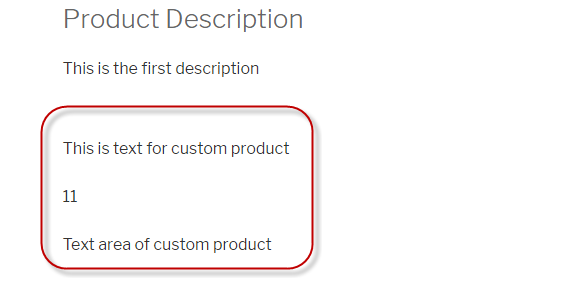
Add custom product fields on the product page
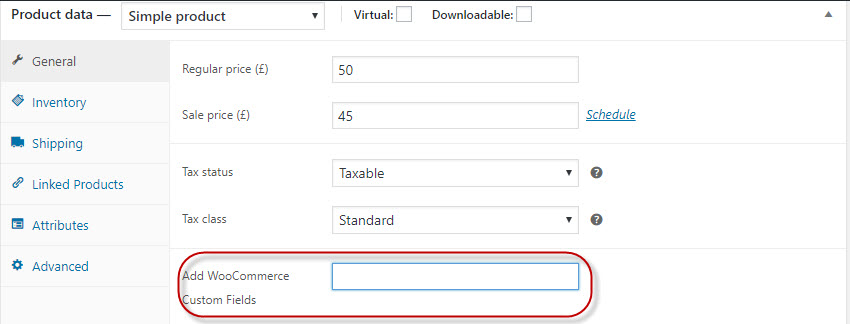
Several business owners are unaware that they can add custom fields to the product data box. This provides a one-of-a-kind possibility to display information that does not fit into the standard WooCommerce UX. The good news is that these custom fields are simple to add via the backend. These modifications are subsequently mirrored in the front-end as custom fields on product pages, cart pages, and other locations. These custom fields can show on order status pages as well. To explain the concept of WooCommerce product custom fields, we’ll show you how to add a new custom field to the Product Data section of a WooCommerce product page:
 function woocommerce_product_custom_fields()
{
  $args = array(
    	'id' => 'woocommerce_custom_fields',
    	'label' => __('Add WooCommerce Custom Fields', 'cwoa'),
  );
  woocommerce_wp_text_input($args);
}

add_action('woocommerce_product_options_general_product_data', 'woocommerce_product_custom_fields');
This is how the snippet would look on the front end. The custom field, as you can see, has the same label as the $args array.
Save your changes
To add custom fields to product pages, use the code snippet below. The snippet’s most essential feature is that it makes use of traditional WooCommerce methods and actions.
function save_woocommerce_product_custom_fields($post_id)
{
    $product = wc_get_product($post_id);
    $custom_fields_woocommerce_title = isset($_POST['woocommerce_custom_fields']) ? $_POST['woocommerce_custom_fields'] : '';
    $product->update_meta_data('woocommerce_custom_fields', sanitize_text_field($custom_fields_woocommerce_title));
    $product->save();
}
add_action('woocommerce_process_product_meta', 'save_woocommerce_product_custom_fields');
Display your new custom fields
The custom fields are shown in the following excerpt. The procedure is straightforward: it validates the custom field value and certifies that it has a value. If the case is valid, the value is shown as the field’s title.
function woocommerce_custom_fields_display()
{
  global $post;
  $product = wc_get_product($post->ID);
    $custom_fields_woocommerce_title = $product->get_meta('woocommerce_custom_fields');
  if ($custom_fields_woocommerce_title) {
    	printf(
            '<div><label>%s</label><input type="text" id="woocommerce_product_custom_fields_title" name="woocommerce_product_custom_fields_title" value=""></div>',
            esc_html($custom_fields_woocommerce_title)
    	);
  }
}
add_action('woocommerce_before_add_to_cart_button', 'woocommerce_custom_fields_display');
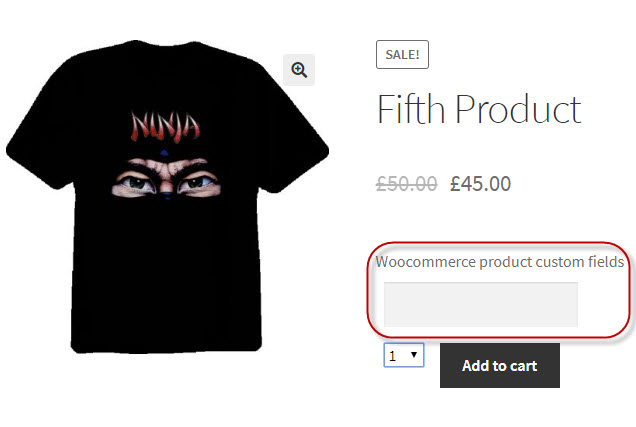
The custom field is displayed on the product page, as seen in the figure below. The field title is “WooCommerce product custom fields title,” which is the same as the id value in the excerpt.
Method 2: Using a third-party plugin
In this approach, we’ll create a fictitious computer store that sells laptops as an example. It would take a long time to enter in computer specifications for each new notebook. Therefore we’ll add fields to choose those characteristics based on the sorts of laptops we offer.
First, install the free Advanced Custom Fields plugin on your WordPress site to add custom fields to WooCommerce goods. Then here’s how to do it.
Step 1: Set up a new field group
Navigate to the new Custom Fields tab in your WordPress dashboard. Then, next to Field Groups, click Add New.
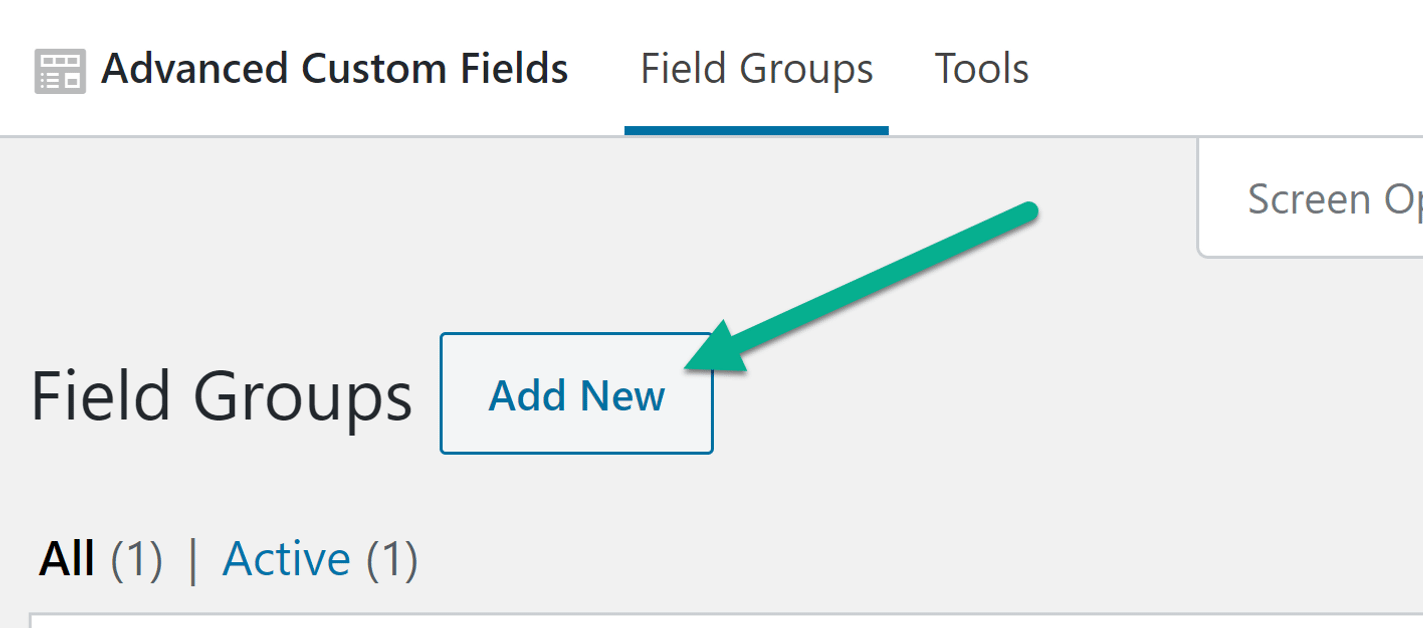
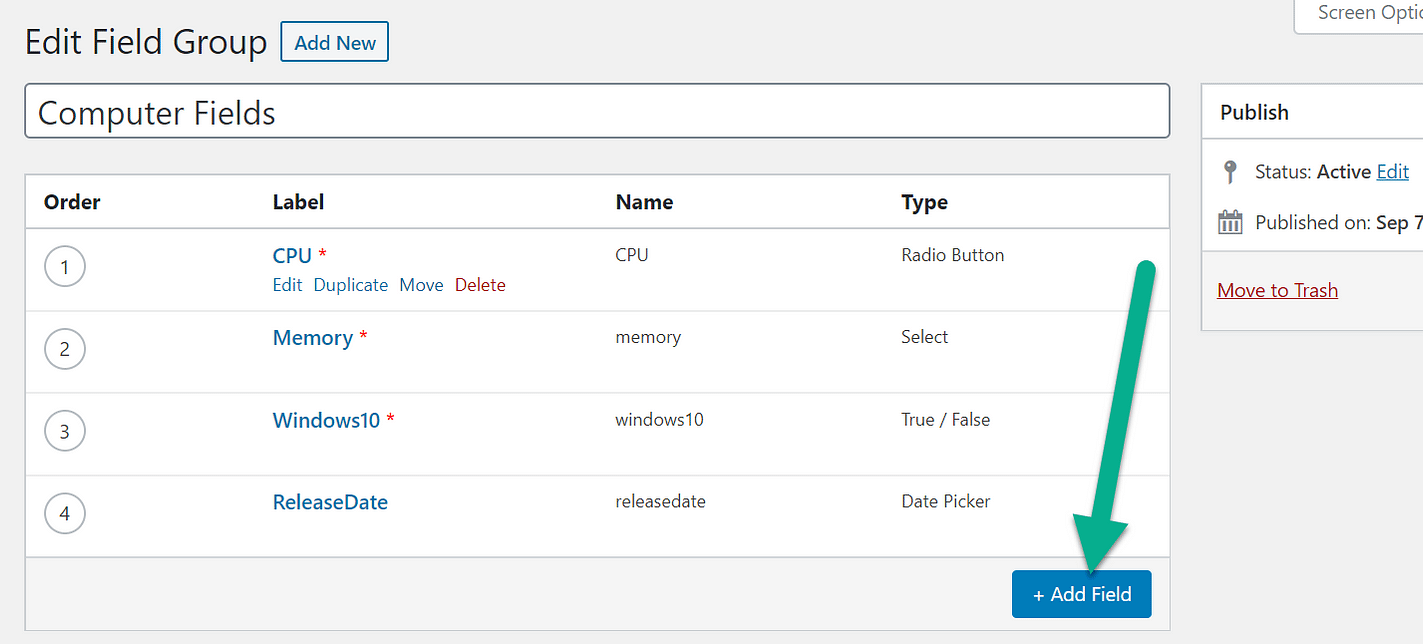
Give a field group a name. A Field Group is a set of fields for a single product or part of your website, such as a list of attributes that should display on all laptop product pages.
Step 2: Add your custom field(s)
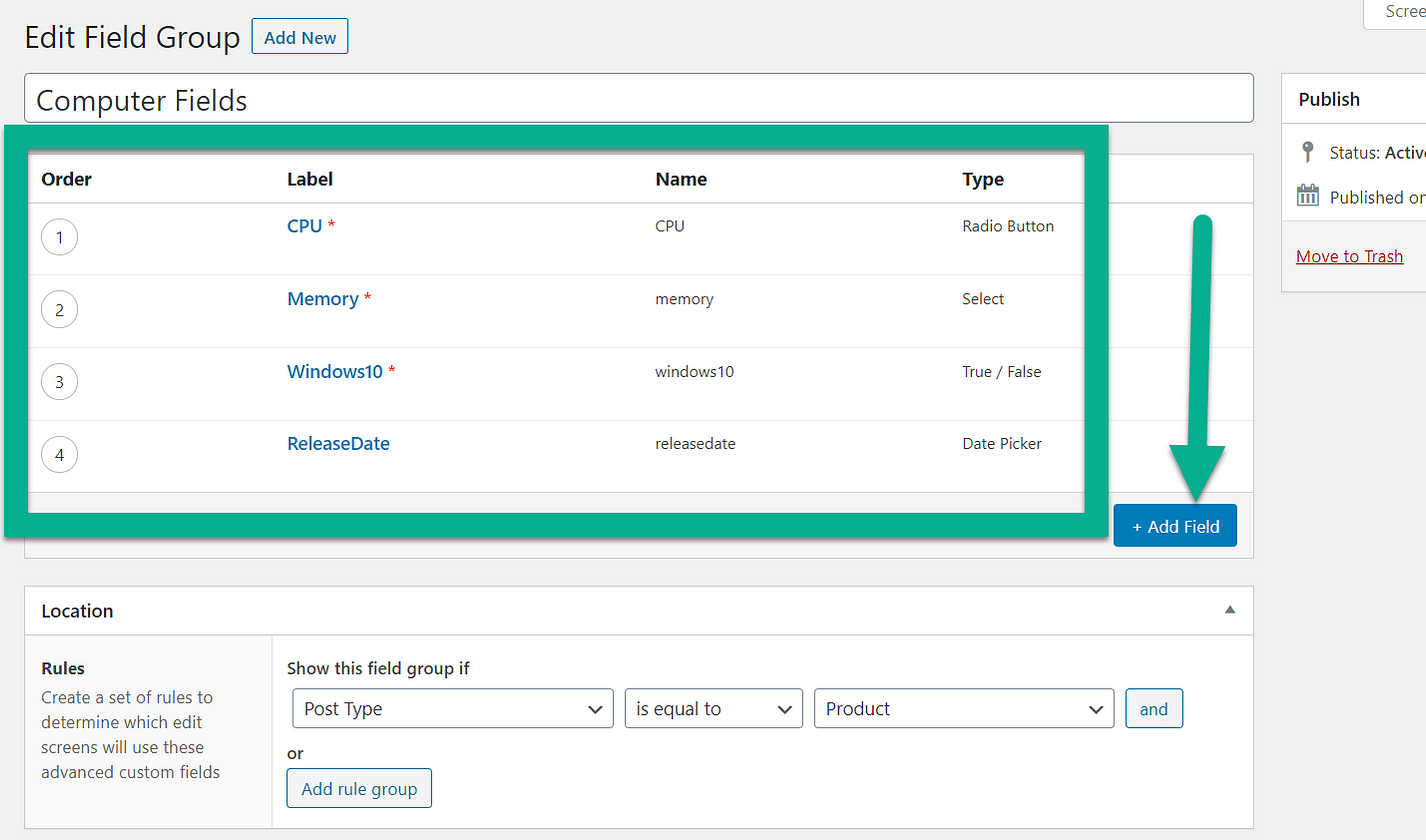
To add a custom field to this group, select the Add Field button.
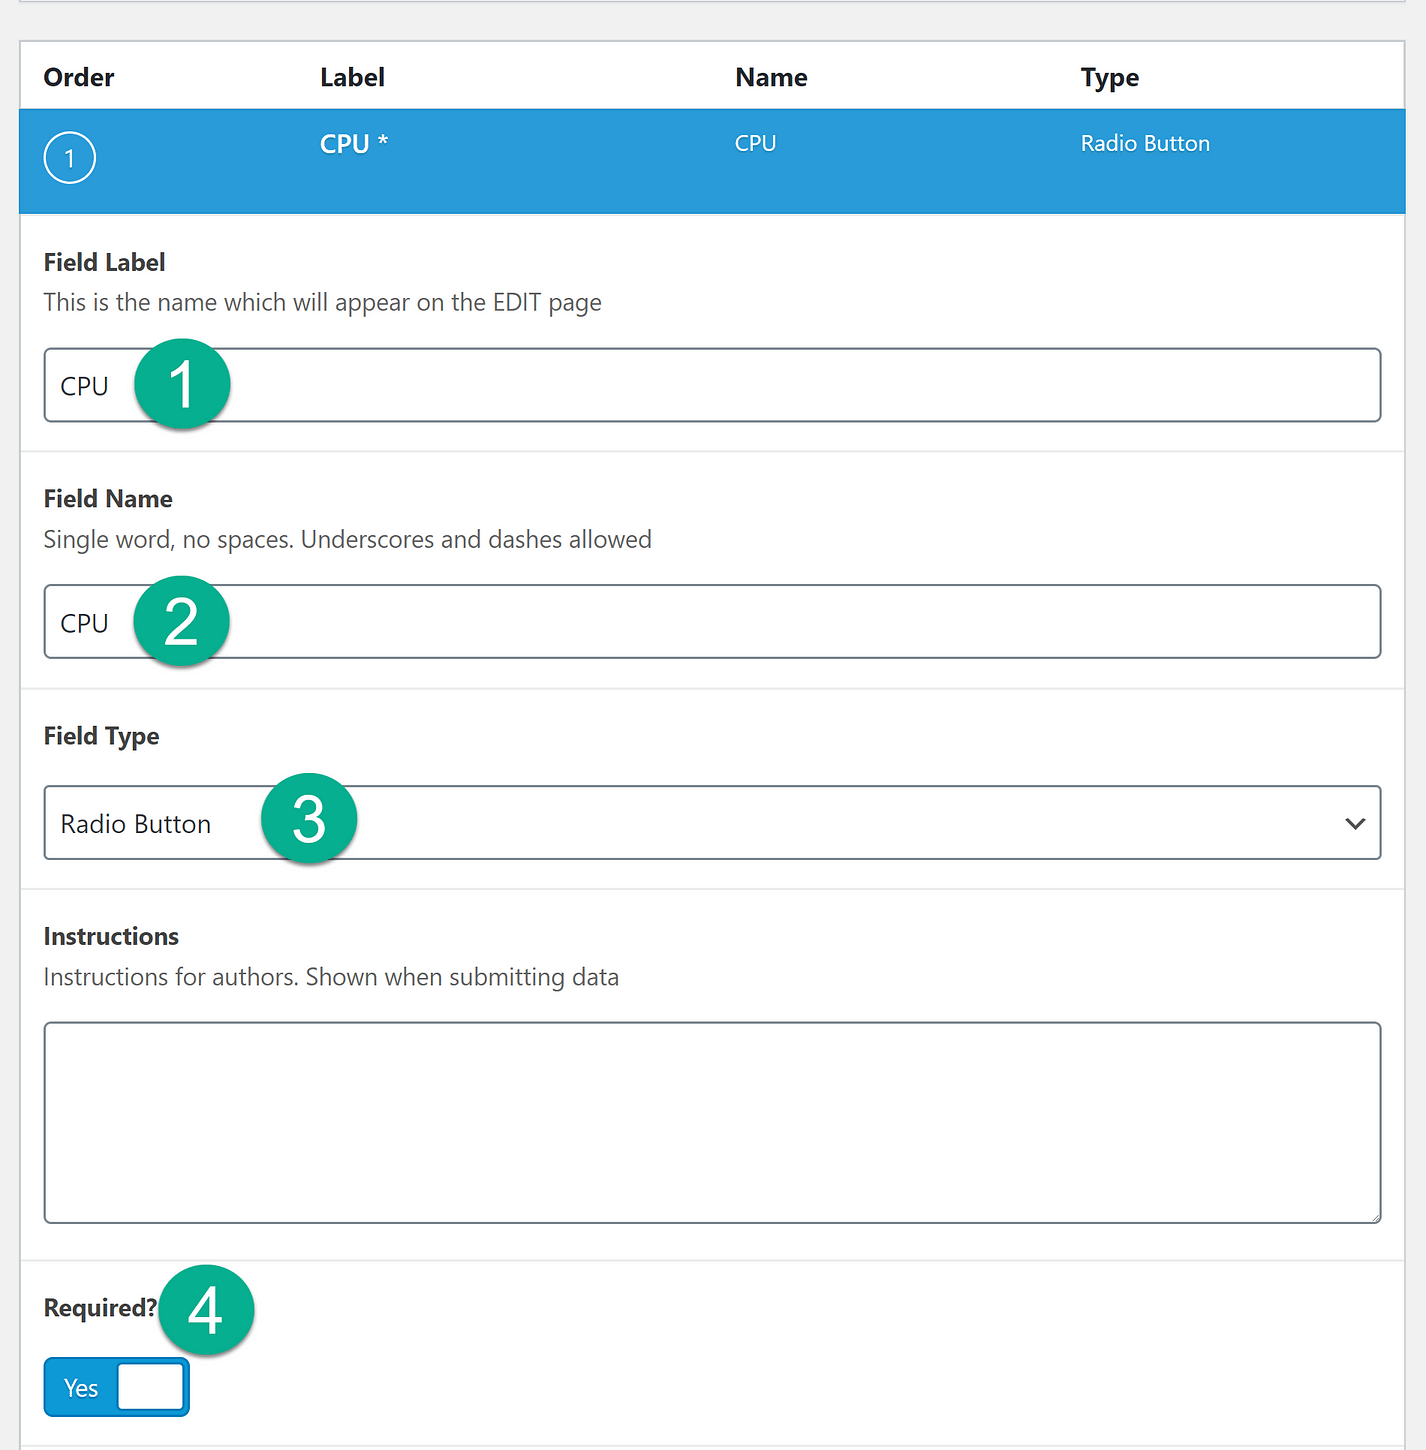
In the next section, you can add a:
- Field Label – primarily for your usage.
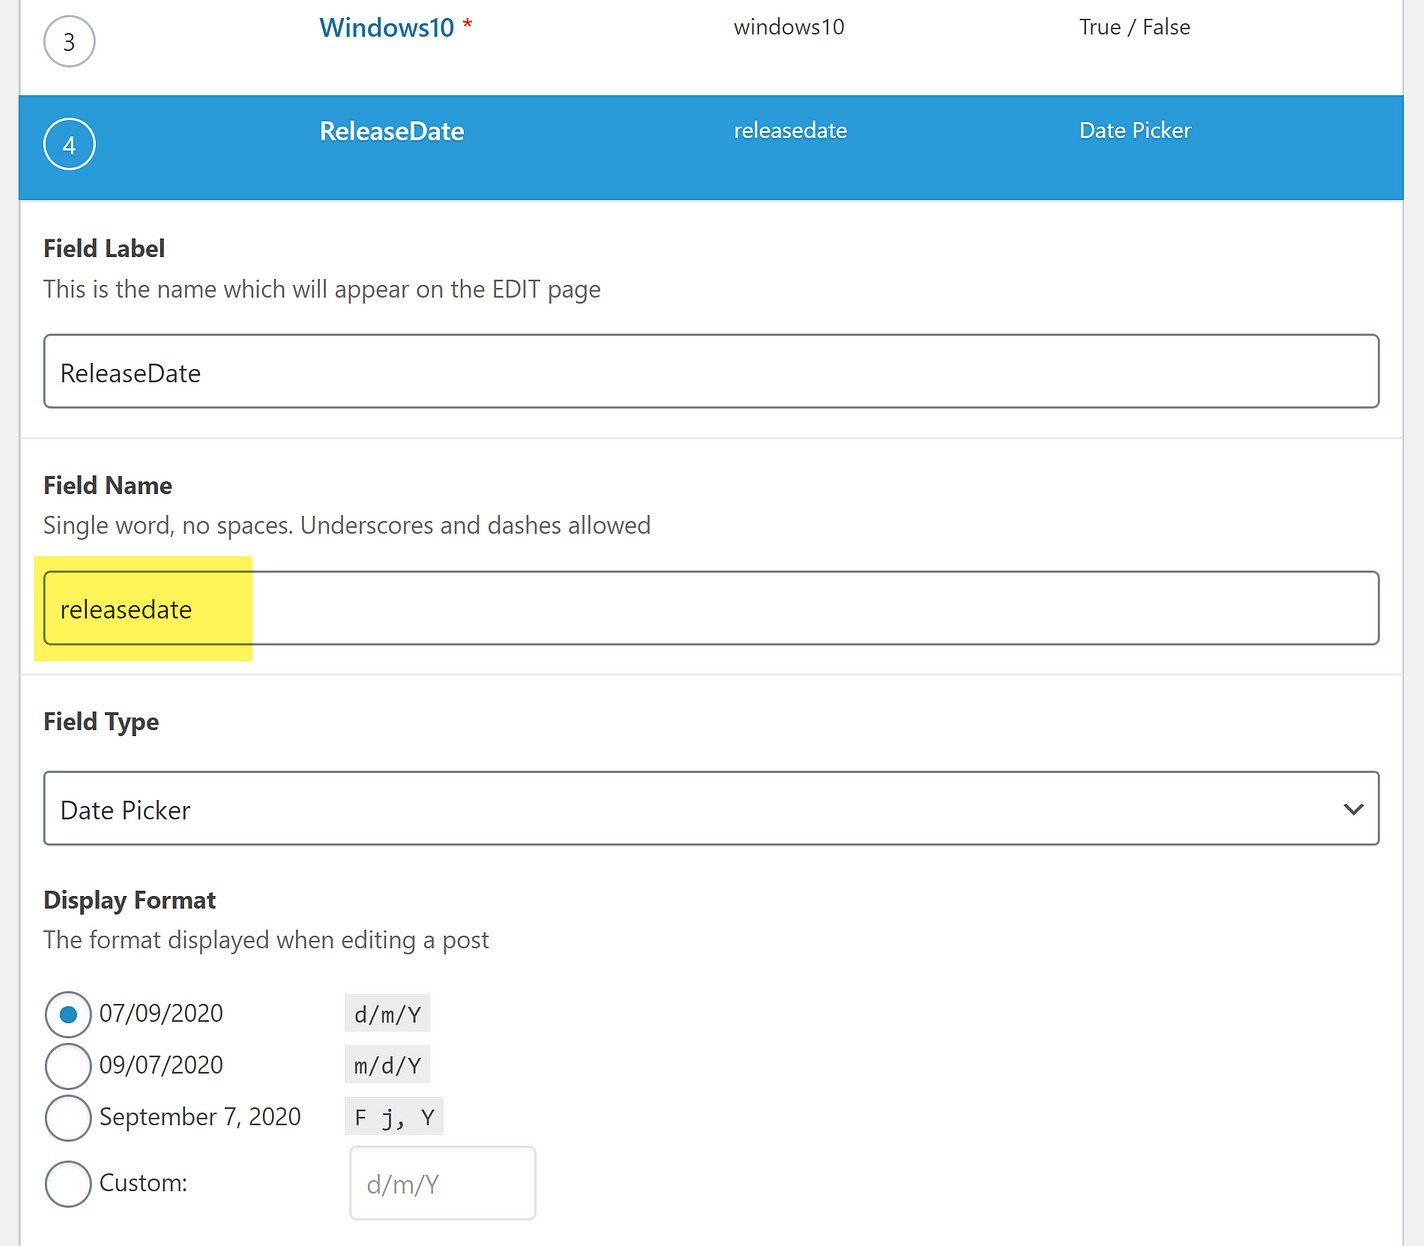
- Field Name — these are the sections you’ll use to create your custom code or shortcode in our instance. You may leave this as the plugin’s default value.
- Field Type — the format you’re putting up for that field. Date pickers, checkboxes, dropdowns, and radio buttons are among the possibilities available. You may also need to include some guides for yourself or the developer—moreover, a statement about whether or not this field is essential.
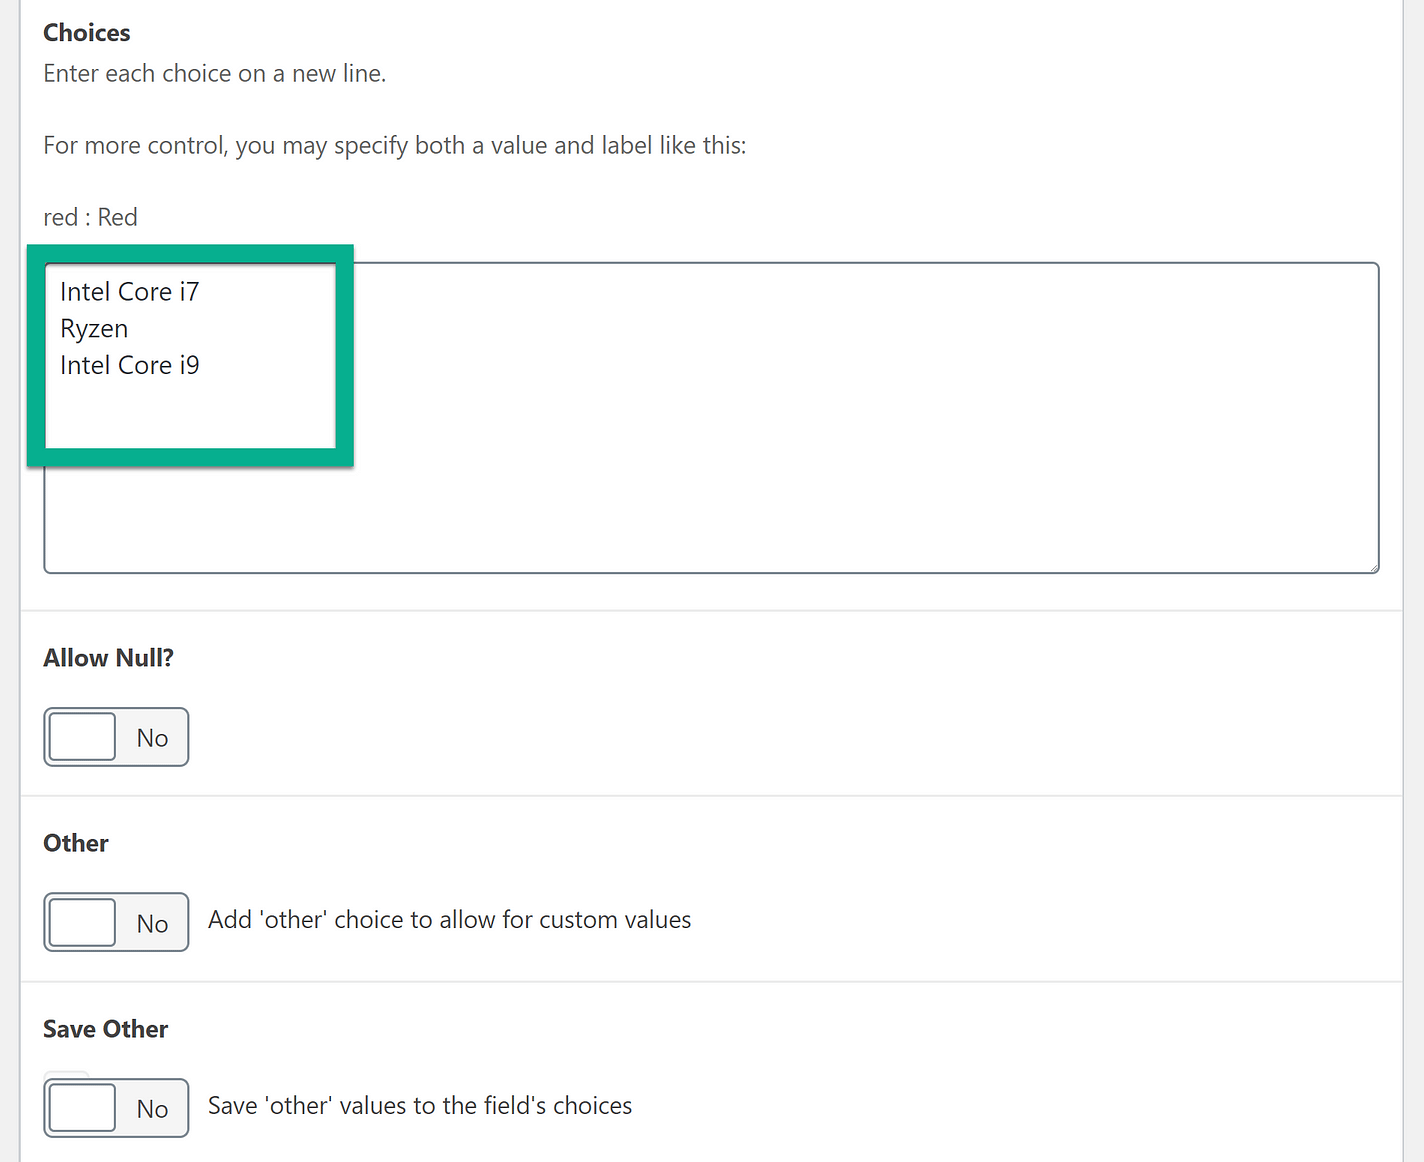
If you’re dealing with a field that contains numerous possibilities (such as radio buttons), add your field Choices next. These are the choices you wish to present on the backend of your product page, such as various core processors.
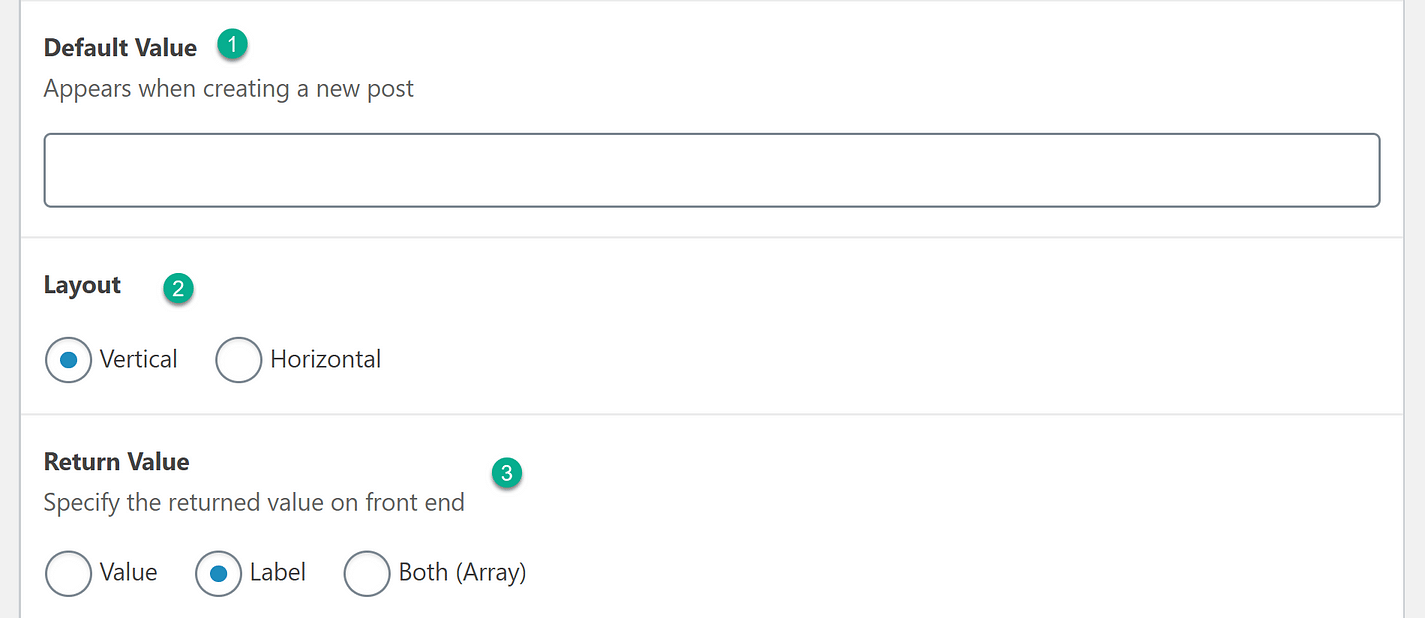
The other options, such as the default value, layout, and whether or not to display the value or label, are usually optional.
When you’re finished with a field or group, click the Publish or Update button to save it.
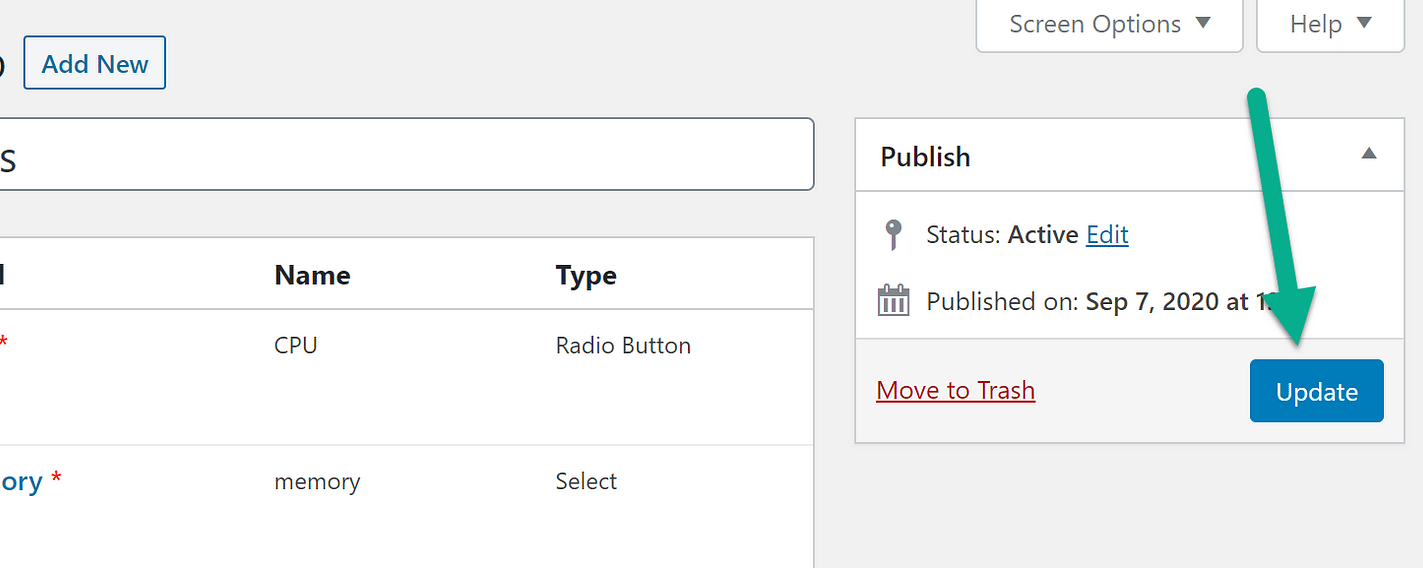
Click the Add Field button once more to add extra fields to your group.
Step 3: Customize additional field group settings
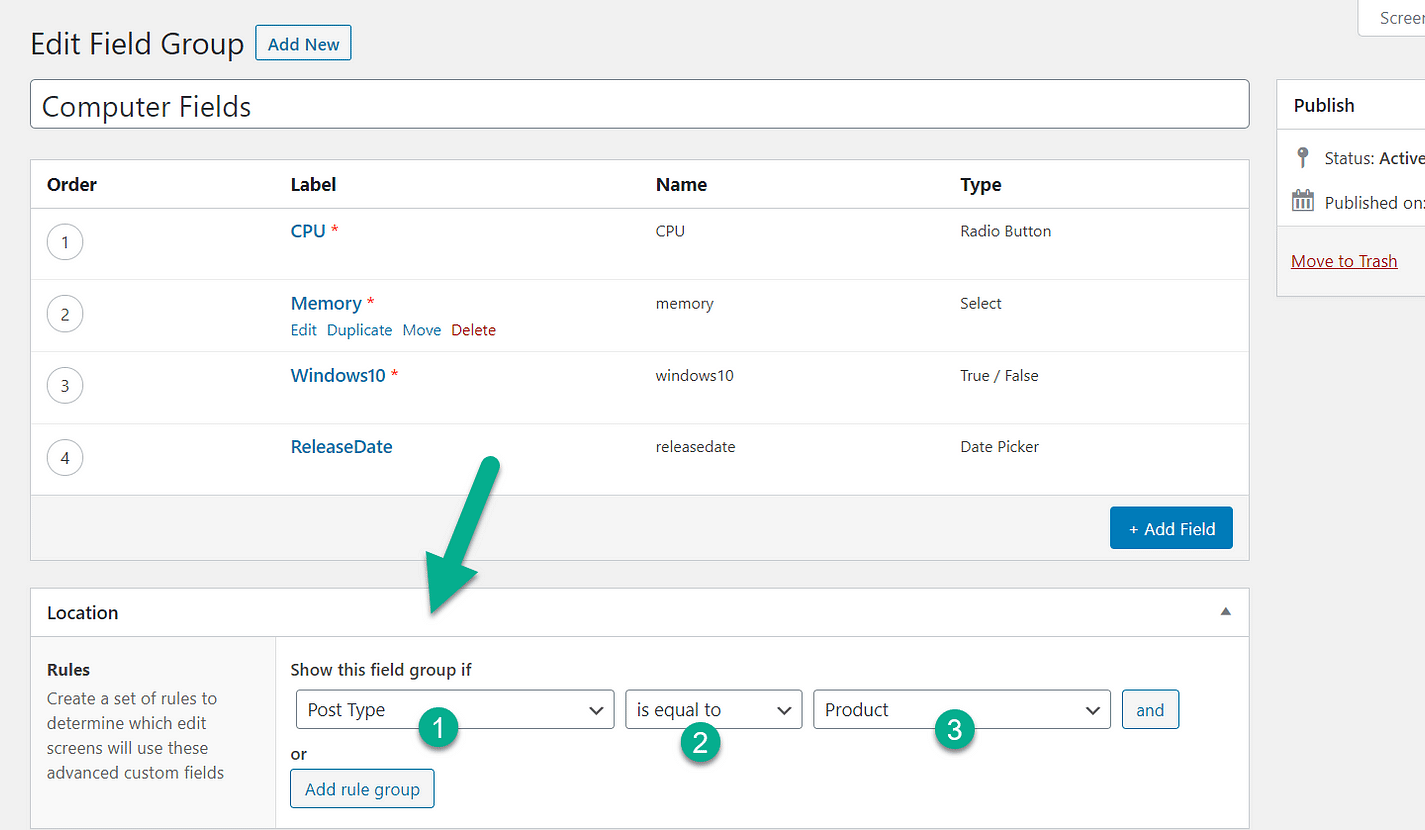
When you’re finished with the field group, go on to the Location module. This is where you tell WordPress where you want the field group to show in your dashboard. The product should be set as the Post Type. Alternatively, if you’re going to be more particular, you may select a product category.
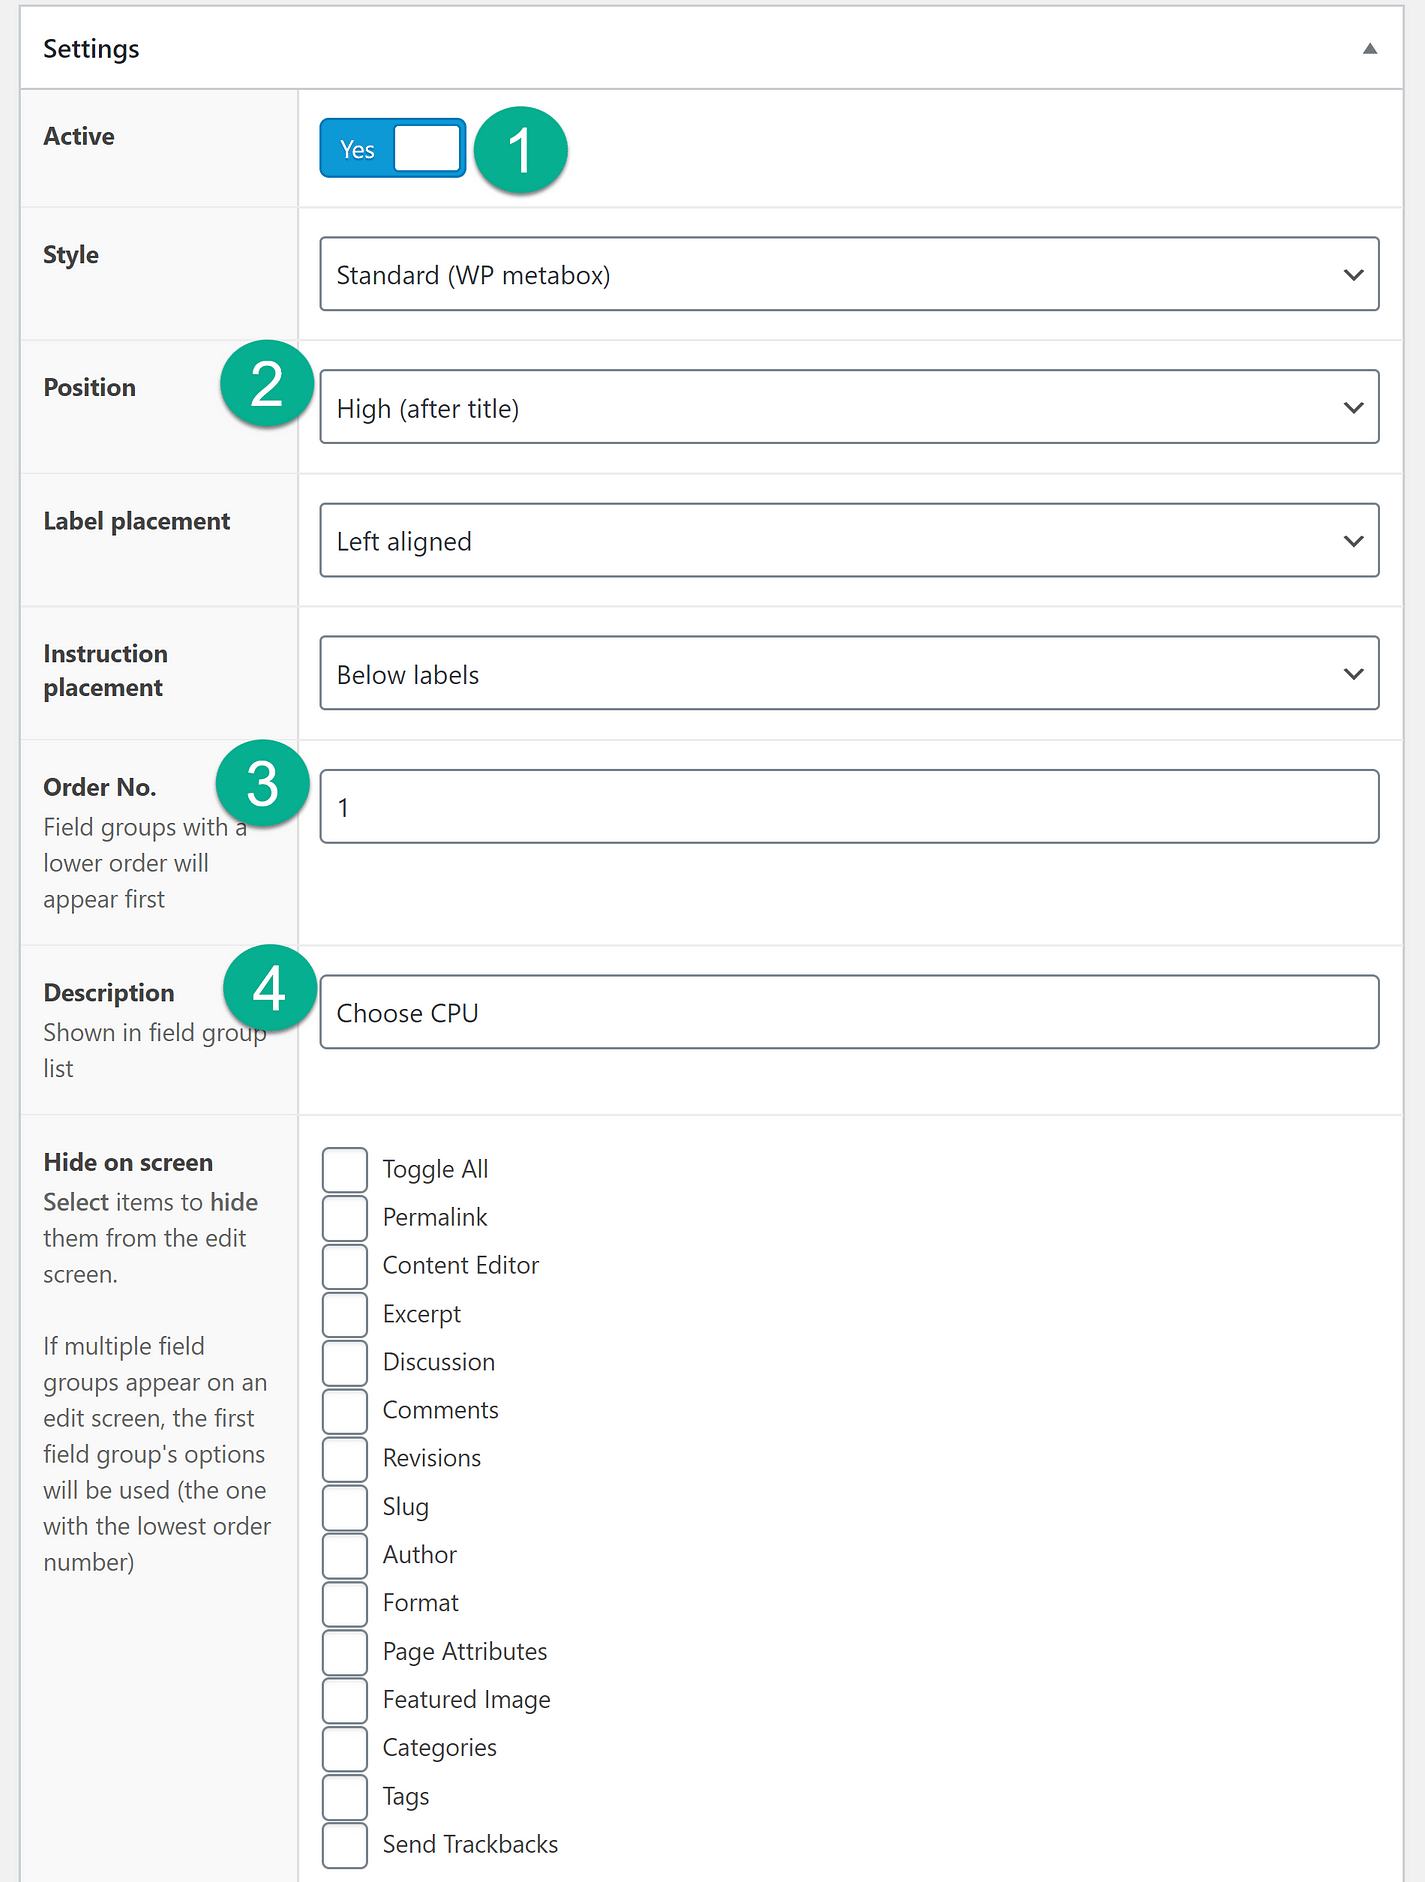
Ensure the Field Group is available in Settings. This allows users to view it on those product pages and maybe display your consumers the field options. Your personal choices determine the style. The same is true for the position, label placement, and instructional arrangement. That is entirely up to you and the way you choose to organize your backend. When in doubt, leave them as defaults. If you have numerous field groups that appear on product pages, use the Order Number. This determines the order in which specific field groupings appear. You may also add a description to your screen and conceal particular features.
Step 4: Add more data to products
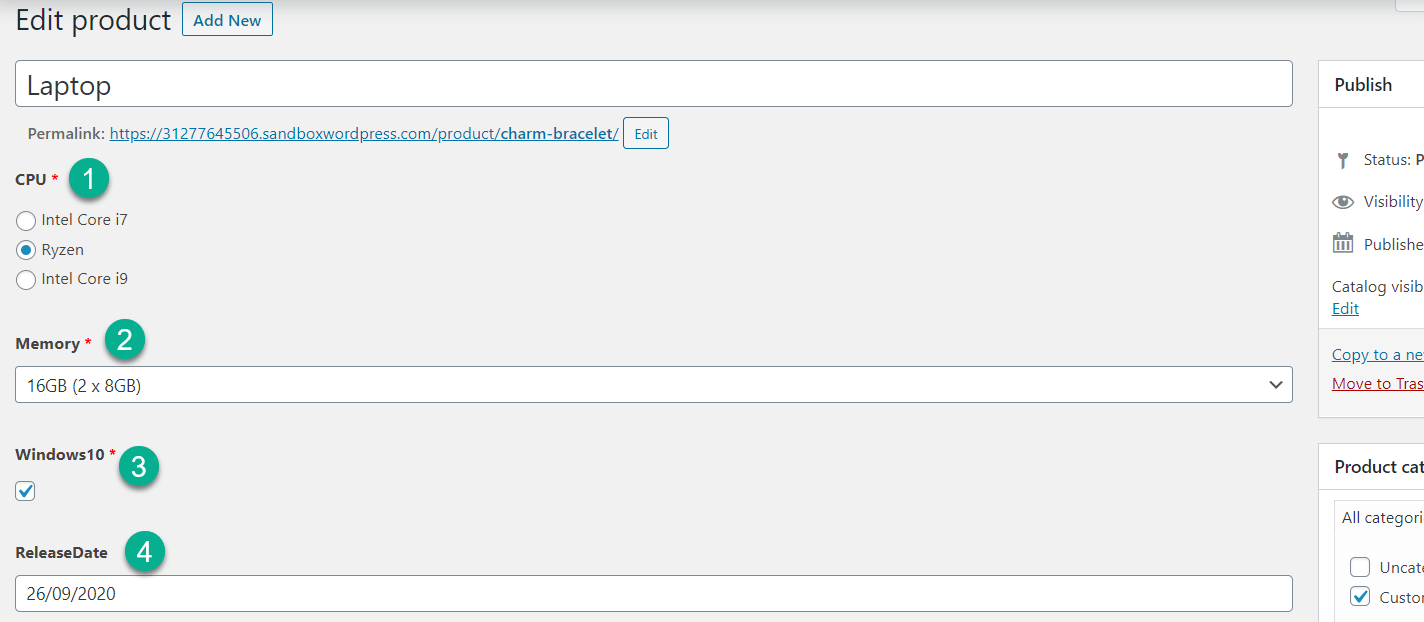
Next, go to the editor for the product to which you want to add custom fields. If all of your settings are correct, you should see the custom fields underneath the Product data box. For example, if you were to create a new laptop product page, you would select some additionals as in the image below.
Step 5: Display custom field on the front-end
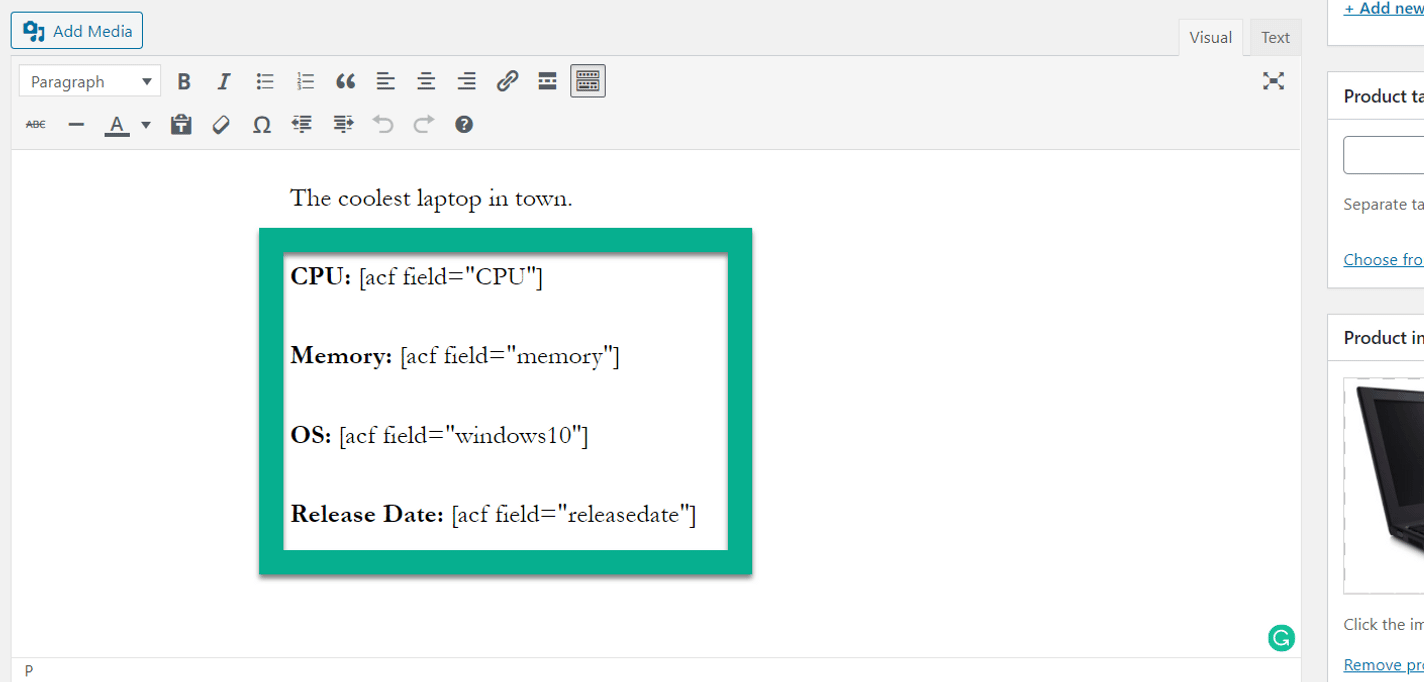
You must show the data from your custom fields on the front-end single product page to complete the process. You may include this information wherever, but the product’s long or short description is an excellent place to start. Use the [acf field=""] shortcode to display field data on the front end. In between the quote marks, add the Field Name:
The Field Name for each field may be found in the field group editing interface:
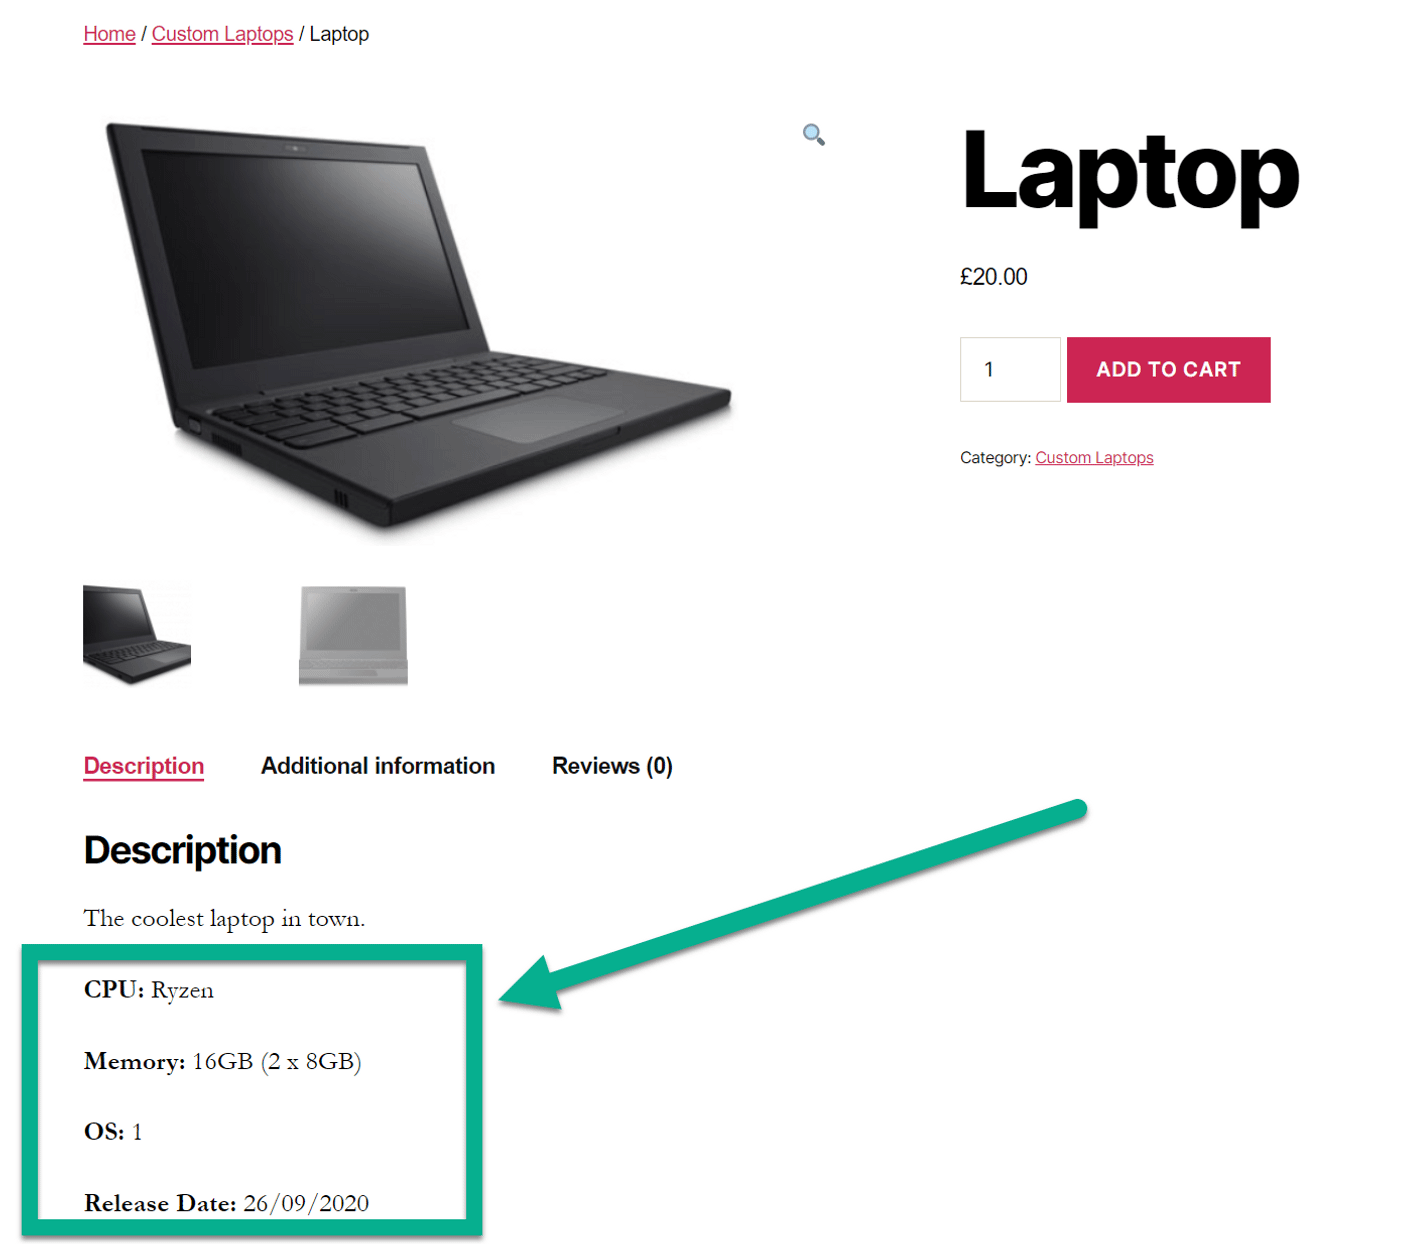
To finish, select the Publish or Update button. When you customize your product on the front end, you would see your custom fields with the shortcodes:
Conclusion
The advantage of utilizing Advanced Custom Fields over other field-creation plugins is that you can insert your new fields anywhere on your site, including product pages, articles, and cart modules, allowing you to customize your dashboard and speed up the content production process. It’s a fantastic alternative for increasing your creativity and doing the time-consuming chore of creating product pages a bit easier.
We hope this tutorial will help you understand how to add WooCommerce custom product fields and store them in the WordPress backend without any specialized technical knowledge (as well as a quick look at how to do it programmatically). Follow the instructions in this guide and implement them on your website. It’s an excellent non-technical method for storing and displaying additional product info in WooCommerce.


